
Couchbase x Medblocks - Building a NoSQL FHIR Server
We walk you through building a FHIR server on top of Couchbase's NoSQL database, covering challenges, technical decisions, architecture, and local setup.
May 21, 2025
This hands-on guide will teach you how to wrap your patient data in a FHIR-ready API using FastAPI, PostgreSQL and the fhir.resources library.
Healthcare systems all around the world are facing increasing pressure to become FHIR-compliant, and that can be a daunting task. There are simpler and less expensive options available to try out, before you attempt to rip and replace your legacy data system, and in this tutorial we will explore one of them.
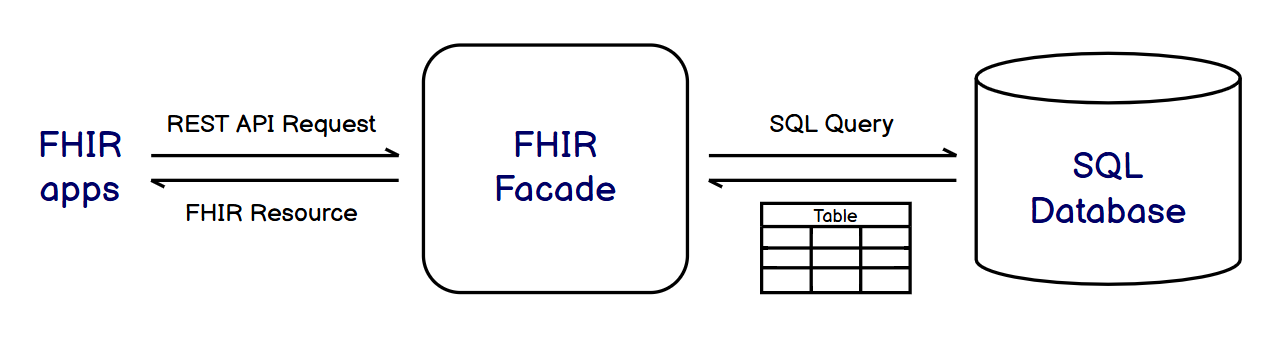
A FHIR Facade built in Python might be the answer you are looking for - it lets you expose key FHIR resources like Patient, Encounter and Observation through REST APIs, while continuing to store and manage data the way you’ve always done.
FHIR-compliant applications use the FHIR data exchange protocol to send and receive patient data through HTTP requests. If your existing patient data is on a database and you want your FHIR application to be able to access it, a facade can help you do it. A facade is a layer built on top of a data storage system that can understand and respond to FHIR-based requests. It speaks to both the FHIR-compliant application and the legacy database in ways they understand, and bridges the communication gap between them.
In this tutorial we will learn to,
The FHIR REST API specification includes definitions for,
First, we will create a patient table and enter the information of a few dummy patients using postgres. If you already have a patient database you want to work with, you can skip ahead to the next section.
Here is how we will create a simple patient table and populate it with some dummy information. Let’s start by setting up our docker-compose.yaml file.
version: '3'
services:
  db:
    image: postgres:15
    environment:
      POSTGRES_PASSWORD: postgres
    ports:
      - "5432:5432"
We can start the postgres instance by running the following command,
docker-compose upTo create the patient table, open a new terminal and run,
Psql -h localhost -U postgresYou will be prompted to enter your password. After this, you can create a table and insert patients.
CREATE TABLE patients(
id SERIAL PRIMARY KEY,
first_name VARCHAR(50) NOT NULL,
last_name VARCHAR(50) NOT NULL,
date_of_birth DATE
);
INSERT INTO patients (first_name, last_name, date_of_birth)
VALUES ('John', 'Doe', '1980-01-01'),
('Jane','Doe','1985-01-01'),
('Alice','Smith','1990-01-01'),
('Bob','Smith','1995-01-01');
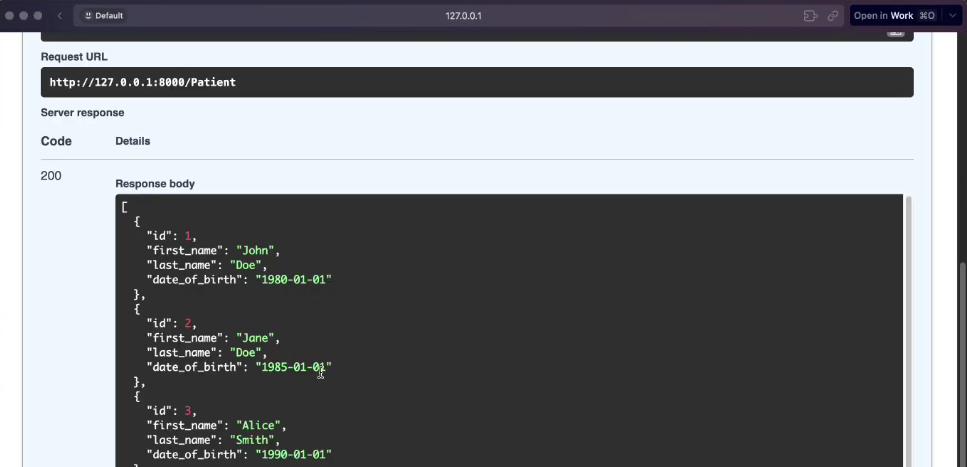
SELECT * from patients;On executing the SELECT operation, you will see the following output. | id | first_name | last_name | date_of_birth | | ------ | ------ | ------ | ------ | | 1 | John | Doe | 1980-01-01 | | 2 | Jane | Doe | 1985-01-01 | | 3 | Alice | Smith | 1990-01-01 | | 4 | Bob | Smith | 1995-01-01 |
Now that we have a patient database, we can build a FHIR facade for it to expose patient data through FHIR REST APIs.
Building a facade lets us make our patient data server FHIR compliant. It also allows us to expose this data through the FHIR REST API.
Check your version of python with the below command. We recommend using 3.10.17 or higher.
python --versionLet’s create a virtual environment in accordance with Python best practices.
python -m venv venv
source venv/bin/activateWe’ll be installing psycopg which is the most popular Postgres database adapter for Python.
pip install psycopgLet us now attempt to execute a simple select statement via the psycopg library methods. In app.py,
import psycopg
import psycopg.rows

connection = psycopg.connect("postgresql://postgres:postgres@localhost:5432/postgres",
                             row_factory=psycopg.rows.dict_row )
cur = connection.cursor()
cur.execute("select * from patients;")
results = cur.fetchall()
print(results)
You will get an output that looks like this,
[
  {
    "id": 1,
    "first_name": "John",
    "last_name": "Doe",
    "date_of_birth": "1980-01-01"
  },
  {
    "id": 2,
    "first_name": "Jane",
    "last_name": "Doe",
    "date_of_birth": "1985-01-01"
  },
  {
    "id": 3,
    "first_name": "Alice",
    "last_name": "Smith",
    "date_of_birth": "1990-01-01"
  },
  {
    "id": 4,
    "first_name": "Bob",
    "last_name": "Smith",
    "date_of_birth": "1995-01-01"
  }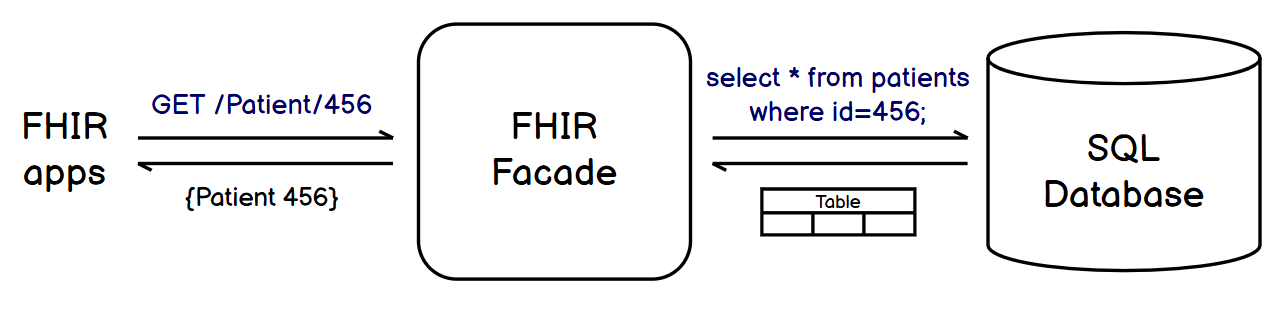
]Connecting this back to the FHIR facade we’re building, the server needs to be able to respond to a GET request, and translate it to the corresponding SQL query. For this, we will use the FastAPI library.
 The FastAPI library in Python is a modern, high-performance web framework for building APIs. To install FastAPI we run the following command.
 standard also installs some CLI tools to make development easier.
pip install “fastapi[standard]”Now let’s replicate the output of the earlier code snippet, but incorporating FastAPI.
import psycopg
import psycopg.rows
from fastapi import FastAPI

connection = psycopg.connect("postgresql://postgres:postgres@localhost:5432/postgres",
								row_factory=psycopg.rows.dict_row )

app = FastAPI()

@app.get('/Patient')
def get_all_patients():
    cur = connection.cursor()
    cur.execute("select * from patients;")
    results = cur.fetchall()
    print(results)
    return results
To run this file use the following command,
fastapi dev app.pyUsing FastAPI generates a convenient Swagger-based documentation UI, the URL to which is provided in the command line interface.

The documentation UI looks something like this,
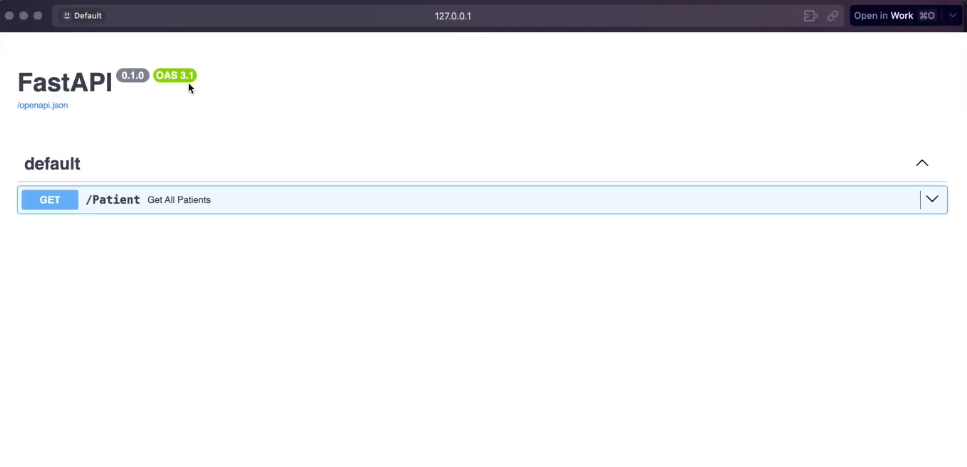
On running the GET command through this interface, you will see the following output.
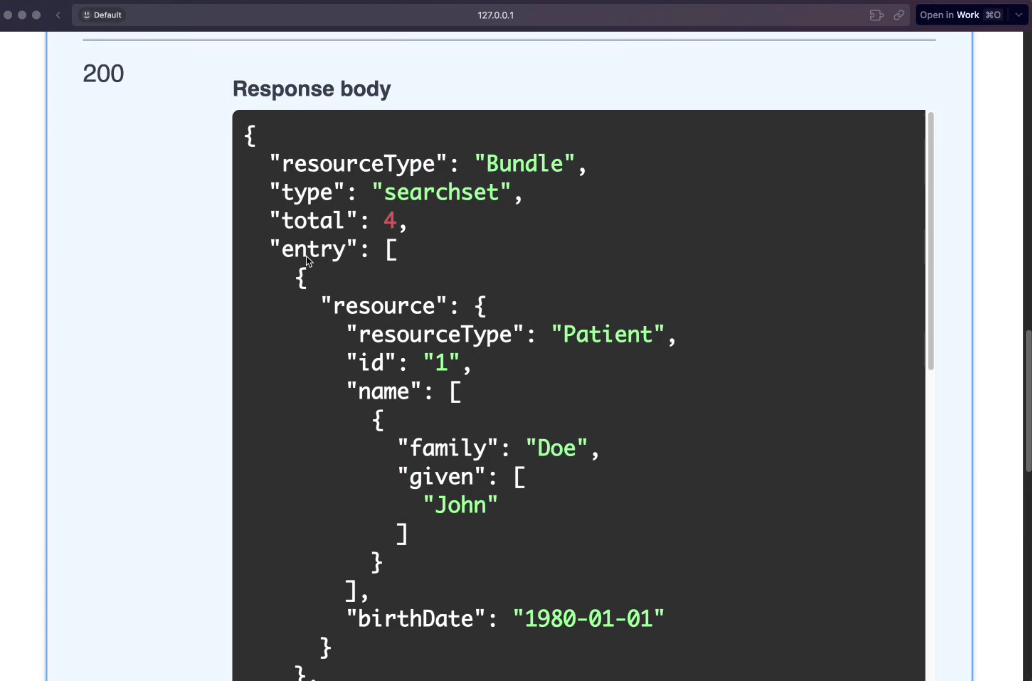
Taking a look at the FHIR REST API specification for search, we see that the expected output type is a Bundle.
If the search succeeds, the server SHALL return a 200 OK HTTP status code and the return content SHALL be a Bundle with type = searchset containing the results of the search as a collection of zero or more resources in a defined order. Note that resources returned in the search bundle MAY be located on another server than the one that performs the search (i.e. the Bundle.entry.fullUrl may be different to the [base] from the search URL).
Next, let’s try to implement returning a Bundle containing patient details. This contains two steps - converting each row from the search result into a FHIR resource, and then inserting them into a Bundle.
import psycopg
import psycopg.rows
from fastapi import FastAPI
from fhir.resources.patient import Patient
from fhir.resources.humanname import HumanName
from fhir.resources.bundle import Bundle, BundleEntry

connection = psycopg.connect("postgresql://postgres:postgres@localhost:5432/postgres", row_factor=psycopg.rows.dict_row )

app = FastAPI()

def patient_row_to_resource(row):
    patient = Patient()
    patient.id = str(row["id"])
    patient.name = [
        HumanName(given=[row["first_name"]], family=row["last_name"])
        ]
    patient.birthDate = row["date_of_birth"]
    return patient

# Create a FHIR Bundle from a list of resources
def to_bundle(resources: List) -> Bundle:
    bundle = Bundle(
        type="searchset",
        total=len(resources),
        entry=[BundleEntry(resource=r) for r in resources]
    )
    return bundle

@app.get('/Patient')
def get_all_patients():
    cur = connection.cursor()
    cur.execute("select * from patients;")
    rows = cur.fetchall()
    patient_resources = [patient_row_to_resource(row) for row in rows]
    bundle = to_bundle(patient_resources)
    return bundle.model_dump()
On executing this, you will get the following response, which is in the format we require.
Accessing a patient by ID is an important function in a FHIR server. Let’s look at how we can implement that next.
@app.get('/Patient/{id}')
def get_patient_by_id(id):
    cur = connection.cursor()
    cur.execute("select * from patients where id=%s;",[id])
    row = cur.fetchone()
    patient = patient_row_to_resource(row)
    return patient.model_dump()
You can use the Swagger UI to test this out, and for example, if I search for a patient with ID: 4, this is the output received.
{
    "resourceType": "Patient",
    "id": "4",
    "name": [
        {
            "family": "Smith",
            "given": [
                "Bob"
            ]
        }
    ],
    "birthDate": "1995-01-01"
}OperationOutcomeSuppose the user searches for a patient with an ID that does not exist in the server, we can use OperationOutcome in order to define a clear and readable error message. Here’s an edited version of the get_patient_by_id() function with error handling included.
@app.get('/Patient/{id}')
def get_patient_by_id(id):
    cur = connection.cursor()
    cur.execute("select * from patients where id=%s;",[id])
    row = cur.fetchone()
    if not row:
        outcome = OperationOutcome(
                issue=[{
                    "severity": "error",
                    "code": "not-found",
                    "details": {
                        "text": f"Patient with id {id} not found"
                    }
                }]
            )
            return outcome.model_dump()
    patient = patient_row_to_resource(row)
return patient.model_dump()All FHIR Servers must contain a CapabilityStatement that describes its functionality. This includes the FHIR version, formats it supports (e.g. json, xml etc.), resource types, search parameters and so on.
The easiest way to create a CapabilityStatement is to use an example and modify it according to your Server capabilities. Here is an example below for the FHIR facade we created that supports read and search interactions via json.
from typing import Dict, Any
from fastapi import APIRouter, status
from fastapi.responses import JSONResponse
from datetime import datetime
from fhir.resources.capabilitystatement import CapabilityStatement
from fhir.resources.bundle import Bundle
from fhir.resources.meta import Meta

from ..utils import FHIRJSONResponse, fhir_error_handler

router = APIRouter()

def create_capability_statement() -> CapabilityStatement:
    """
    Create a FHIR capability statement for the server.
    """
    capability = CapabilityStatement.model_construct(
        status="draft",
        date=datetime.now().strftime("%Y-%m-%d"),
        kind="instance",
        software={
            "name": "FHIR Facade",
            "version": "1.0.0",
        },
        implementation={
            "description": "FHIR Facade API",
            "url": "/fhir"
        },
        fhirVersion="4.0.1",
        format=["json"],
        rest=[{
            "mode": "server",
            "resource": [
                {
                    "type": "Patient",
                    "profile": "https://hl7.org/fhir/StructureDefinition/Patient",
                    "interaction": [
                        {"code": "read"},
                        {"code": "search-type"}
                    ]
                }
            ]
        }]
    )
    return capability

@router.get("/metadata", summary="Capability Statement", tags=["Capability Statement"])
async def capability_statement():
    """Get the capability statement for this FHIR server."""
    capability = create_capability_statement()
return FHIRJSONResponse(content=capability.model_dump(exclude_none=True), status_code=status.HTTP_200_OK, media_type="application/fhir+json")Creating a FHIR facade can be a cost effective and simple way to make your EHR FHIR compliant. Using python to implement this is a simple and effective solution. In this tutorial we learnt what a FHIR facade is, set up a dummy postgres patient database, built a facade on this database that allows the read and search interactions, managed error handling using OperationOutcome and set up the CapabilityStatement.
To try this out yourself, check out the complete code on our git repo, making it easy for you to create a FHIR facade over your EHR databases.
We walk you through building a FHIR server on top of Couchbase's NoSQL database, covering challenges, technical decisions, architecture, and local setup.

Beginner-friendly tutorial to use Python's fhir.resources package to build & validate a Patient resource. Covers JSON output, virtual env setup & real FHIR server ops. With video walkthrough.
Understand the FHIR Questionnaire resource from scratch, structure, item types, QuestionnaireResponse, and hands-on exploration using free NLM open-source tools.
No comments yet. Be the first to comment!