
Couchbase x Medblocks - Building a NoSQL FHIR Server
We walk you through building a FHIR server on top of Couchbase's NoSQL database, covering challenges, technical decisions, architecture, and local setup.
April 24, 2025
A few lines of Python code is all that stands between you and your first FHIR resource. This step-by-step guide will help you do it.
Data interoperability is one of the most important health IT challenges of our time, and open standards like HL7 FHIR or Fast Healthcare Interoperability Resources are an essential part of the solution. Whether you’re building apps, integrating with EHRs or working on health data pipelines, you’ll likely need to understand how to work with FHIR resources. If you’re new to FHIR, you might want to start with our Beginner’s Guide to FHIR.
If you are even slightly familiar with Python and are looking to explore FHIR hands-on, this tutorial is for you. As one of the most beginner-friendly and widely used programming languages in healthtech, Python has several libraries that make it easier to work with FHIR.
You can also follow along with the video How to Create a FHIR Resource Using Python from our youtube channel.
In this tutorial we will,
As a prerequisite, ensure that you have Python 3.x installed in your system. To check, you can run the following command in your terminal.
python3 --versionNext, we’ll be setting up a virtual environment. This is according to Python development best practices and to allow isolation and easier dependency management.
python3 -m venv venvWe will then install the fhir.resources package. It provides tools and classes for all FHIR Resources defined in the FHIR specification, and allows you to create and manipulate FHIR resources in Python.
pip3 install fhir.resourcesNow that you’ve set up the environment, you can run Python scripts using the command,
python3 your_script.pyTo create a FHIR Patient resource, let’s start by defining a sample patient. Here are the details we’re considering,
Here are three ways to generate a Patient resource.
The easiest way to create a Patient resource is to directly create a JSON object by hand. We can take a look at any of the example JSONs available on the FHIR Patient Specification for reference.
import json

patient = {
    "resourceType": "Patient",
    "gender": "male",
    "name": [
        {
            "use": "official",
            "family": "Doe",
            "given": ["Jay"]
        }
    ]
}
print(json.dumps(patient, indent=2))
While this is the simplest method, it will not always be possible to hand code a JSON object that conforms to the FHIR specifications. This brings us to methods that use the fhir.resources package.
fhir.resources to construct from JSONThe fhir.resources package provides tools and classes for all FHIR Resources defined in the FHIR specification. The documentation also contains examples you can reference. Now, we’ll be replicating the same Patient resource using fhir.resources classes.
from fhir.resources.patient import Patient
import json

patient_object = {
    "resourceType": "Patient",
    "gender": "male",
    "name": [
        {
            "use": "official",
            "family": "Doe",
            "given": ["Jay"]
        }
    ]
}

patient = Patient(**patient_object)

print(patient)

# Print as JSON
print(patient.json())
With these simple changes, we can now leverage the built-in validation provided by the fhir.resources package.
Try it yourself: Add a value that’s not present in the FHIR specification to the
patient_objectdefinition to see what response you get.
fhir.resources model classesHere’s another way to create a patient class, this time we’ll be using the fhir.resources primitives to create a patient.
First let’s take a look at the definition of a Patient resource, and specifically the name.
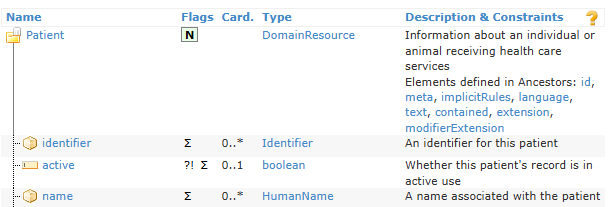
And this is the definition of HumanName.
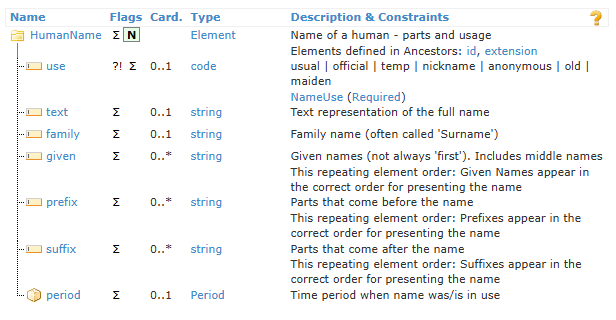
Based on this information, we can now create a Patient resource and add some details as in the code below,
import json
from fhir.resources.patient import Patient
from fhir.resources.humanname import HumanName
from fhir.resources.contactpoint import ContactPoint
patient = Patient()
patient.name = [HumanName(given=["Jay"], family="Doe")]
patient.gender = "male"
patient.telecom = [
ContactPoint(system="email", value="example@abc.com")]
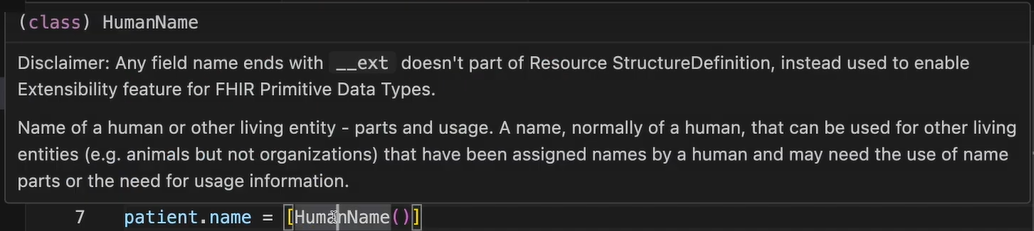
print(patient.model_dump_json(indent=2))Prompts given by the IDE such as in the below image, can help you understand what each of the FHIR resource classes are in terms of data format and intention.
Congratulations, you have successfully created a FHIR resource in Python!
Now that you know how to create a FHIR resource, let’s also take a look at how to validate a JSON object. In this case, we’re using the model_validate_json() function.
import json
from fhir.resources.patient import Patient
from fhir.resources.humanname import HumanName
from fhir.resources.contactpoint import ContactPoint

patient = Patient.model_validate_json("""{
  "resourceType": "Patient",
  "name": [
    {
      "family": "Doe",
      "given": [
        "Jay"
      ]
    }
  ],
  "telecom": [
    {
      "system": "email",
      "value": "example@abc.com"
    }
  ],
  "gender": "male"
}
""")

print(patient.model_dump_json(indent=2))
You can test the validation by adding an invalid field to the JSON. Here’s a sample error message on entering an invalid JSON,

Whether you’re building integrations or just beginning to explore the FHIR spec, Python is a flexible and developer-friendly environment to work with. In this tutorial, we explored how to create a FHIR resource using Python, specifically a Patient resource. First, we set up the project environment and installed the necessary dependencies - including the fhir.resources package.
Next, we looked at 3 different ways to construct a Patient resource - directly as a JSON object, using fhir.resources to parse and construct from JSON, and creating the resource using fhir.resources model classes. We also looked at how to validate resources using the model_validate() method, to ensure that data aligns with the prescribed FHIR specifications. To go further and send this data to a FHIR server, this tutorial on using Python to interact with FHIR REST APIs may help.
If you’re interested to get to know more about FHIR, join the FHIR Fundamentals course conducted by Dr. Sidharth Ramesh. You’ll get to know more about how FHIR is used and how it can make a difference in your work.
We walk you through building a FHIR server on top of Couchbase's NoSQL database, covering challenges, technical decisions, architecture, and local setup.

Learn to build a Python FHIR Facade using FastAPI and PostgreSQL to expose legacy EHR data as FHIR APIs supporting read search operations and interoperability
This guide explores performing real-world operations like creating, reading, updating, and deleting patient data on a FHIR Server using Python.
No comments yet. Be the first to comment!