The Archetype Designer is more than a tool, it brings the power of modern tech solutions to solve clinical challenges. In this article we explore how it helps you implement openEHR in a way that supports your clinical needs.
openEHR is a set of open specifications, clinical models and software that create standards for healthcare information technology. The primary objective of openEHR is to solve one of health IT’s biggest challenges - interoperability.
By using a two-level information model that separates how the data is stored (information model) from what the data means (knowledge model), openEHR provides a novel solution to the interoperability problem. It also accounts for the medical space being ever-changing and vast, this way new discoveries or details in clinical understanding do not need to affect the way information is stored and retrieved.
openEHR’s clinical modelling specifications, namely Archetypes, are a key building block to modelling clinical concepts. Combining two or more such archetypes to reflect real-world applications that reference clinical models such as GUI forms and document definitions are implemented through Templates. That is, Templates are used to logically represent a use case such as a discharge summary or a radiology report. In essence, the template is a specialized archetype. Different types of templates can be designed by using pre-existing or newly created archetypes to accurately reflect the needs of clinical workflows.
Creating Archetypes and Templates
Both Archetypes and Templates are created using the openEHR Archetype Designer, we’ll be exploring this tool in the next section. First, it is important to understand the workflow followed in creating them. Here is a key difference,
- Archetypes need to be created de novo or from scratch
- Templates are created from the various Archetypes present in the Clinical Knowledge Manager (CKM) repository. In creating a template, it is also possible to apply constraints on archetype elements in order to suit the particular use case
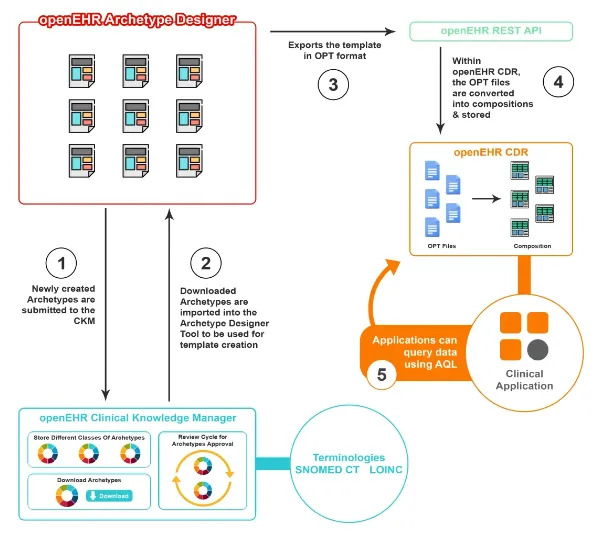
The workflow followed in interacting with Archetypes and Templates is depicted in the image above.
- Archetypes are created using the openEHR Archetype Designer, and are submitted to the openEHR Clinical Knowledge Manager (CKM) that acts as a repository and knowledge bank. The CKM also manages mapping concepts against terminologies like SNOMED CT and LOINC
- Existing and newly created Archetypes can be downloaded from the CKM in the Archetype Definition Language(ADL) format to be used in the Archetype Designer for creating Templates
- From the Archetype Designer, Templates can be exported in the OPT format for use via openEHR REST APIs
- For storage into openEHR Clinical Data Repositories (CDRs), OPT files are converted into compositions
- Clinical applications built on the CDR, can then query this data using Archetype Query Language (AQL)
Types of Templates
There are two types of templates - Operational Template(OPT) and openEHR Template(OET).
- Templates are developed in a simple XML format known as the openEHR Template, or the .OET format. This is also called the source template.
- The Operational Template(OPT) is a dynamically created object generated from the OET template by modelling tools. The OPT is a compiled template that produces a ‘flattened’ form expressed in XML, that can be read and used by a machine.
This is how both formats are used in the Template and Archetype creation process.
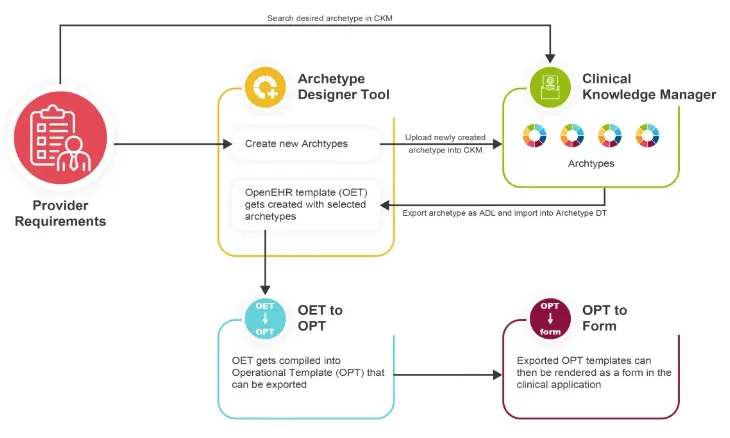
Based on the clinical requirements of healthcare providers, Archetypes are selected from pre-existing ones on the CKM, or they are created and uploaded to the CKM. Next, an OET is created with the selected archetypes, which is then compiled into an OPT that can be exported. The exported OPT templates can then be rendered as a form in clinical applications.
Introducing the openEHR Archetype Designer tool
The openEHR Archetype Designer is a web-based clinical modelling tool with an intuitive visual interface that lets you create openEHR Archetypes and Templates.
Here are some things to keep in mind while building a template using archetypes:
- Different types of archetypes are aggregated to build a template, such as the Composition archetype is used at the top level, followed by Section, Entry and Cluster archetypes
- It is mandatory to include Composition as it is the root archetype. The Composition is like a container for clinical data and can be considered equivalent to Encounter, Report or Discharge summary. Actual information is usually captured within Sections. E.g. The root Composition can be a “report” which needs to be filled with specific archetypes corresponding to the use case such as “blood pressure” (Observation) and “service” (Action).
- Choosing the right archetypes for a use case is done by first identifying the fields required for a form, and then matching them against archetypes and the specific fields within them.
- Several archetypes could be used in one form, and they are aggregated or constrained to fit the use case. Archetypes usually contain the maximum possible information for a particular concept, however not all may be necessary in a particular use case. E.g. a Blood Pressure archetype would contain systolic, diastolic, mean arterial pressure, pulse pressure, clinical interpretation and comments as data points, whereas in the particular use case only systolic and diastolic are required. So, archetypes can be constrained by removing unwanted elements, setting default values, creating terminology mappings and coded text.
- Archetypes can be further constrained by changing the allowed number of occurrences and making some items mandatory or optional.
How to create a template using the Archetype Designer?
Step 1: Sign Up or Log In
Sign in to the Archetype Designer tool, or if it’s your first time you’ll need to sign up using a Google, Microsoft or Github account.
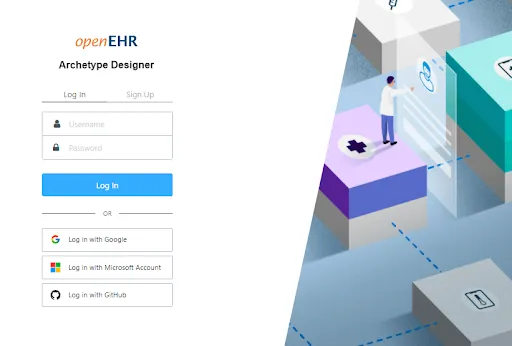
Step 2: Choose or Create a Repository
A repository can be considered a container that holds archetypes and templates. We’ll be adding archetypes from the CKM that we require for our use case into this repository.

If you’re a new user, you will need to create a new repository. Clicking the ‘+New Repository’ button will open a dialog box that prompts you to name and create a new repository.
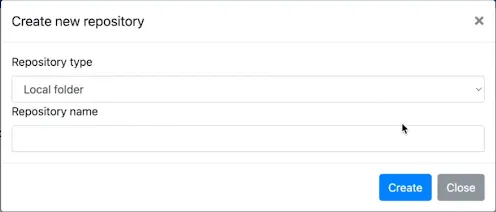
Step 3: Upload Archetypes to the Archetype Designer
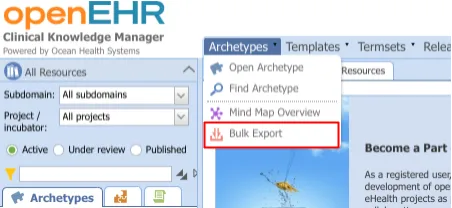
Now we need to download archetypes from the CKM to upload to the Archetype Designer. The Bulk Export option under Archetypes is an easy way to do this. You can select the archetypes you need on the next page, and download them in either XML or ADL format.
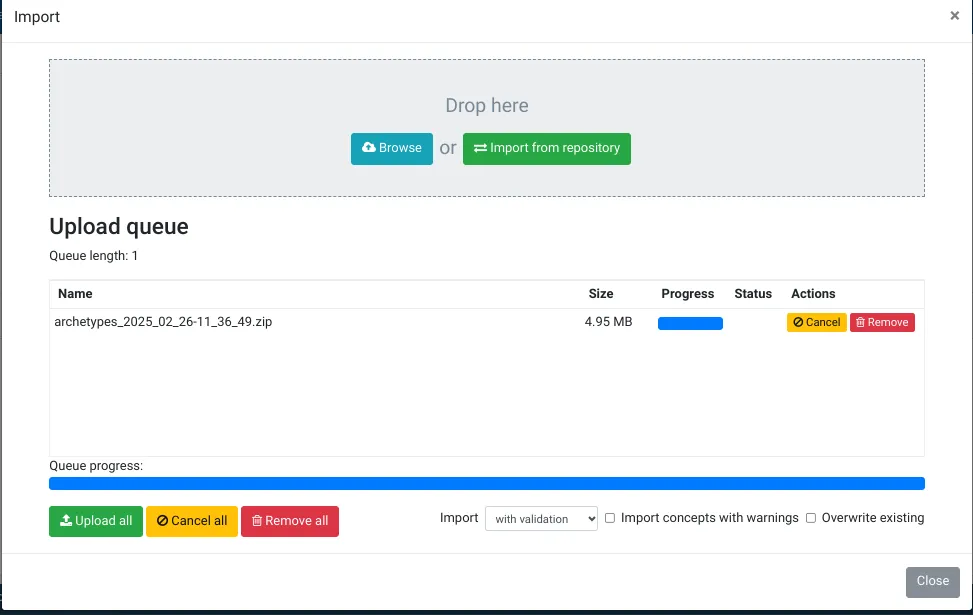
Upload the zip file you just received in the Archetype Designer from the Import menu. Do remember to select the repository you just created.
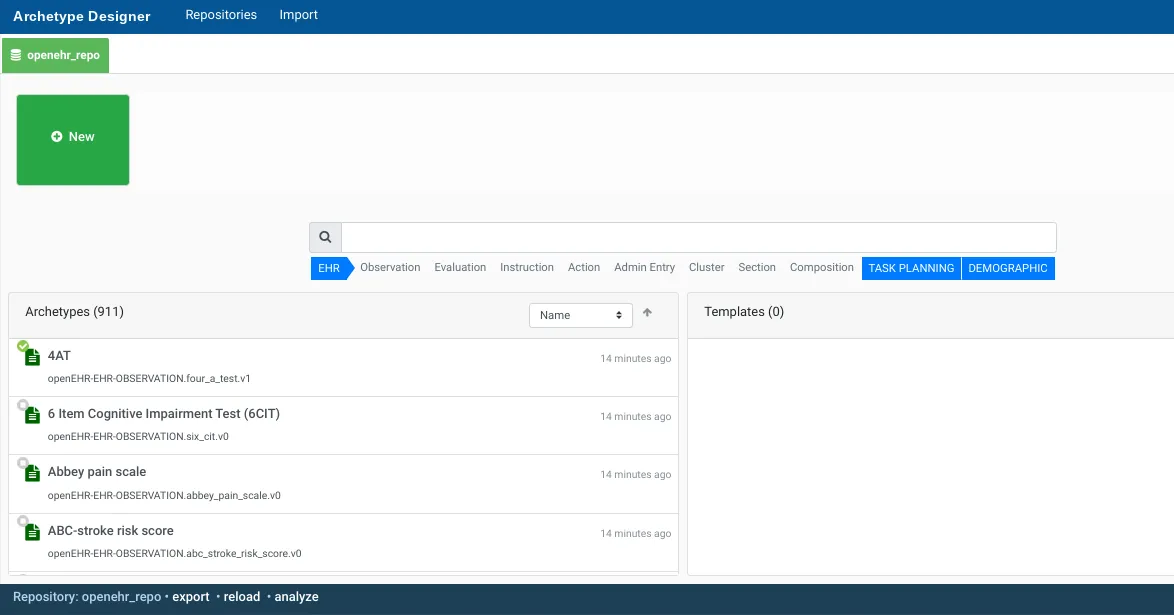
 Now you’ll be able to see the archetypes you just uploaded in your repository as in the screenshot below.
Step 4: Creating a new Template
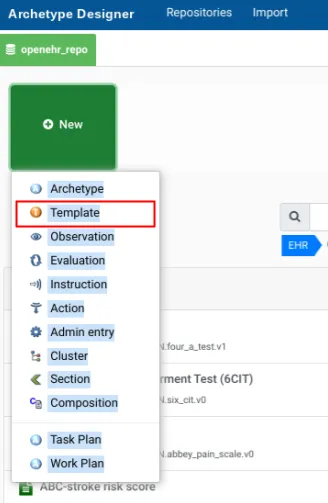
Click ‘+New’ and select Template from the drop down.
 A dialog box will prompt you to enter template details. We will be creating a simple template that captures the most commonly used data elements in a care setting, namely body temperature, blood pressure, pulse/heart beat, respiratory rate and pulse oximetry.
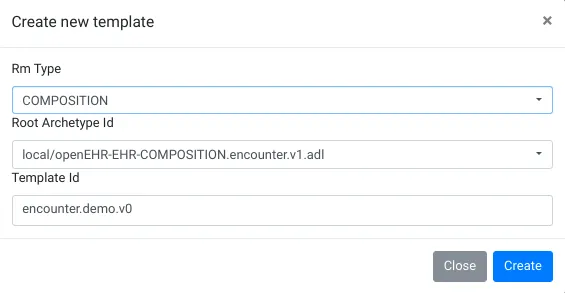
Explaining the fields below,
- Rm Type: It defaults to Composition, which is what we will be choosing but you can also choose other elements like Observation, Evaluation etc.
- Root Archetype Id: As a rule of thumb, we select Encounter from this drop down.
- Template Id: You can enter any template name you like followed by a version number as shown in the screenshot above.
Clicking ‘Create’ will create a new template with id vitalsigns.demo.v0. The blue tab (indicated by the red arrow in the screenshot below) always displays the name of the active template. It also indicates if there are changes yet to be saved with an *.
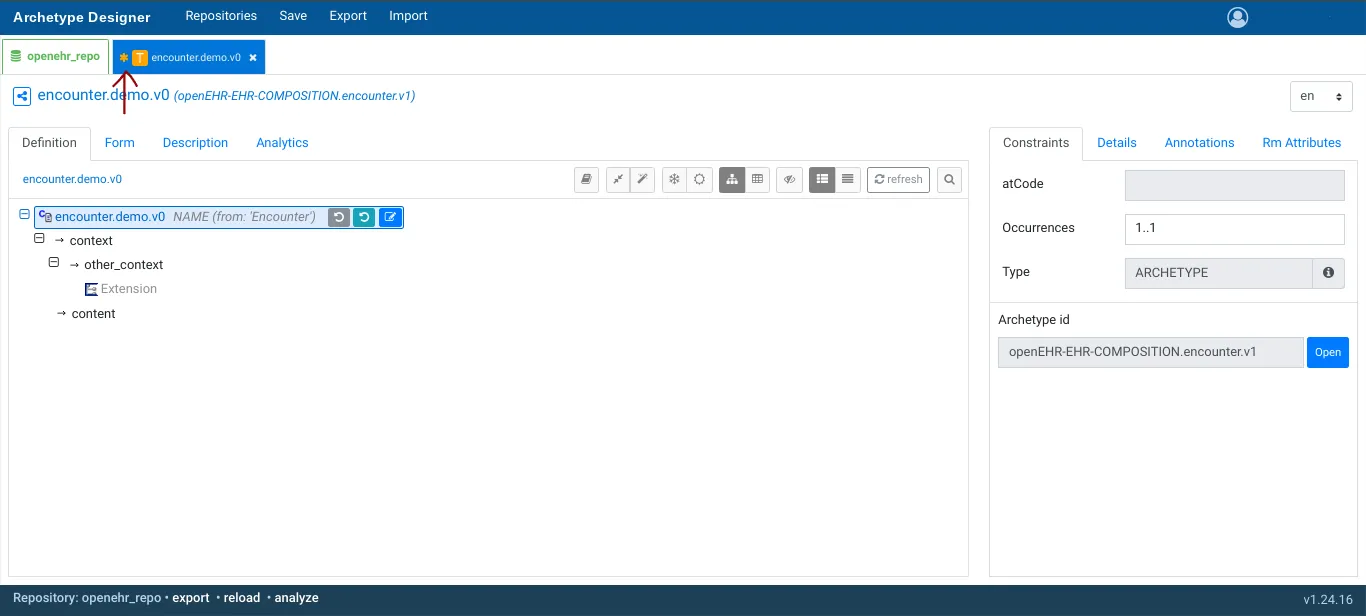 On the left panel, there are 4 tabs available:
- Definition: The default view, and the main view from where you will create the template
- Form: Generates a preview of the form created by the template
- Description: Change/add header and attribution to the template
- Analytics: View metrics, issues, dependencies etc.
Step 5: Adding Clinical Content to the Template
Clicking on content from within the encounter.demo.v0 tree structure, opens up the ‘Add archetype’ menu on the right. Here you’ll see the list of archetypes added from the CKM, and they can now be added to the template. You can use the search bar to find the archetype you need.
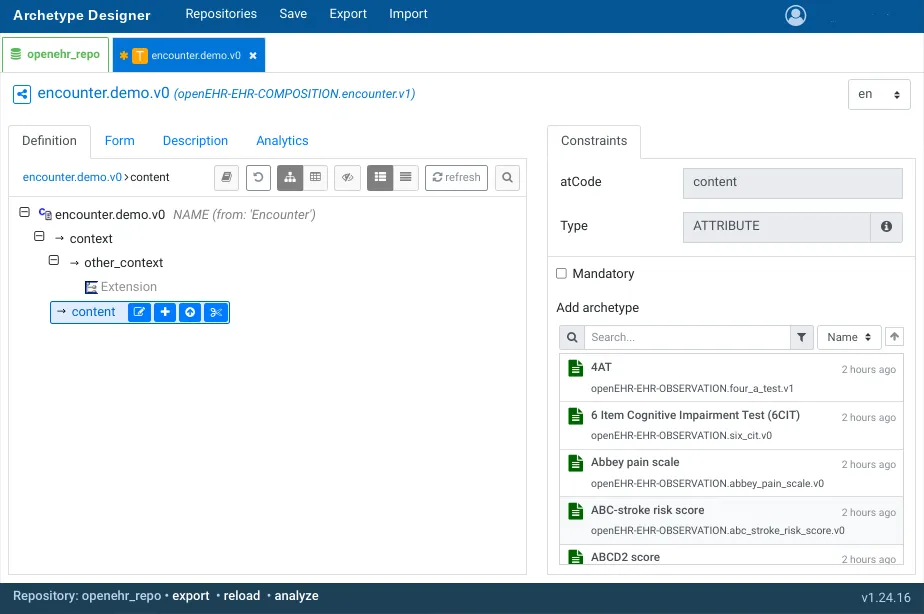 For our vital signs template, let’s add Body Temperature, Blood Pressure, Pulse/Heart beat, Respiration and Pulse Oximetry archetypes.
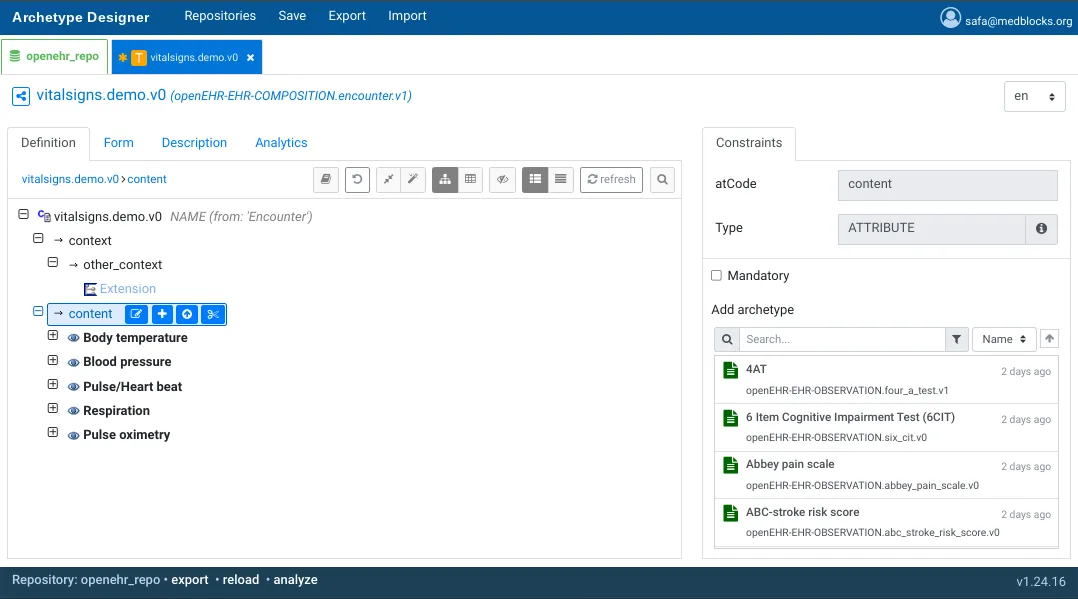
Step 6: Edit the archetypes
Edit the archetypes to retain only the elements you require for your use case.
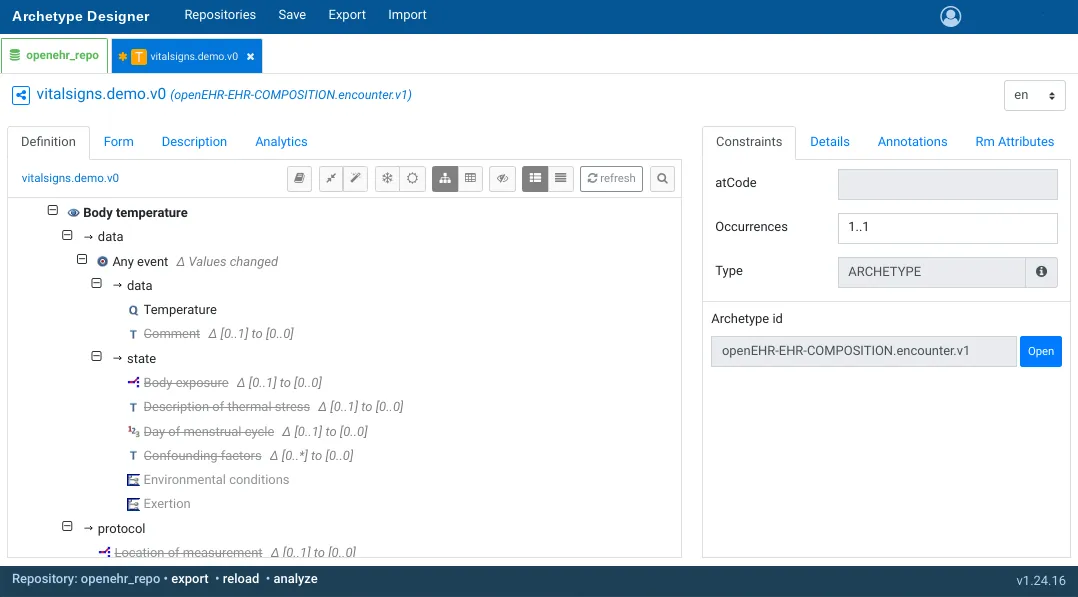 When you’re ready, you can save your template for future use.
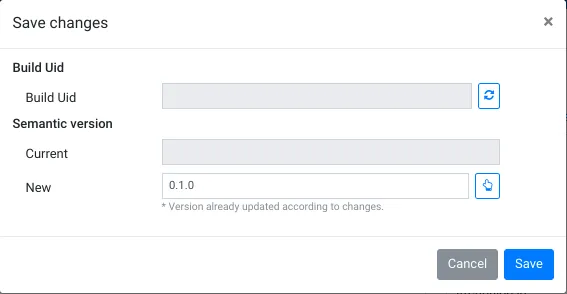 Congratulations! You have successfully explored the Archetype Designer and created your first Template. We’ll go into the details of exporting templates for use in future blogs.
Understanding the Archetype Designer interface
Here’s a handy guide to the various options available to you on the Archetype Designer interface and how they are helpful.
Options related to Archetypes
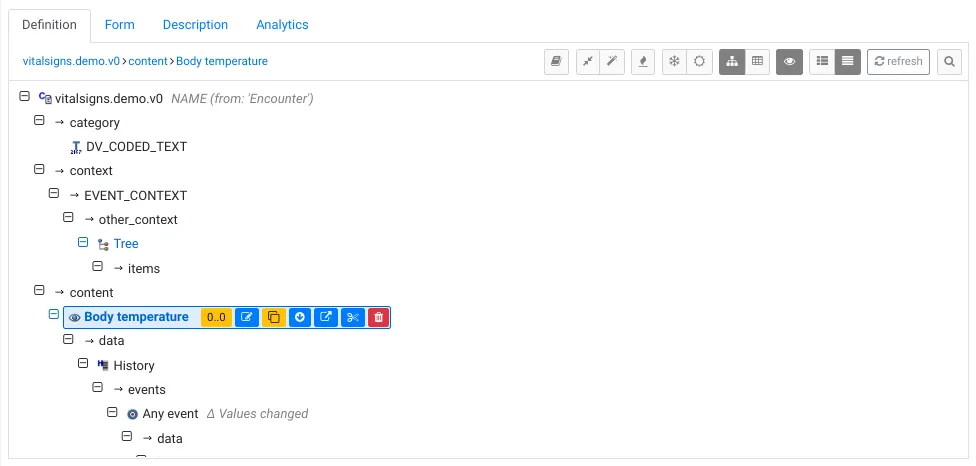
On selecting this archetype, several options appear. Let’s take a look at what they are.

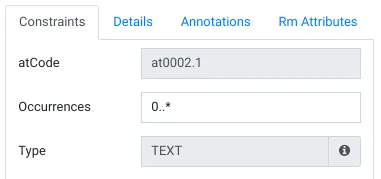
- Occurrence: Referring to the cardinality of the archetype within the template, the first digit is the minimum number of occurrences and the second is the maximum number of occurrences. The Occurrence can be changed from the menu in the right panel.
- If the first digit is 0, the field is optional. If the first digit is 1 or n, the field is mandatory, and must be present at least 1 or n times.
- If the second digit is 0, the field is not present in the use case. If the second digit is n, it can be present a maximum of n times. If the second digit is *, the field can be present any number of times.
- Revert Name: Appears once you’ve changed the name of the archetype and returns the name to its default value
- Revert: Appears once you’ve made any changes to the archetype and returns all fields to their default value
- Rename: Lets you change the name of the archetype
- Clone: A copy of the archetype is made and the copy is named with a number following the name e.g. Reason for encounter (2)
- Move: Appears once you’ve added more than one archetype, and lets you change the position of the archetype in the tree by moving it one step up or down
- Extract Template: The selected archetype as a separate, reusable partial template

- Cut: Lets you remove the archetype from where it is, and copies it to your clipboard(a paste button appears)
- Delete: Lets you remove the archetype from the template
Options in the Definition panel

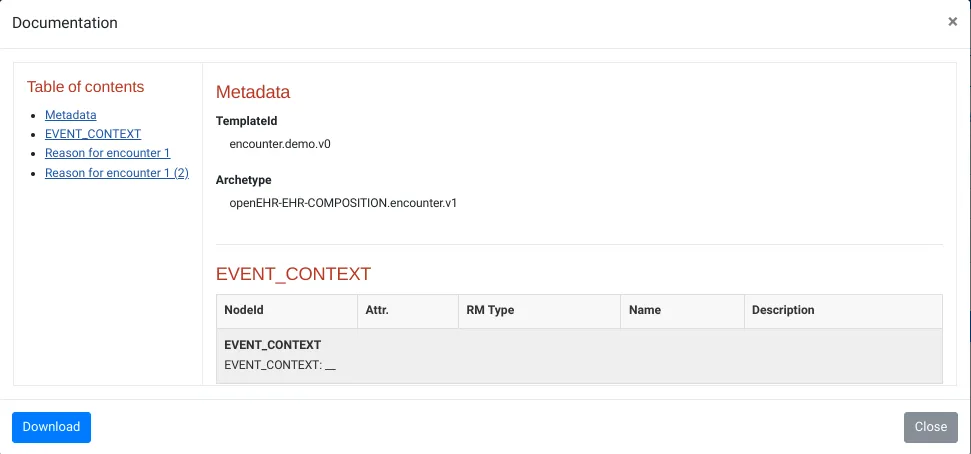
- Documentation: Opens up the documentation for all components in the template
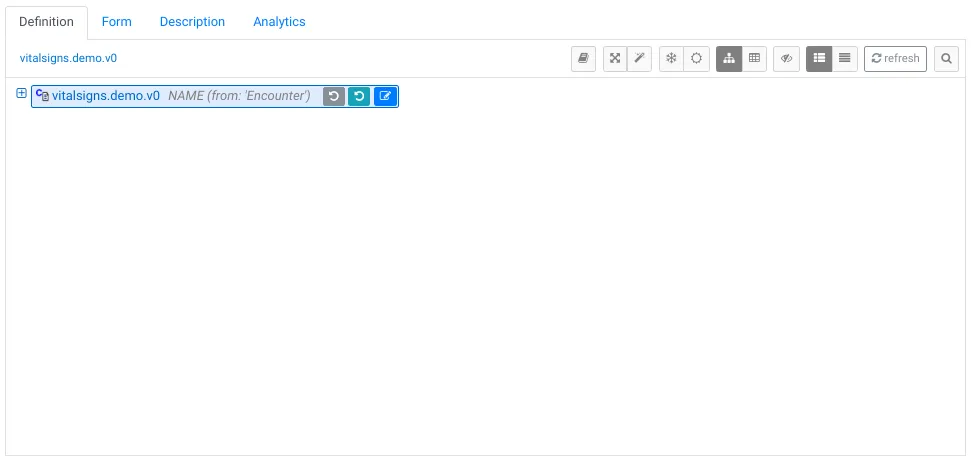
- Collapse or Expand: Collapses all the sub-levels of the selected element in the template. The images below show the effect of clicking Collapse (a) and then Expand (b)
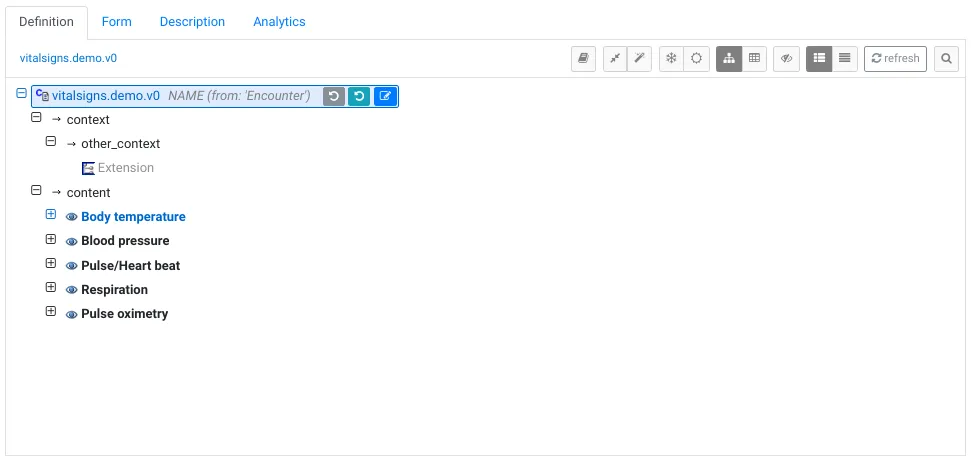
- Collapse to Concepts: Collapses all sub-levels within the content tab at the archetype-level. The images below show the window before clicking Collapse to Concepts (a) and after (b)
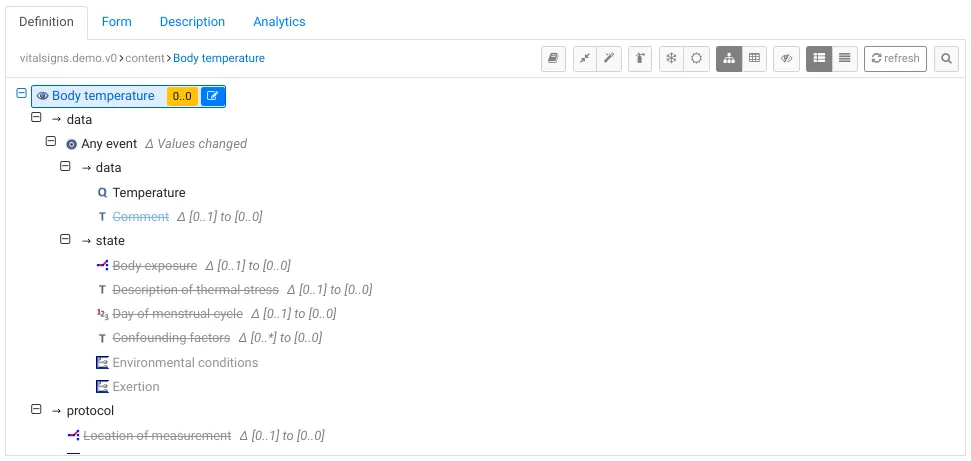
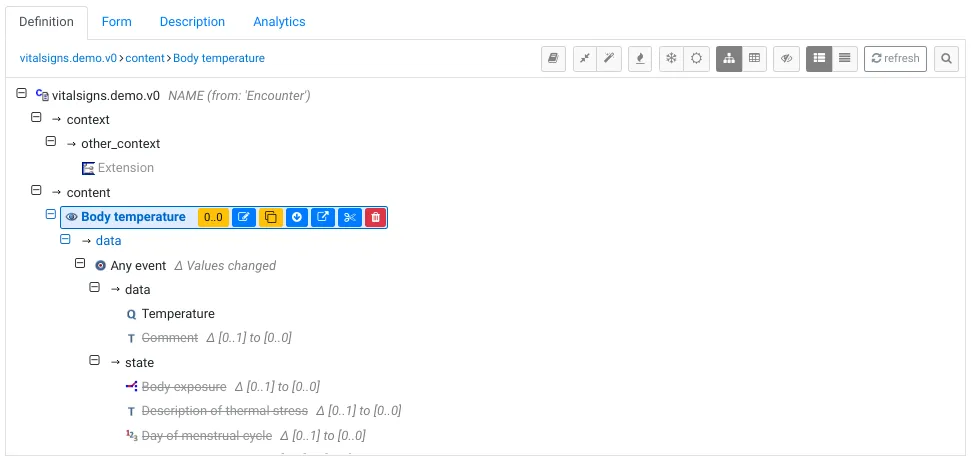
- Bring into Spotlight/Return to Full Tree: Shows only the selected element in the window or returns to the view showing the entire template tree structure. The images below show the window after clicking Bring into Spotlight (a), and clicking Return to Full Tree (b)
- Prohibit Optional Elements: This deletes all optional data items defined within the archetype, allowing you to enable items as per requirements. This makes it easier to choose the data items especially when a particular archetype has lots of optional items within it. The below image shows all optional elements disabled from the blood pressure archetype
- Unprohibit Optional Elements: This enables all optional elements from the archetypes
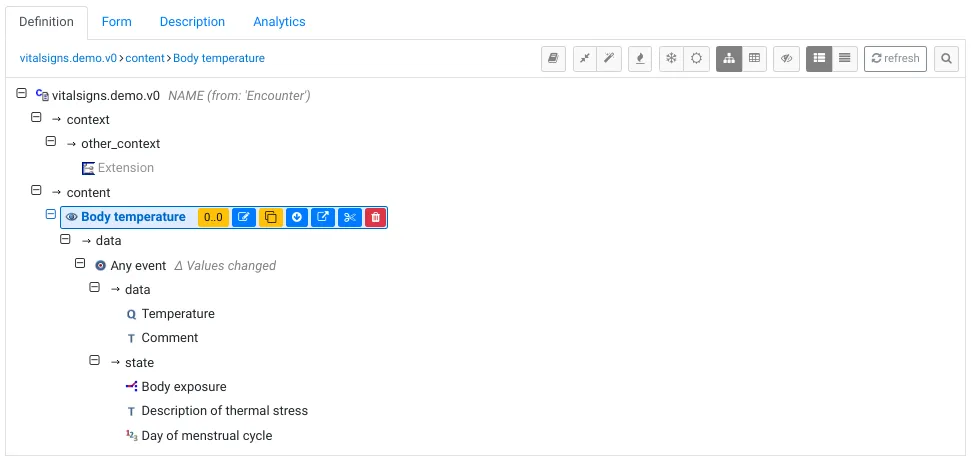
- Tree View: This is the default view of the Archetype Designer
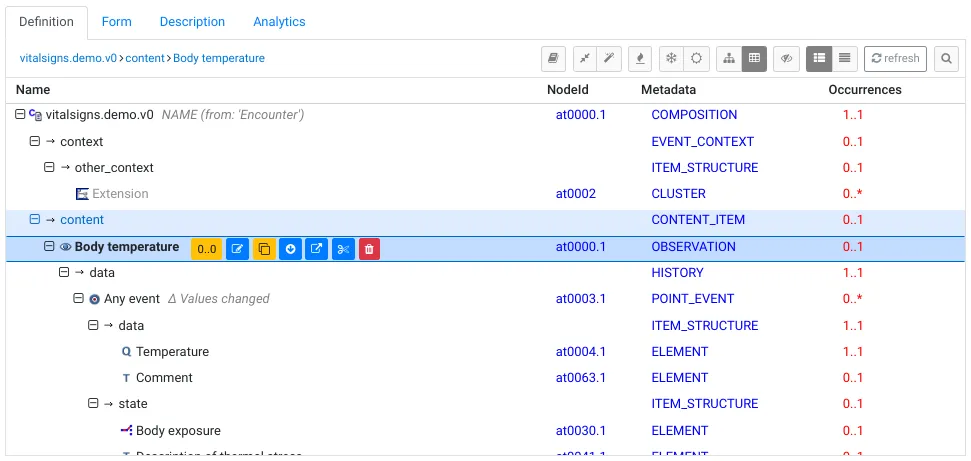
- Table View: This provides a tabular view of the elements in the template, highlighting NodeId, Metadata and Occurrences
- Hide Removed Nodes: This removes all items where the Occurrence is set to 0. The images below show changes made before (a) and after (b) hiding removed nodes
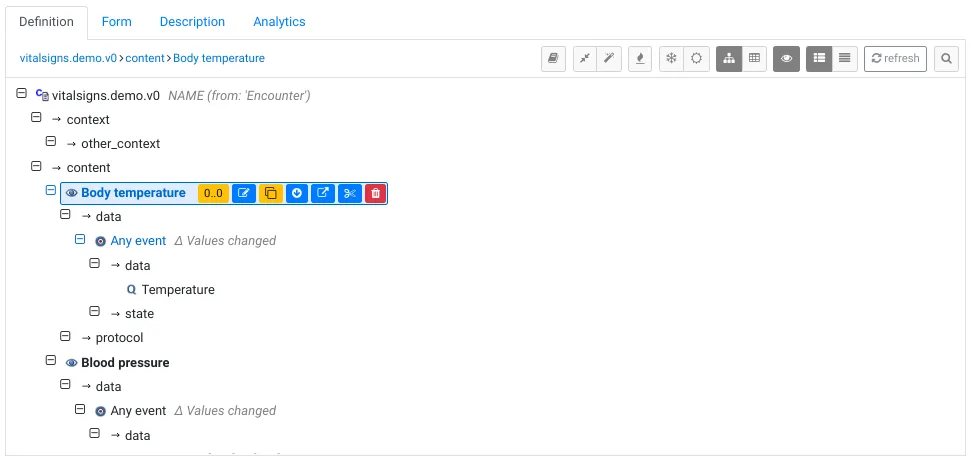
- Low Detail Level: This is the default view and reduces the amount of detail shown
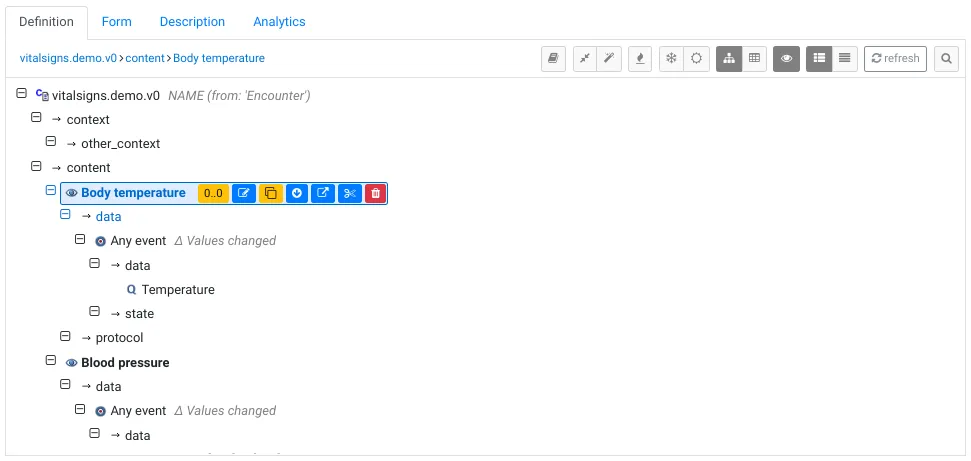
- High Detail Level: This view shows additional details about the structure of the archetypes, e.g. the History Structural node
- Refresh: Refreshes the tree and syncs changes
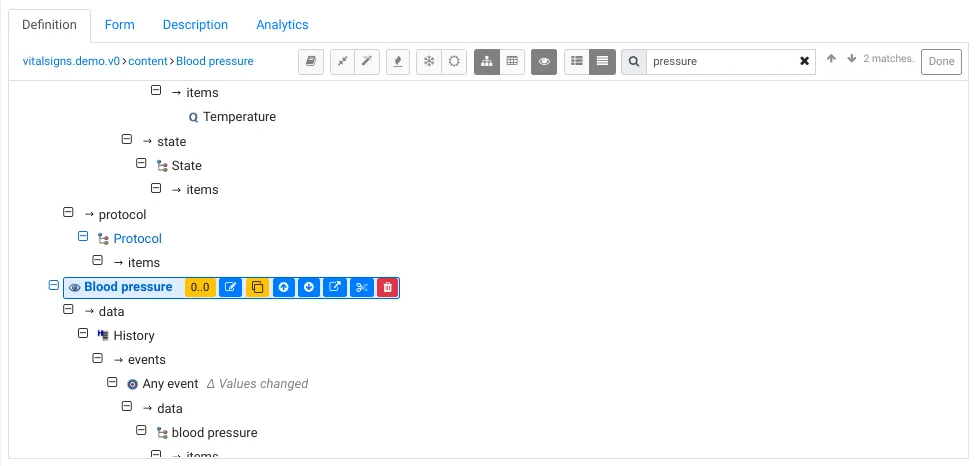
- Open Tree Search: Lets you search within the tree for specific elements or components
Making changes within an Archetype
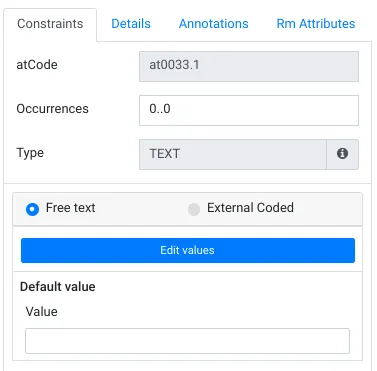
- Set data as Free Text or Coded Text: An element can be set to have Free Text or Coded Text in using the menu on the right panel. You can also bind the element to an external value set or terminology by selecting External Coded, in which case you can also select the terminology. E.g. ICD 10
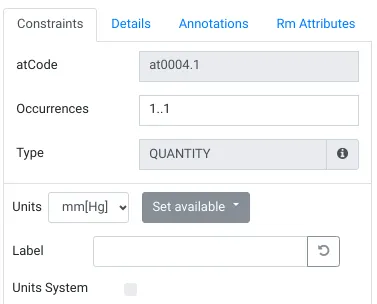
- Set units of measurement: The units of measurement associated with data elements can also be mandated or changed from the right panel. You can also disable some units as per your use case. In the image below, I have selected the data element ‘Height/Length’ from the Height/Length archetype.
- Set MAX and MIN values: It is also possible to set the range of acceptable values for an element

Final thoughts
The openEHR framework introduces a powerful, future-proof approach to managing healthcare data - it separates the technical structure from its clinical meaning. This two-level system addresses the long-standing interoperability challenges in healthcare technology, allowing new domain knowledge to be incorporated into systems easily. Using Archetypes and Templates that provide foundational clinical models and customisability allow for structured flexibility.
The openEHR Archetype Designer tool is useful for navigating and building Archetypes and Templates. It offers extensive customization options and allows you to constrain optional elements, assign coded terminology and dictate units of measurement. With these tools, it is possible to build robust, reusable templates to capture vital sign measurements or any other clinical data.
Ultimately, openEHR ensures that healthcare data is interoperable, accurate and adaptable to change standards - to make it invaluable for modern and future healthcare ecosystems. Our free openEHR Fundamentals Course can help you understand how to implement openEHR for your specific use case, enroll now to get going.
