Learn core FHIR concepts and also how to deploy your own FHIR server.
If you’re building a FHIR project or just starting to learn FHIR, you’ll know how overwhelming it can get very quickly. One moment you’re dipping your toes in FHIR, and the next you’re drowning in endless documentation, specs, profiles, and implementation guides.
But here’s the thing: working with FHIR doesn’t have to be all doom and gloom. With the right tools in your kit, you can save time, avoid unnecessary headaches, and make the whole process a lot smoother. Otherwise, you risk running into what I like to call FHIR Burn, that familiar set of headaches every developer gets when wrestling with FHIR.
Using FHIR Tools makes your life Easier
So in this article, I’ll walk you through some of the tools I’ve come across while working with FHIR, the ones that have genuinely made my life a lot simpler. These aren’t just “nice to have,” they’re the kind of tools that can save you hours of work and spare you from the dreaded FHIR Burn.
Here are the 10 tools every FHIR developer should know:
HAPI FHIR Library
FHIR Validation Tool
Inferno Testing Suite
Postman/Insomnia
Firely Forge
Simplifier/FHIR IG Registry
FHIR IG generator (Java)
Vanya FHIR Browser
Synthea
FHIR Foundry
1. HAPI FHIR Library
Why build from scratch when you can Clone
What it is
The HAPI FHIR library is a Java toolkit that makes working with FHIR much easier. Think of it as a collection of ready-made tools so you don’t have to build everything from scratch.
If you’re working in Java and need to use, share, or host FHIR healthcare data, HAPI FHIR gives you almost everything you need without reinventing the wheel. And the best part? You’re not limited to Java. You can run the HAPI FHIR server in a Docker container and connect to it with a client built in any framework or language of your choice.
Why it matters
The HAPI FHIR library exists to make working with healthcare data a whole lot easier. FHIR comes with plenty of rules for how information should be stored and shared, and handling all of that on your own can be slow and frustrating. HAPI FHIR takes care of the tricky parts for you, so you can spend less time worrying about the rules and more time building your application.
Client – to connect to and interact with existing FHIR servers.
Plain Server – to build your own lightweight FHIR server with custom logic, also known as a FHIR Facade.
JPA Server – a full-featured FHIR server implementation that uses a database (JPA/Hibernate) to store resources.
This flexibility means you can start simple with a client or plain server and scale up to a production-grade JPA server when your project demands it.
Let’s go through the implementation of each of these, one by one.
Client
The HAPI FHIR Client is essentially a Java API that makes it easy to send and receive requests from any FHIR server. Instead of writing raw HTTP calls and manually handling JSON, the client gives you a higher-level interface to interact with FHIR resources.
For example, you can easily read a Patient resource, search for Observations, or even create new resources on a remote FHIR server—all with just a few lines of Java code. Under the hood, it’s still making the HTTP requests for you, but you don’t have to worry about constructing URLs, handling headers, or parsing responses.
This comes in especially handy when you’re building Java-based applications (or working in languages like Kotlin or Scala that run on the JVM) which need to consume data from an external FHIR API. Whether you’re connecting to a public FHIR server, integrating with a hospital’s backend, or testing against your own instance, the HAPI FHIR Client saves you from reinventing the wheel.
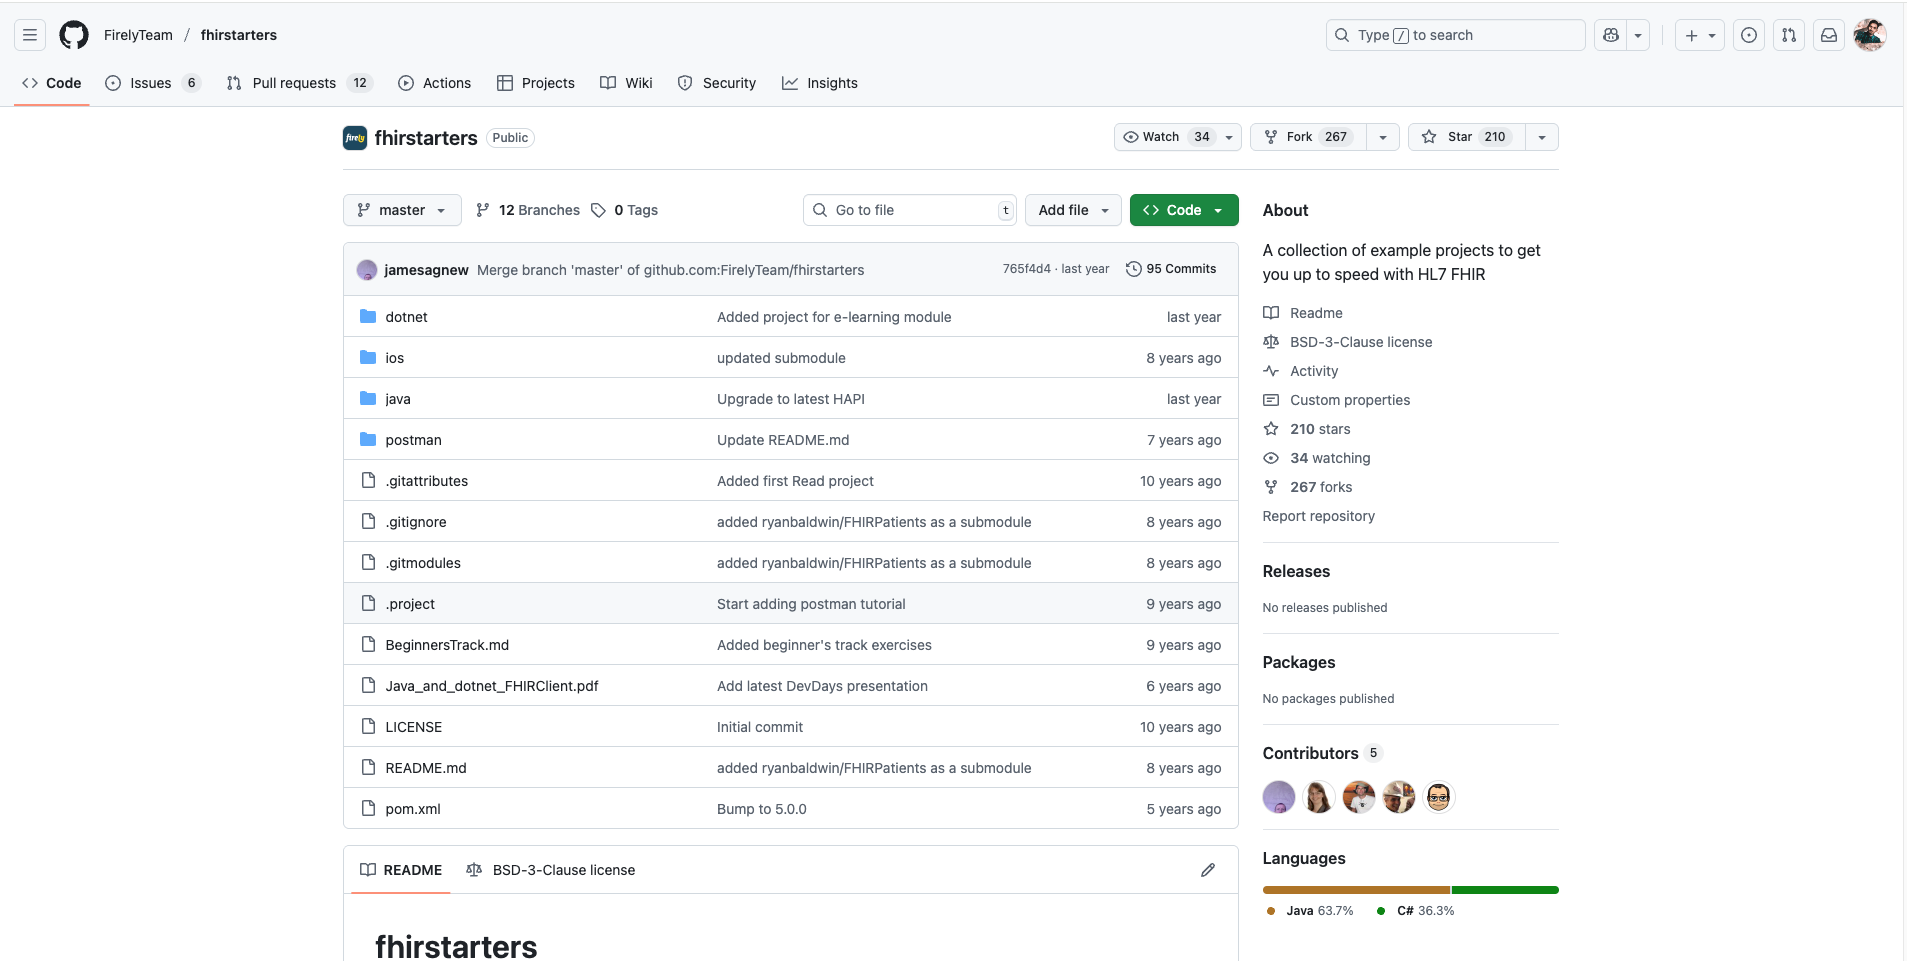
To get started with the HAPI FHIR Client, the library provides a handy Starter Repository. It includes a ready-to-use project setup that you can clone into your system and quickly begin experimenting with client-side FHIR operations. This saves you the hassle of configuring everything from scratch and gives you a clean base to build your own client implementation on top of.
To clone this project, open your terminal and run the following command :
This will create a local copy of the starter repo on your system, which you can then open in your preferred IDE and start customizing for your HAPI FHIR Client implementation.
Next, navigate to the client starter skeleton project by running the following command in your terminal:
cd fhirstarters/java/hapi-fhirstarters-client-skeleton
This will take you into the HAPI FHIR Client starter project directory, where all the boilerplate code and configuration are already set up. From here, you can explore the project, open it in your IDE, and start experimenting with FHIR client operations.
Once you’re inside the client starter project, build it using Maven with the following command:
mvn clean package
This will download the required dependencies, compile the project, and package it into a runnable JAR file. If everything is set up correctly, you’ll see a BUILD SUCCESS message in your terminal.
Note: If your terminal says mvn: command not found or mvn is not recognized, it means Maven isn’t installed on your system.
You can install it by following the official guide here: Maven Installation Documentation.
Finally, to run the project, use the following command:
This will start the sample client application included in the starter project. From here, you can explore the code, customize the client, and begin making real FHIR API calls.
If you’d like to dive deeper into the HAPI FHIR Client library, we’ve got you covered.
Check out our detailed YouTube video where we walk through it step by step:
Plain Server
The Plain Server, also known as a FHIR Facade, is a lightweight way to host a FHIR REST API by writing Java code for each resource type you want to support. It’s best suited when you need a custom backend for specific FHIR workflows and don’t require a full database-backed server.
I’ve deployed a starter project on GitHub to make it easier for you to run a Plain Server implementation. You can check it out here: https://github.com/medblocks/hapi-plain-server
and follow the instructions to get started.
To run this project, open your terminal and clone the git repository with the following command :
Next, run the server by executing the following command on your terminal :
mvn jetty:run
This will start the server at http://localhost:8080.
Test if the server is active by making a call to http://localhost:8080/metadata
To confirm everything is working, open http://localhost:8080/metadata
in your browser or make a GET request to it. If the server is running correctly, you’ll see the FHIR CapabilityStatement response.
JPA Server
The JPA Server is a fully-featured FHIR server implementation that stores resources in a relational database using JPA/Hibernate. It’s ideal when you need a complete, production-ready FHIR server with its own database, capable of handling a wide range of resource types and operations out of the box.
You can use this Starter Project on GitHub
to quickly get up and running with the HAPI FHIR Validator. Just follow the instructions in the repository to set it up and start validating your FHIR resources.
To get started with the HAPI FHIR JPA Server, clone the starter project from GitHub:
To build and run the project using Docker, run the following the command :
docker-compose up --build
This will spin up a fully functional JPA-backed FHIR server, available at: http://localhost:8080/fhir
2. Inferno Testing Suite
Inferno makes testing FHIR easy.
What it is
Inferno is a U.S. government–backed test platform (developed for ONC) that provides automated checks to verify your FHIR implementations against key implementation guides and workflows. It includes multiple tools; we’ll focus on two: Inferno Validator and the Inferno Test Suite.
Why it matters
Trying to validate FHIR by hand is like proofreading your own code, you’ll always miss something. Inferno takes that pain away by running automated, repeatable checks against the FHIR spec and the guides you care about.
The result? Fewer late-night debugging sessions wondering why your Patient resource won’t validate, and more time actually building features. Plus, you get the bonus of having proof your implementation plays nicely with the standards.
How to Use
We’ll look at the two main ways you can use Inferno: the Inferno Validator for quick resource checks, and the Inferno Testing Suite for full end-to-end testing.
Inferno Validator
Using the Inferno Validator is straightforward. Just open the Inferno Validator page
, paste your FHIR resource JSON into the text box, and click Validate.
You’ll then see a report with errors and warnings:
Errors mean your resource doesn’t meet the FHIR specification or the chosen Implementation Guide. These issues must be fixed before your resource can be considered valid.
Warnings are more like suggestions. They point out areas that may not strictly break the rules but could cause problems for interoperability (e.g., missing recommended elements or using unusual coding systems).
Think of errors as “You must stop and fix this” while warnings are “Proceed, but you might run into trouble.”
Inferno Testing Suite
We’ll use the Inferno Testing Suite to run end‑to‑end checks against our live FHIR server that we use for our bootcamp students:
Open Inferno Test Suite : Go to the Inferno Test Suite (Program or Community Edition) in your browser.
Pick a test set : Choose the suite that matches what you want to verify (e.g., base FHIR reads/search, US Core, SMART App Launch, Bulk Data).
Tip: If you’re unsure, start with the US Core or Base FHIR tests to get quick signal.
If the chosen test set requires OAuth/SMART, provide the auth endpoints/client details.
If your server is open for read tests, you can proceed without auth.
Run the tests : Click Run. Inferno will execute scenario‑based checks (reads, searches, must‑support elements, provenance, pagination, etc.).
Review results
Pass: your server met the requirement.
Fail: missing or incorrect behavior (click into the step to see the request/response and exact requirement).
Skip/Not Applicable: the test didn’t run due to prerequisites or suite scope.
3. FHIR Validation Tool
Picking the right validation tool is important
What it is
The HL7 FHIR Validator (Java) is the validator maintained by HL7. You can use it in two ways: as a Java library inside your app, or as a simple command-line tool you run on your machine or in CI.
Point it at a FHIR resource (JSON or XML), and—optionally—at the Implementation Guide(s) you’re using. It will check structure, profiles, and terminology, then give you an OperationOutcome with clear errors and warnings. It can load IGs from packages, follow references, and handle single resources or Bundles. Because it tracks the FHIR spec closely, it’s a dependable choice for everyday checks, batch validation, and build gates.
Why it matters
Because it’s maintained by HL7, this validator is as close to “source of truth” as you’ll get. It tracks the spec, supports profiles and IGs, and performs terminology checks, so when it says a resource is valid (or not), you can rely on it across teams, audits, and certifications.
Operationally, it’s simple and scriptable. You can run it locally for quick checks or drop the CLI into CI/CD to fail fast on bad resources, batch-validate data loads, and keep broken payloads out of your pipelines. Clear messages make fixes straightforward and consistent across environments.
How to use
Download the latest validator_cli.jar from the official releases page, then start the built-in server by executing the following in the terminal :
java -jar validator_cli.jar -server 8080
This starts a validator server at http://localhost:8080.
You can validate resources by sending a POST request to http://localhost:8080/validateResource with your resource as the payload.
You can also validate against the Official FHIR JSON Schema; it’s useful for simple structural checks but is fairly basic and won’t enforce profiles or terminology.
4. Postman/Insomnia
What it is
Postman is a full-featured API client. You can send requests, inspect responses, and save them in organized collections. It also supports environments/variables, pre-request and test scripts, automated runs/monitors, and team workspaces—making it a solid choice for larger projects and collaborative workflows. For FHIR, it’s great for testing CRUD/search, auth flows, and repeatable test suites.
Insomnia is a clean, lightweight API client focused on speed and simplicity. It makes sending requests and viewing responses fast and frictionless, with handy extras like environments, templating, and request chaining. It’s ideal when you want a minimal tool for quickly testing and debugging FHIR endpoints without the overhead.
Why it matters
Working with FHIR means you’ll be making lots of HTTP calls. Postman or Insomnia lets you hit endpoints, inspect requests/responses, manage auth tokens, and reuse environment variables—without writing a client app.
Once your FHIR server is up, you can iterate fast: exercise CRUD and search, test pagination/conditional operations, script checks, and save/share collections with your team or CI. In short, you validate behavior without building a front end.
How to Use
Start by creating a collection/workspace in Postman or Insomnia, add a few requests, and set headers to Accept: application/fhir+json and Content-Type: application/fhir+json. Do a quick smoke test with GET /metadata. If you get a CapabilityStatement, you’re good to proceed.
Then try a basic flow: POST /Patient with a small Patient JSON, capture the returned id, GET /Patient/{id} to verify, and run a search like /Observation?patient={id}. Save these requests, add a couple of simple tests (status code, content type, key fields), and iterate—paging, filters, and $validate—until your typical FHIR workflows pass cleanly.
5. Firely Forge
Forge UI makes it easy to create profiles
What it is
Firely Forge is a Windows desktop app for visually creating and editing FHIR profiles, extensions, and examples. No more wall-of-JSON, use a clean UI to shape your resources.
Instead of hand-writing StructureDefinition JSON/XML, you point-and-click to set cardinalities, add elements, define slices, bind ValueSets, add constraints, and attach examples. Forge validates as you go against the FHIR spec (and loaded IGs) and exports proper StructureDefinitions and examples ready for IG Publisher or other tooling.
Why it matters
Conformance resources (“profiles”) are how you tailor FHIR to your use case and set clear rules for data exchange. Instead of hand-editing StructureDefinitions, Forge gives you a visual, guided way to author profiles, extensions, logical models, search parameters, and operation definitions—making conformance work faster and less error-prone.
Mixed teams (engineers, analysts, clinicians) don’t want to wrestle with raw JSON/XML. Forge’s form-based UI validates as you go, applies the right bindings and cardinalities, and keeps everything compliant with the FHIR spec and your chosen IGs—so what you design is immediately usable.
With Firely Forge you can:
Constrain or extend base FHIR resources for specific workflows.
Build simple/complex extensions with proper slicing and discriminators.
Define ValueSets and CodeSystems, and set binding strengths.
Create example resources that match your profiles.
Author search parameters and operation definitions.
Export artifacts as an IG package ready for the HL7 FHIR IG Publisher.
How to Use
Here’s the simplest way to get started with Forge:
Create a new profile from a base resource (e.g., Patient, Observation).
Tweak fields: set required/optional, add or remove elements, add slices if you need multiples.
Bind codes to ValueSets where needed.
Add a couple of example resources.
Hit validate, fix any issues, then export your profiles (and examples) for your IG/publisher.
6. FHIR IG Registry
Both Registries are essential to find the right IG’s
What it is
The FHIR IG Registry (HL7) and the Simplifier IG Registry are places to find FHIR Implementation Guides. They list guides by country, program, and domain so you can quickly spot what fits your use case.
Each guide page shows a short description plus the key details you need: canonical URL, package ID, and available versions. You also get links to the published guide and the downloadable package.
Search or filter, pick the guide you need, then copy the canonical and exact version into your validator or IG Publisher. Use either registry—both will get you to the same IGs.
Why it matters
FHIR gives a common base, but real systems tailor it. Countries, programs, and projects publish Implementation Guides (IGs) to say “here’s exactly how we use FHIR.” Without a central place, those guides end up scattered across PDFs and repos, and it’s hard to know what’s official or up to date.
The FHIR IG Registry (and the Simplifier Registry) solve this by acting as a trusted directory. You can quickly find the right guide, grab its canonical URL, package ID, and version, and plug them into your validator or IG Publisher—no guesswork.
What the registry helps you do
Find IGs relevant to your use case (by country, program, or domain).
See current and past versions, and pin the one you need.
Get the exact identifiers (canonical + package ID) your tools expect.
Reuse profiles, extensions, and terminology instead of reinventing them.
Publish and validate in a way that aligns with HL7 tooling.
As a developer, it’s the fastest way to use what already exists—and avoid creating duplicate profiles or extensions.
How to Use
Go to the HL7 FHIR IG Registry or the Simplifier IG Registry, search for your use case (country/domain), open the guide, and confirm the FHIR release (R4/R4B/R5). Pick a released version (not “current”), then copy the canonical URL, package ID, and version.
If you’re authoring an IG, add the package (and any dependencies) to your config. Paste the canonical + package ID + version into your README/CI so everyone stays pinned to the same guide.
7. FHIR IG Generator
All IG’s generated from FHIR IG Generator looks similar.
What it is
The FHIR IG Generator is a Java tool that turns your FHIR artifacts—profiles, extensions, ValueSets/CodeSystems, examples, and pages—into a complete, ready-to-publish Implementation Guide. You point it at your project, and it assembles everything into the standard FHIR package format and a clean documentation website.
Along the way, it runs key checks: validates your artifacts, resolves dependencies, generates snapshots, links examples to profiles, and produces a QA report. The outputs are what teams actually need to ship: a static IG website and an installable NPM package (with canonical URL, package ID, and versions) that downstream tools and validators can use.
Think of it as a compiler for FHIR specs: you author the rules and resources, and the IG Generator produces a polished, consistent guide that others can read, reference, and implement.
Why it matters
Your profiles, extensions, and examples are just parts. The IG Generator turns them into one clear guide people can read and use. It validates the pieces, wires up links, and builds the docs site and the installable package.
Without it: loose files and guesswork. With it: a clean, versioned IG that others can implement the same way, every time.
How to Use
Start from a starter IG project, add your profiles, extensions, terminology, and a few example resources, then set the basics (name, canonical URL, version). Keep your docs pages as simple Markdown.
Run the IG Publisher to build. It will validate everything and produce a website plus a package you can use in tools. Check the QA page, fix what it flags, rebuild, and publish the site when it looks clean.
Vanya FHIR Browser is a desktop tool that brings clarity to FHIR data through a clean, intuitive interface.
It is a desktop application specifically designed for viewing and navigating data stored on FHIR R4 servers. Unlike general tools like Postman or Insomnia, Vanya is tailored to make working with FHIR data easier and more developer-friendly.
Why it matters
Vanya started as a pain-killer. Its creator, Darren Devitt, was frustrated trying to inspect huge FHIR payloads in general API tools like Postman because of thousand-line Bundles, endless scrolling, and no easy way to follow references. Vanya turns that into a point-and-click experience.
For developers, that means faster debugging and clearer insight: connect to an R4 server, browse any resource type, follow links, open contained resources, and make sense of profiles without hand-crafting requests or staring at raw JSON. In short, it saves time, reduces mistakes, and makes exploring FHIR data actually pleasant.
How to use
Start by installing and opening Vanya. Add your FHIR R4 server’s base URL (e.g., https://your-server/fhir) and connect. From the sidebar, pick a resource type like Patient or Observation to see live data, or jump straight to a specific resource by pasting its id. You can also run simple searches (e.g., by patient, date, or code) to narrow the list.
Click any resource to inspect it. Vanya shows a clean overview and the raw JSON, and lets you follow references (e.g., from an Observation to its Patient or Encounter) with a click. Open Bundles to step through entries, navigate back and forth as you explore, and switch servers anytime when you need to compare environments.
9. Synthea
Synthea provides data very similar to real world data.
What it is
Synthea is an open-source synthetic patient generator from MITRE. It simulates lifelike but entirely fake patient records, so you can build and test healthcare software without touching real PHI.
It produces rich, end-to-end histories (conditions, meds, labs, encounters) and exports in developer-friendly formats like FHIR, plus others. In short: realistic data you can safely use for demos, pipelines, and CI.
Why it matters
Synthea lets you work with health records that look real without risking anyone’s privacy. You get end-to-end patient histories that behave like production data, but they’re 100% synthetic and safe to share.
It’s ideal for developers, researchers, and students: seed test databases, exercise FHIR servers and EHR workflows, generate bulk datasets for analytics, and run CI/CD checks with reproducible cohorts—no approvals, no PHI, no risk.
How to use
To use Synthea, install Java, clone the Synthea repo, and run the generator with a patient count (and optionally a seed and a location). It will create realistic but synthetic patient records and save them in an output folder. You’ll typically get FHIR JSON (for R4) and CSV files; you can also enable bulk NDJSON via config if you need it.
Next, load the FHIR Bundles into your server (or point your analytics tools at the CSV/NDJSON). Do a quick sanity check with a validator (HL7 Validator or Inferno), tweak settings if needed, and re-generate. Keep the seed you used so your team can reproduce the exact same dataset later.
10. FHIR Foundry
FHIR Foundry is a treasure chest of FHIR Projects.
What it is
FHIR Foundry is HL7’s hub for discovering, trying, downloading, and deploying working FHIR software, reference servers, validators, test suites, IG tooling, and more. It’s a catalog of “ready-to-run” projects with descriptions, versions, and run instructions so implementers can spin them up locally or in the cloud.
The platform launched in May 2024 and is aimed at speeding real-world FHIR adoption by giving teams a central, trusted place to find vetted projects and test against standards. It’s referenced by U.S. agencies and industry write-ups as a way to lower the burden of implementing FHIR.
Why it matters
FHIR Foundry shrinks the gap between specs and running code. Instead of hunting for repos and wiring them up yourself, you get a curated set of ready-to-run projects reference servers, validators, test suites, IG tooling, each with clear docs and versions. That means faster prototypes, cleaner demos, and fewer “works on my machine” surprises.
It also boosts consistency and confidence. Teams can pin exact versions, reuse proven pipelines, and validate against standards the same way across dev, test, and CI. In short: less time scaffolding, more time shipping real FHIR features.
How to Use
Start at the FHIR Foundry catalog, search or filter for what you need (e.g., reference server, validator, test suite, IG tooling), then open a project page. Skim the overview to confirm the use case and FHIR version, check prerequisites (often Docker or Java), and note the tagged release you want to use.
Next, follow the project’s “Run” instructions—copy the Docker command or clone the repo and run the provided script. Keep the version you chose pinned in your README/CI so teammates run the same thing. If it fits, wire it into your workflow (local dev, demos, or CI validation) and you’re off the ground without starting from scratch.
Conclusion
These ten tools cover the core jobs you’ll keep running into: explore and test FHIR APIs, validate resources and IGs, author and package profiles, generate realistic test data, and stand up reliable servers. Used together, they cut down guesswork, help you spot problems early, and keep your work close to the spec. You’ll spend less time wrestling with setup and more time building features that actually matter.
You don’t have to use everything on day one. Start with the tool that solves today’s problem. Validate a resource, try a test server, or browse data, then add the next one when you need it. As your project grows, a small, well-chosen toolkit will make your FHIR work clearer, faster, and easier to maintain.