Learn core FHIR concepts and also how to deploy your own FHIR server.
Your health app reminds you about medications, syncs with your lab results, and even pulls records from different hospitals. It feels effortless, but what’s really happening behind the scenes?
The secret is SMART on FHIR.
This game-changing framework is revolutionizing healthcare app development, yet few truly understand how it works. In this guide, we’ll break it down step by step and show you how to build your own SMART-powered health app. When we’re done, you’ll understand how SMART on Epic works and have a working patient app built end to end.
What is SMART on FHIR?
Substitutable Medical Applications and Reusable Technologies or SMART is a framework that provides functionalities to build healthcare apps to function on top of EHRs in a secure and standardized way without the need to reconfigure it for individual EHRs. It is a one-size-fits-all solution.
When using SMART on FHIR it combines the authentication layer of SMART with the data standardization of FHIR to create a secure, interoperable way for applications to interact with EHRs, thereby proving the best of both worlds.
The core security features of SMART are that it uses oAuth2 and OpenID Connect to securely access the EHR and provide user credentials back to the SMART application.
SMART provides the following advantages:
Interoperability - Enables apps to work across different EHRs
Patient Access - Patients can connect personal health apps to their medical records
Clinician-Friendly Apps - Doctors can use third-party tools inside EHRs without extra login steps
Standardized API Access - Developers don’t have to build separate integrations for each hospital/EHR
SMART uses a few core components such as oAuth, OpenID Connect, well-known discovery endpoints, scope and launch context. Let’s understand each of these in the simplest way possible.
Let’s understand all about oAuth2
Let’s say application ‘A’ wants to access the resources of application ‘B’ for its own use. Now here’s where oAuth2 comes into play, through which ‘B’ can provide ‘A’ access to its resources, effectively providing authorization.
Register the client, and keep the credentials safe until you are done with this testing
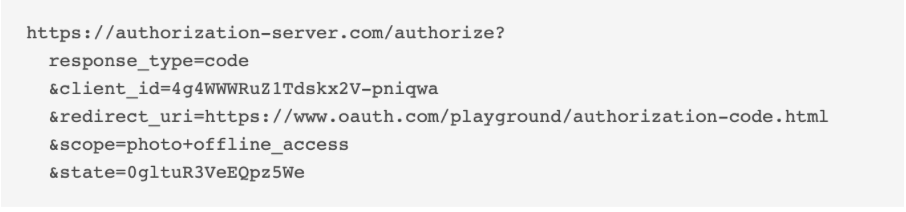
Click on ‘Authorization code’ to begin and you will see a similar code as below
Breaking down the parts of the URL:
client_id: Identifies your application
response_type=code: Requests an authorization code (OAuth 2.0 Authorization Code Flow).
scope=openid profile email: The resources being requested by your application from Epic
redirect_uri: This is where the user will be sent after authentication
state=random_string: A unique value to prevent CSRF attacks.
This step tells the oAuth2 app that it needs an authorization code.
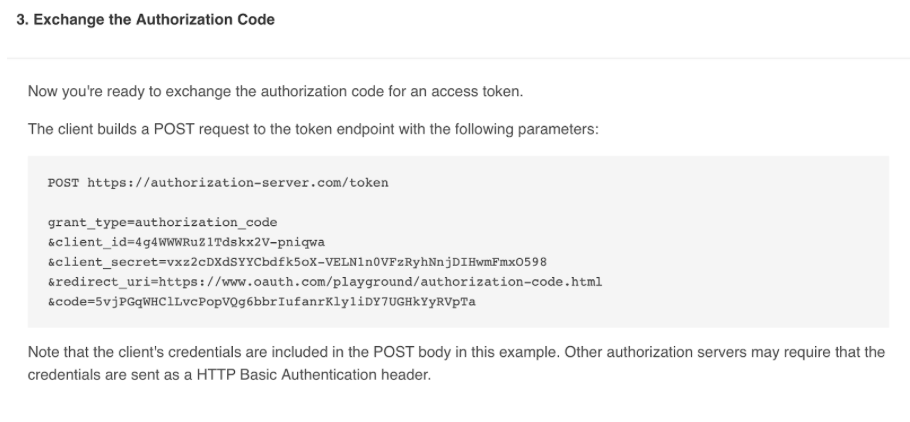
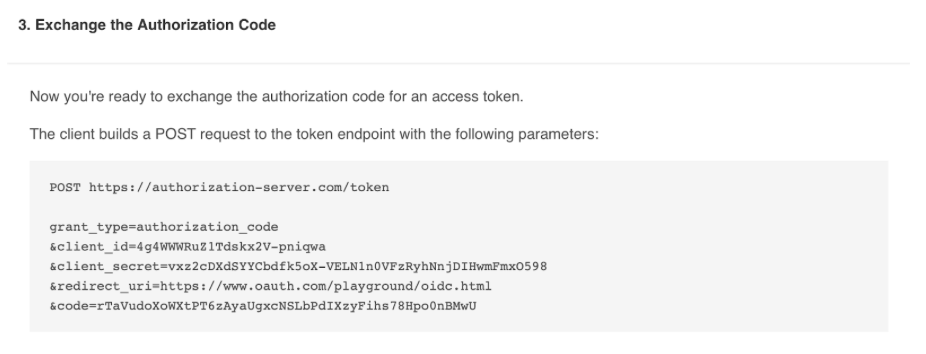
Click on Authorize, type in the credentials, and then check the state in the URL and click ‘It matches’. Now you will be shown a POST request code that takes the authorization code requested in step 2 and requests for the access and refresh token.
As you can see from the screenshot the code is being sent along the POST request.
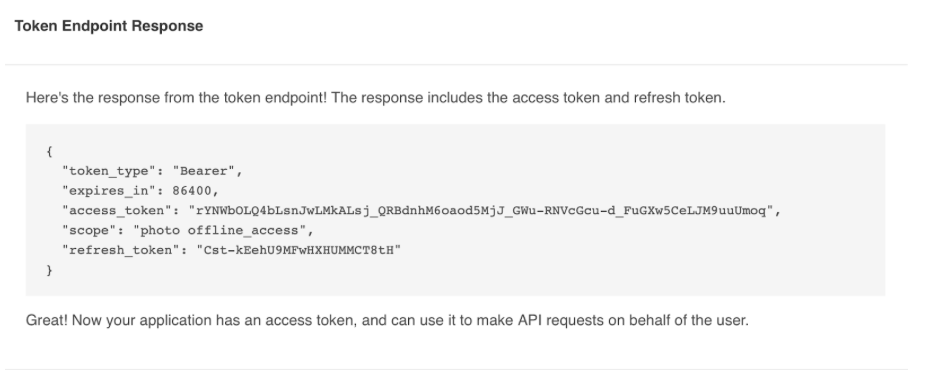
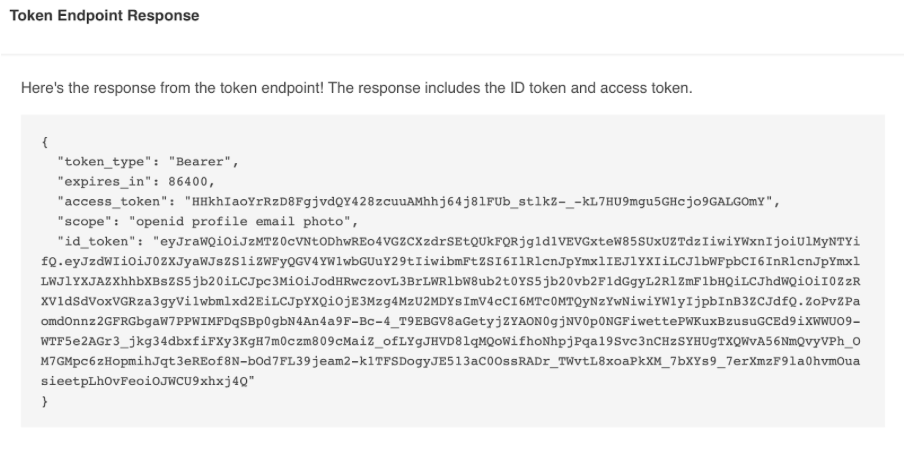
This is the final step where application ‘A’ gets its access and refresh token, with which now it can access the resources of application ‘B’. Remember to save these tokens to your local storage for API calls.
What’s OpenID Connect? Why use it after oAuth2?
OpenID Connect (OIDC) is an authentication protocol that works on top of OAuth 2.0, allowing apps to verify a user’s identity and get their profile information securely.
To put it simply:
OAuth 2.0 = Authorization (Who can access what?)
OpenID Connect = Authentication (Who is this user?)
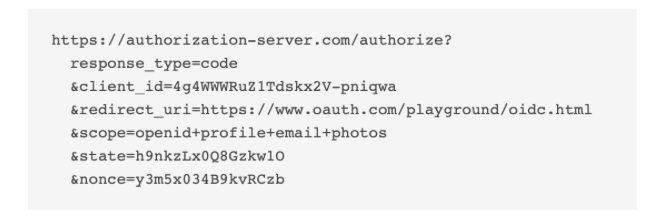
Click ‘Authorize’ and you’ll be shown the Authorization URL as below. The URL parts are the same as the one seen in oAuth2 except for an addition of ‘Nonce’ which prevents replay attacks.
Follow the steps and you will shown the Code as below just like in oAuth2, but the difference lies in the next step.
Click ‘go’ and you will see a token generation response that now contains an additional token ‘id_token’. This is the identity of the user, let’s decode it. Copy the id_token and follow along.
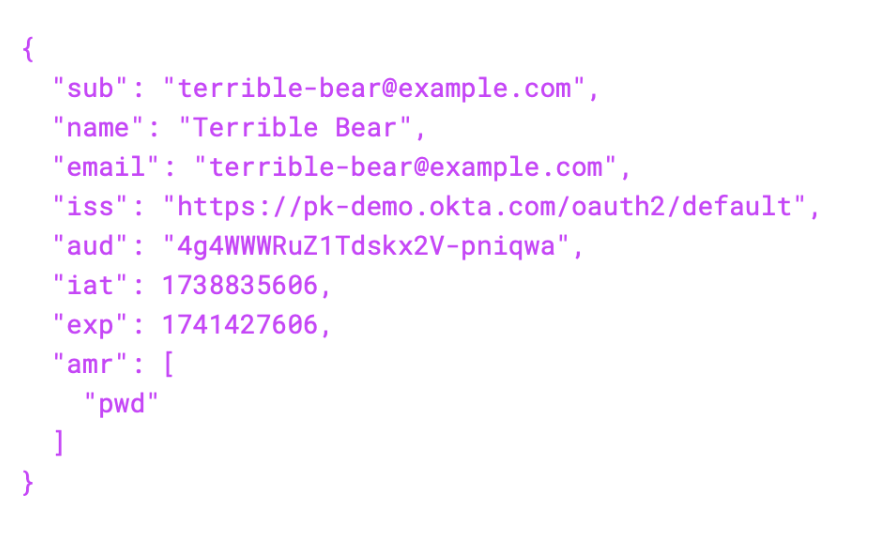
Navigate to jwt.io where we can decode JWT tokens and paste your token in the box and you’ll see a decoded user detail something like this
This is the sole purpose of OpenID Connect, it gives the details of the authorizing user.
Looking at oAuth2 and OpenID Connect together
Authorization Request: Redirect the patient to the EHR’s auth server with response_type=code.
Patient Authentication (OIDC): The user logs in via the EHR’s identity provider.
Patient Consent: User grants access to requested resources.
Authorization Code Issued: EHR redirects back with code=AUTHORIZATION_CODE.
Token Exchange: The App sends the auth code to EHR’s token endpoint, and gets access_token & id_token.
Fetch FHIR Data: Use access_token in API requests to access patient data.
Decode ID Token: Extract user identity (sub, fhirUser, profile).
SMART discovery endpoints and ‘.well-known’
Discovery Endpoints are used by client apps to dynamically discover authentication The ‘.well-known’ directory defines a location where publicly accessible metadata can be stored in a predictable format.
In SMART it is used for auto-discovery of an authorization server’s capabilities.
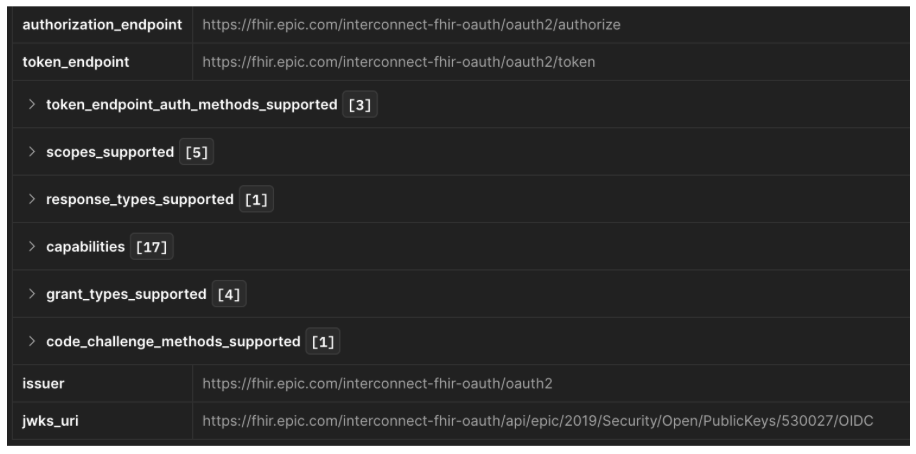
Let’s use the R4 endpoint https://fhir.epic.com/interconnect-fhir-oauth/api/FHIR/R4/ and append .well-known/smart-configurations and use it in POSTMAN to see the response.
Let’s break down the response:
authorization_endpoint: Where clients start the OAuth flow (users log in here).
token_endpoint: Where the client exchanges the authorization code for tokens.
token_endpoint_auth_methods_supported: How clients authenticate (client_secret_basic, private_key_jwt).
scopes_supported: List of available (e.g., fhirUser, launch, openid, profile).
response_types_supported: OAuth response types (e.g., code for Authorization Code Flow).
grant_types_supported Allowed grant types like authorization_code, client_credentials.
code_challenge_methods_supported: code challenge methods the authorization server supports for PKCE
Why use discovery endpoints?
Auto-discovery: Instead of hardcoding URLs, clients can dynamically fetch the OAuth endpoints.
Security: Ensures clients use the correct authorization and token URLs.
Interoperability: FHIR apps can integrate with multiple servers using the same discovery logic.
How does this work?
When the SMART app starts, it fetches all endpoints available at the .well-known endpoint and now the app has the endpoints to query for different purposes.
Hence based on the response breakdown we saw earlier, it sends requests to the respective endpoint.
Let’s look at what scopes are and what they do
In SMART on FHIR, scopes control access to healthcare data and identity information.
Scopes can be simplified in explanation as to what the SMART app needs for it to perform its functions, e.g. requesting user details or patient information.
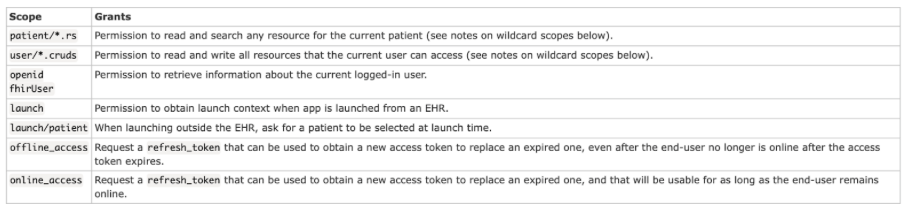
Some common scopes seen in the R4 endpoint are:
Let’s look at fhirUser scope in depth as that is very important, and we advise you to go through the link for a comprehensive understanding as scopes are a vast topic, whereas launch will be discussed in the next section.
fhirUser scope is divided into:
Patient-specific scopes:
Patient-level scopes in SMART on FHIR define what data a healthcare app can access for a specific patient after authentication. They restrict access to only the authorized patient’s data, rather than system-wide or practitioner-wide data.
User-level scopes:
User-level scopes allow an app to access multiple data based on the permissions of the logged-in user
System-level scopes:
System-level scopes allow server-to-server communication without a user logging in. Used for background tasks, data synchronization, population health analytics, and reporting.
Let’s look at what the Launch context is
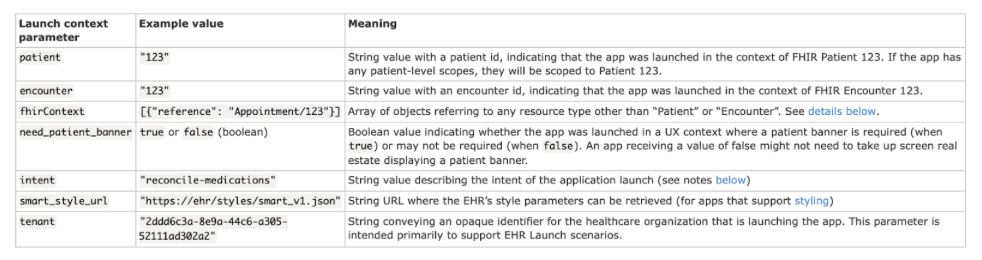
The launch context is an important concept that refers to additional information passed along with the authorization request. It is required by the SMART app to contextually know what data it will be working on.
Eg: A vitals app needs to know which patient is being read and the patient’s observation, hence the launch context here would ask for ‘launch/patient’ to get the patient detail and to read it will raise a scope as user/Observation.read. This is how scope and launch context work together
Use of Launch Context:
When your app is launched, especially in clinical settings, the launch context allows the app to be aware of:
Which patient the app is focused on?
Which encounter or episode of care is relevant?
Which FHIR server should the app interact with?
A quick recap of Scope and Launch Context:
Scopes define what data an app can access.
Example: patient/Observation.read allows the app to read patient observations.
Launch context provides specific identifiers to the app at runtime.
Example: launch/patient gives the app the active patient ID.
Scopes control access to FHIR resources, while launch context provides context.
Example: patient/Observation.read allows reading observations, but without launch/patient, the app wouldn’t know which patient to request data for.
Launch context is set during app registration, while scopes are also set but determine access permissions.
The access token includes both scope permissions and launch context parameters.
The app can only use the data granted by the combination of scope and launch context.
Example: If an app has patient/Observation.read but no launch/patient, it cannot automatically get patient data without user input.
If an app needs more context or permissions, both the requested scopes and launch parameters must be updated in the registration.
Hands-on Tutorial
Now that we’ve covered the fundamentals, let’s get into assembling it to make a fully functional application. Here’s the GitHub repository for reference.
First, we’ll have to register the client, that is, our application with Epic’s Developer Apps portal
Add an appropriate App name
Use the non-production client ID (takes 24 hours to function after registering)
Fill in the fields
Add the required scopes
Redirect URI: The callback page after oAuth
Let’s look at the overall app structure and the steps:
Home page to sign in to Epic for OAuth
A callback page that redirects from Epic
Patient detail page
Vitals page
Labs page
Medication page
The main functions include:
Fetch all .well-known endpoints on app initialization
Function to handle PKCE challenge
Constructor for creating the oAuth URL
Function to get the auth code and create a post URL for the access code
API calls to the FHIR server for patient, medication, observation, and vitals
Coding the functions
Creating the Config file
// List of all endpointsexport const CONFIG = { ISSUER: '', ACCESS_TOKEN: '', CODE_CHALLENGE: '', CODE_VERIFIER: '', AUTHORIZATION_ENDPOINT: '', TOKEN_ENDPOINT: '', CLIENT_ID: 'a56411ee-67d8-43be-a181-1ef625da3c64', REDIRECT_URI: 'http://localhost:5173/callback', FHIR_BASE_URL: 'https://fhir.epic.com/interconnect-fhir-oauth/api/FHIR/R4'};// Function to update multiple values at onceexport function setWellKnown(authorization, token, issuer) { CONFIG.AUTHORIZATION_ENDPOINT = authorization; CONFIG.TOKEN_ENDPOINT = token; localStorage.setItem('token_endpoint', token); CONFIG.ISSUER = issuer; localStorage.setItem('issuer', issuer);}// Function to set the access tokenexport function setToken(access) { CONFIG.ACCESS_TOKEN = access;}// Function to set the code challenge and verifierexport function setChallenge(code_challenge, code_verifier) { CONFIG.CODE_CHALLENGE = code_challenge; CONFIG.CODE_VERIFIER = code_verifier; localStorage.setItem('code_verifier', code_verifier);}// Function to get all variablesexport function getVariables() { return CONFIG;}
Fetching .well-known (wellKnown.js):
The well-known endpoints can be fetched from the R4 base URl by concatenating .well-known/smart-configuration
async function getWellKnown(){ try{ const res = await axios.get('https://fhir.epic.com/interconnect-fhir-oauth/api/FHIR/R4/.well-known/smart-configuration') const data = res.data // Set the variables in the config to use in other files setWellKnown( data.authorization_endpoint, data.token_endpoint, data.issuer, ); }catch(error){ console.error(error.message) }};export default getWellKnown
PKCE challenge (pkce.js):
This is required when constructing the oAuth URL where the code challenge will be passed and in the access token request the associated code verifier will be passed in the body.
To construct this function, we will need to install the PKCE npm package.
Once done, this is our function utilizing the pkceChallenge()
import pkceChallenge from "pkce-challenge";export async function getChallenge(){ const {code_verifier, code_challenge} = await pkceChallenge(); return { code_verifier, code_challenge }}
You can call this function at places where the code challenge and verifier are needed, or save it in localStorage.
Constructing the oAuth URL (authorization.js):
This is responsible for redirecting the user from the sign-in page to Epic’s page.
The URL structure is given in the documentation and the comments in the code. This function was made in a way to accept the parameters as arguments in the invoking page, which we will see soon as we assemble the pieces together.
This function is responsible for getting the authorization code returned by the oAuth and sending a post URL to fetch the access token.
import { getVariables } from "../config/config";import axios from "axios";// This function takes the code from the URL and gets the token.export async function getToken(){ try { // Get the code from the redirect URL const token_endpoint = localStorage.getItem('token_endpoint') const params = new URLSearchParams(window.location.search); const code = params.get('code'); if (!code) { throw new Error("Authorization code not found in URL."); } if(!token_endpoint){ throw new Error("Token endpoint not available.") } // Get stored configuration variables const config = getVariables(); // Construct the token request body const body = new URLSearchParams({ grant_type: "authorization_code", code: code, redirect_uri: config.REDIRECT_URI, client_id: config.CLIENT_ID, code_verifier: localStorage.getItem("code_verifier"), }); // Make the token request const res = await axios.post(token_endpoint, body, { headers: { "Content-Type": "application/x-www-form-urlencoded" } }); return res.data; // Return the response for further use } catch (error) { console.error("Error fetching token:", error.response ? error.response.data : error.message); }}
The access token is received from the ‘Token endpoint’ which we had received from the .well-known endpoint.
The POST URL will require the parameters as listed in the documentation. Remember to use the code verifier received from the PKCE function.
This function will return the access token, patient ID, and token ID along with other data, but we will need the patient ID and access token to send the API request. Saving it to local or session storage will make it easier to retrieve.
FHIR API functions (fhirQueryFunctions.js):
This function does the API calls to theFHIR base URL which is nothing but the R4 URL without .well-known/smart/configuration.
We will create a total of 4 functions for (Brackets are scopes):
Patient details (Patient.read(R4))
Labs (Observation.search(Labs)(R4))
Vitals (Observation.search(Vitals)(R4))
Medications (Medication.Search(R4))
Patient Details API:
This function returns the Patient resource from the FHIR server
Remember to pass the access token and patient ID received from the token function.
// Get the info about the patient from FHIRexport async function getPatientDetails() { const access_token = localStorage.getItem("access_token"); const patient_id = localStorage.getItem("patient_id"); try { const res = await axios.get(`${CONFIG.FHIR_BASE_URL}/Patient/${patient_id}`, { headers: { "Authorization": `Bearer ${access_token}` } }); return res.data; } catch (error) { console.error("Error fetching patient details:", error.response ? error.response.data : error.message); }}
Patient Medications API:
Retrieves the medications of the patient.
The API structure can be browsed here
// Get medication info about Patients from FHIRexport async function getPatientMedications() { const access_token = localStorage.getItem("access_token"); const patient_id = localStorage.getItem("patient_id"); try { const res = await axios.get(`${CONFIG.FHIR_BASE_URL}/MedicationRequest`, { params: { subject: patient_id }, headers: { "Authorization": `Bearer ${access_token}` } }); return res.data; } catch (error) { console.error("Error fetching medication details:", error.response ? error.response.data : error.message); }}
// Get vitals info about Patients from FHIRexport async function getPatientVitals() { const access_token = localStorage.getItem("access_token"); const patient_id = localStorage.getItem("patient_id"); try { const res = await axios.get(`${CONFIG.FHIR_BASE_URL}/Observation`, { params: { subject: patient_id, category: "vital-signs", }, headers: { "Authorization": `Bearer ${access_token}` } }); return res.data; } catch (error) { console.error("Error fetching vitals details:", error.response ? error.response.data : error.message); }}
Putting it all together:
Now that all the functions have been modularised, let’s create the pages to invoke and display the data.
Note: For certain pages, we will create components to render the returned data.
The import statements at the top specify the functions and components that we are combining in each page.
Home Page
Home.jsx initiates the OAuth flow by redirecting the user to Epic’s authorization endpoint.
import { useEffect, useState } from 'react';import getWellKnown from '../auth/wellKnown';import { getVariables } from '../config/config';import { getChallenge } from '../auth/pcke';import { setChallenge } from "../config/config";import { authURL } from '../auth/authorization';import SignIn from '../components/SignInButton';function HomePage() { const [endPoints, setEndPoints] = useState(null); useEffect(() => { const configuration = async () => { // Get the endpoints and set the config vars await getWellKnown(); // Get the challenges const challenge = await getChallenge(); // Set the challenge vars setChallenge(challenge.code_challenge, challenge.code_verifier) // Get all the vars const variables = getVariables(); setEndPoints(variables); }; configuration(); }, []); function handleSignIn() { if (!endPoints) { return; } // Pass the vars to construct the URL const epicURL = authURL( endPoints.AUTHORIZATION_ENDPOINT, endPoints.REDIRECT_URI, endPoints.CLIENT_ID, endPoints.CODE_CHALLENGE, endPoints.FHIR_BASE_URL ); // Relocate to the URL for Auth window.location.href = epicURL; } return ( <div> {endPoints ? ( <SignIn handleSignIn={handleSignIn} /> ) : ( <p>Loading configuration...</p> )} </div> );}export default HomePage;
This page uses the sign-in button component:
import React from "react";import "../styles/SignIn.css";function SignIn({ handleSignIn }) { return ( <div className="signin-container"> <div className="signin-card"> <h2>Welcome to the SMART on Epic FHIR Portal</h2> <p>Access your health data securely and efficiently.</p> <button className="signin-button" onClick={handleSignIn}> Sign In with Epic </button> </div> </div> );}export default SignIn;
OAuth Callback Handling
CallBack.jsx handles the OAuth redirect, retrieves and stores the access token, then navigates to the Patient Home page.
import { useEffect } from "react";import { getToken } from "../auth/getToken";import { useNavigate } from "react-router-dom";import { setToken } from "../config/config";// Function handles the oAuth redirect backfunction CallBack() { const navigate = useNavigate(); useEffect(() => { const fetchToken = async () => { try { const tokenData = await getToken(); if (tokenData) { // Save the access token localStorage.setItem("access_token", tokenData.access_token); localStorage.setItem("patient_id", tokenData.patient); // Set the access_token in the config setToken(tokenData.access_token) navigate("/patient-home"); // Redirect if successful } } catch (error) { console.error("Token retrieval failed:", error); } }; fetchToken(); }, [navigate]); return <h1>Processing authentication...</h1>;}export default CallBack;
Patient Home Page
PatientHome.jsx Displays patient details by fetching data from the FHIR API.
Uses component VitalsList.jsxNote: Vitals is an extensive bundle, hence we will group the data according to the date it was recorded in a tabular format.
import React from "react";import '../styles/PatientVitals.css';// Render the vitals listfunction VitalsList({ details }) { if (!details) return <p>Loading patient vitals...</p>; // Extract the entries from the FHIR response const entries = details?.entry || []; // If there are no entries, display a message indicating no results if (entries.length === 0) { return <p>No vital signs found.</p>; } // Group vitals by date const vitalsByDate = entries.reduce((acc, entry) => { const observation = entry?.resource; if (!observation || observation.resourceType !== "Observation") return acc; const date = observation?.effectiveDateTime ? new Date(observation.effectiveDateTime).toLocaleDateString() : "Unknown Date"; // Check for Blood Pressure and combine systolic and diastolic readings const code = observation?.code?.text || "Unknown Vital Sign"; let value = "N/A"; let unit = observation?.valueQuantity?.unit || ""; if (code.toLowerCase().includes("blood pressure")) { // Find systolic and diastolic values const systolic = observation?.component?.find(c => c.code?.text === "Systolic blood pressure"); const diastolic = observation?.component?.find(c => c.code?.text === "Diastolic blood pressure"); if (systolic && diastolic) { value = `${systolic.valueQuantity.value} / ${diastolic.valueQuantity.value}`; unit = systolic.valueQuantity.unit?.replace(/\[|\]/g, ""); // Remove square brackets from the unit } } else { value = observation?.valueQuantity?.value ?? "N/A"; } // Group by date if (!acc[date]) { acc[date] = []; } acc[date].push({ code, value, unit }); return acc; }, {}); // Render vitals grouped by date in a table format return ( <div className="vitals-list"> <h3>Patient Vitals Table</h3> <table> <thead> <tr> <th>Date</th> <th>Vital Sign</th> <th>Value</th> </tr> </thead> <tbody> {Object.keys(vitalsByDate).map((date, index) => ( <React.Fragment key={date}> <tr> <td rowSpan={vitalsByDate[date].length}>{date}</td> <td>{vitalsByDate[date][0].code}</td> <td>{vitalsByDate[date][0].value} {vitalsByDate[date][0].unit}</td> </tr> {vitalsByDate[date].slice(1).map((vital, i) => ( <tr key={`${date}-vital-${i}`}> <td>{vital.code}</td> <td>{vital.value} {vital.unit}</td> </tr> ))} </React.Fragment> ))} </tbody> </table> </div> );}export default VitalsList;
Patient Medication Page
Medications.jsx displays the medications of the patient.
import { BrowserRouter as Router, Routes, Route } from 'react-router-dom';import HomePage from './pages/Home';import CallBack from './pages/CallBack';import PatientHome from './pages/PatientHome';import Labs from './pages/Labs';import Medications from './pages/Medications';import Vitals from './pages/Vitals';function App() { return ( <Router> <Routes> <Route path="/" element={<HomePage />} /> <Route path="/callback" element={<CallBack />} /> <Route path="/patient-home" element={<PatientHome />} /> <Route path="/labs" element={<Labs />} /> <Route path="/medications" element={<Medications />} /> <Route path="/vitals" element={<Vitals />} /> </Routes> </Router> );}export default App;
Here’s a quick rundown of the application we built:
We modularized key functions to handle tasks like retrieving endpoints, managing authorization codes, fetching access tokens, extracting patient IDs, and making API calls to the FHIR server—all neatly organized for better maintainability.
Using these modular functions, we integrated the logic into their respective pages, triggering API calls when the pages render. For better clarity and structure, we passed the fetched data to dedicated components responsible for displaying the information.
Finally, we added a Navbar for seamless navigation between pages and combined everything in the App.jsx file to bring the entire application together.
Congratulations! You have successfully built the SMART on EPIC application that connects to Epic’s oAuth and fetches patient details.
Your hard work has paid off!
Join our FHIR Fundamentals course to learn more about building healthcare applications. You’ll receive step-by-step guidance on the fundamentals of FHIR with which you can create your app, driving innovation and improving patient care.