Catalonia's openEHR CDR for 8 Million People
Catalonia wanted an openEHR Clinical Data Repository for 8 million people. Medblocks worked with IBM and vitagroup to design the sync layer for hospitals.
January 2, 2026
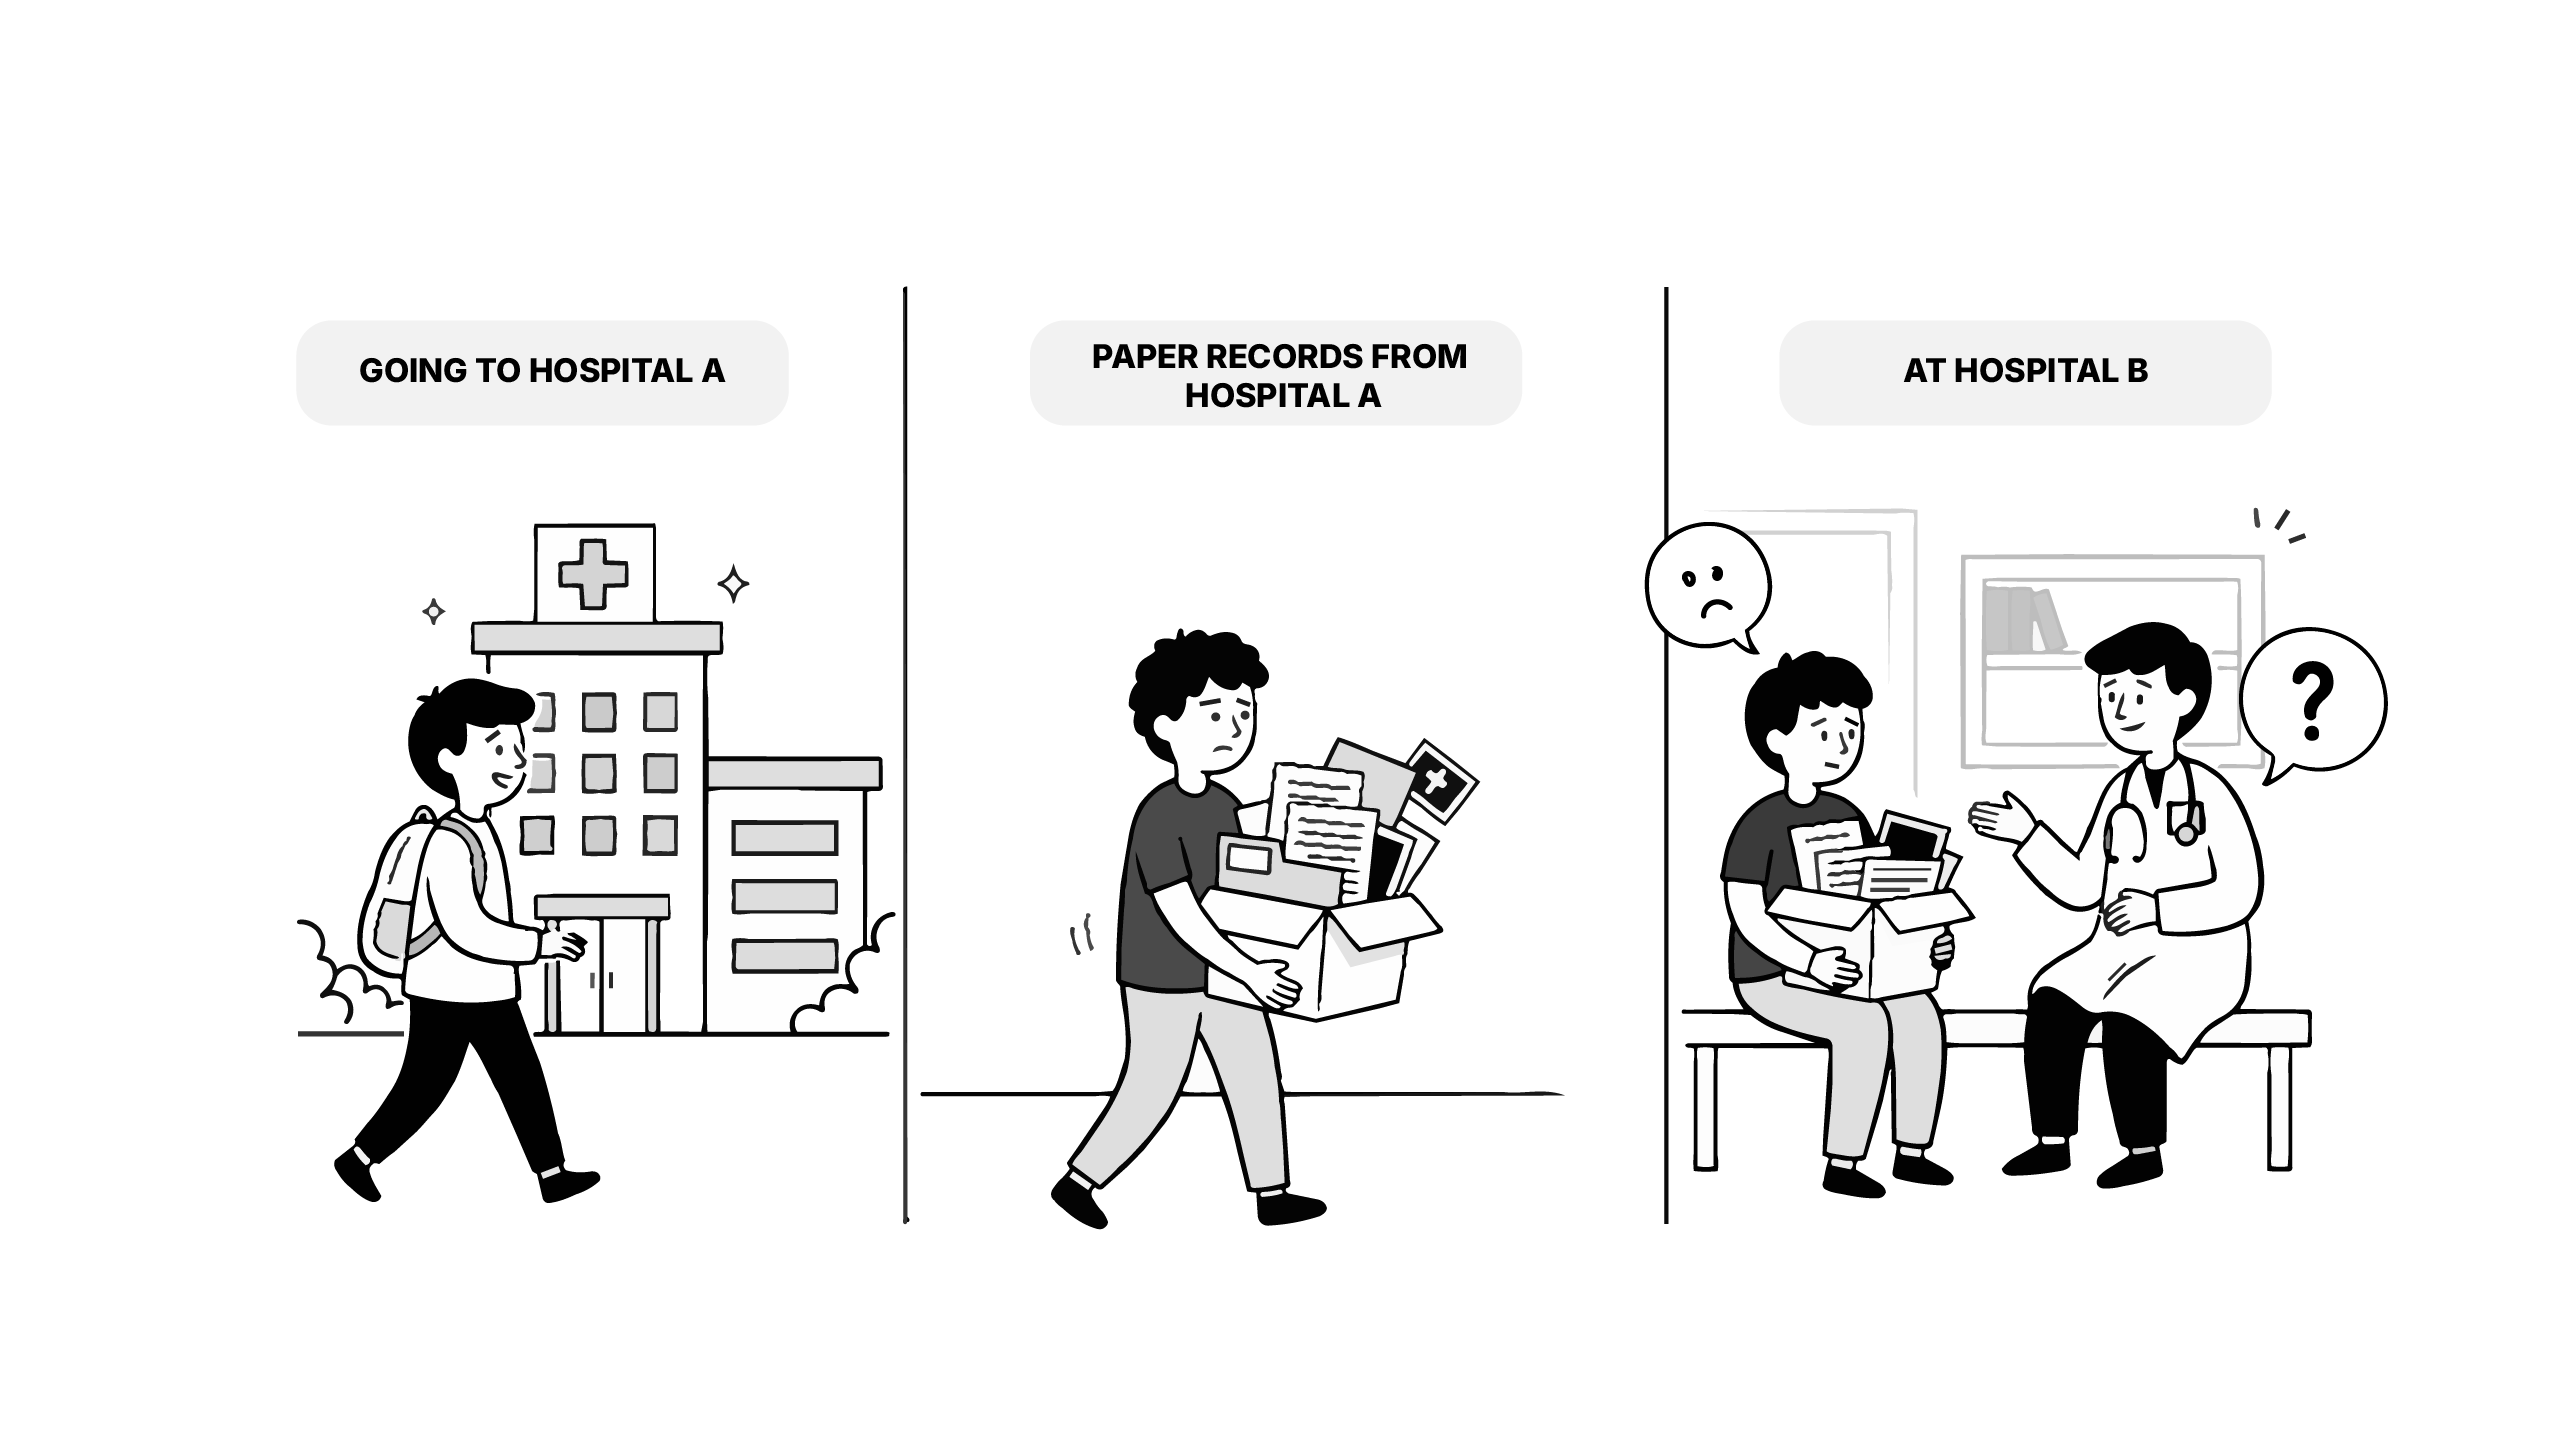
Back in the 1990s and early 2000s, patient information was often created and stored as documents. The problem was that these weren’t easy to share.
If a patient moved between different facilities or even departments, their medical history didn’t always follow them. Doctors didn’t know what tests had been done, and patients had to transport their own records. This was inefficient, expensive, and sometimes dangerous.
That’s the exact gap XDS was designed to solve.
XDS or Cross-Enterprise Document Sharing is an interoperability profile maintained by IHE (Integrating the Healthcare Enterprise) that standardizes how healthcare organizations can publish, find, and retrieve clinical documents across organizational boundaries, without forcing everyone to centralize their data.
Here, we’ll cover two objectives:
A lot of healthcare information was created as documents such as lab reports, discharge notes, imaging results and saving these inside one hospital was straightforward. The trouble started when the patient would go somewhere else. The next organization often has no reliable way to know the document is there, where it’s stored, or how to get it without phone calls, faxes, or someone carrying a file from one place to another.
XDS solved this by separating storage from discovery. The document itself stays in a Repository. The information that makes it searchable like who it’s for, who created it, what kind of document it is, and where it can be retrieved from, goes into a Registry.
So when someone needs a document, they query the Registry first, learn which Repository holds it, and then retrieve it directly from there.
The best part of XDS is in what it doesn’t need. There’s no central data warehouse, no forcing everyone onto the same system, and no single authority taking ownership of patient records. Instead, XDS uses a federated model, where each hospital keeps its documents in its own repository, but shares enough metadata through a common registry for others to find and retrieve what they need.
In many health systems, the default idea of “sharing” is centralization. That is to put everything in one place and make everyone connect to it. It looks neat on an architecture diagram, but it rarely survives contact with reality. Different organizations run different systems, follow different rules, and don’t want to give up control of their data.
XDS takes the opposite route. It keeps storage local and makes discovery shared. Each organization stores documents in its own Repository, and the Registry acts as a common index that points to those documents. The Registry tells you what exists and where it lives, but it doesn’t store the documents themselves.
That’s what federated means in XDS. Many independent repositories are connected by a shared registry, so documents can be found and retrieved across boundaries without being centralized.
XDS is built around four roles that show up in every exchange. The first is the Document Source, which is simply the system that creates the document in the first place, like a lab system producing a report.
The document is then sent to a Document Repository, which stores the actual file. Alongside that, XDS maintains a Document Registry. The Registry holds the details of the document, making it searchable, like which patient it belongs to, who created it, and where it can be retrieved from.
Finally, there is the Document Consumer, which is the system that needs to find and download the document, such as an EHR or a viewer.
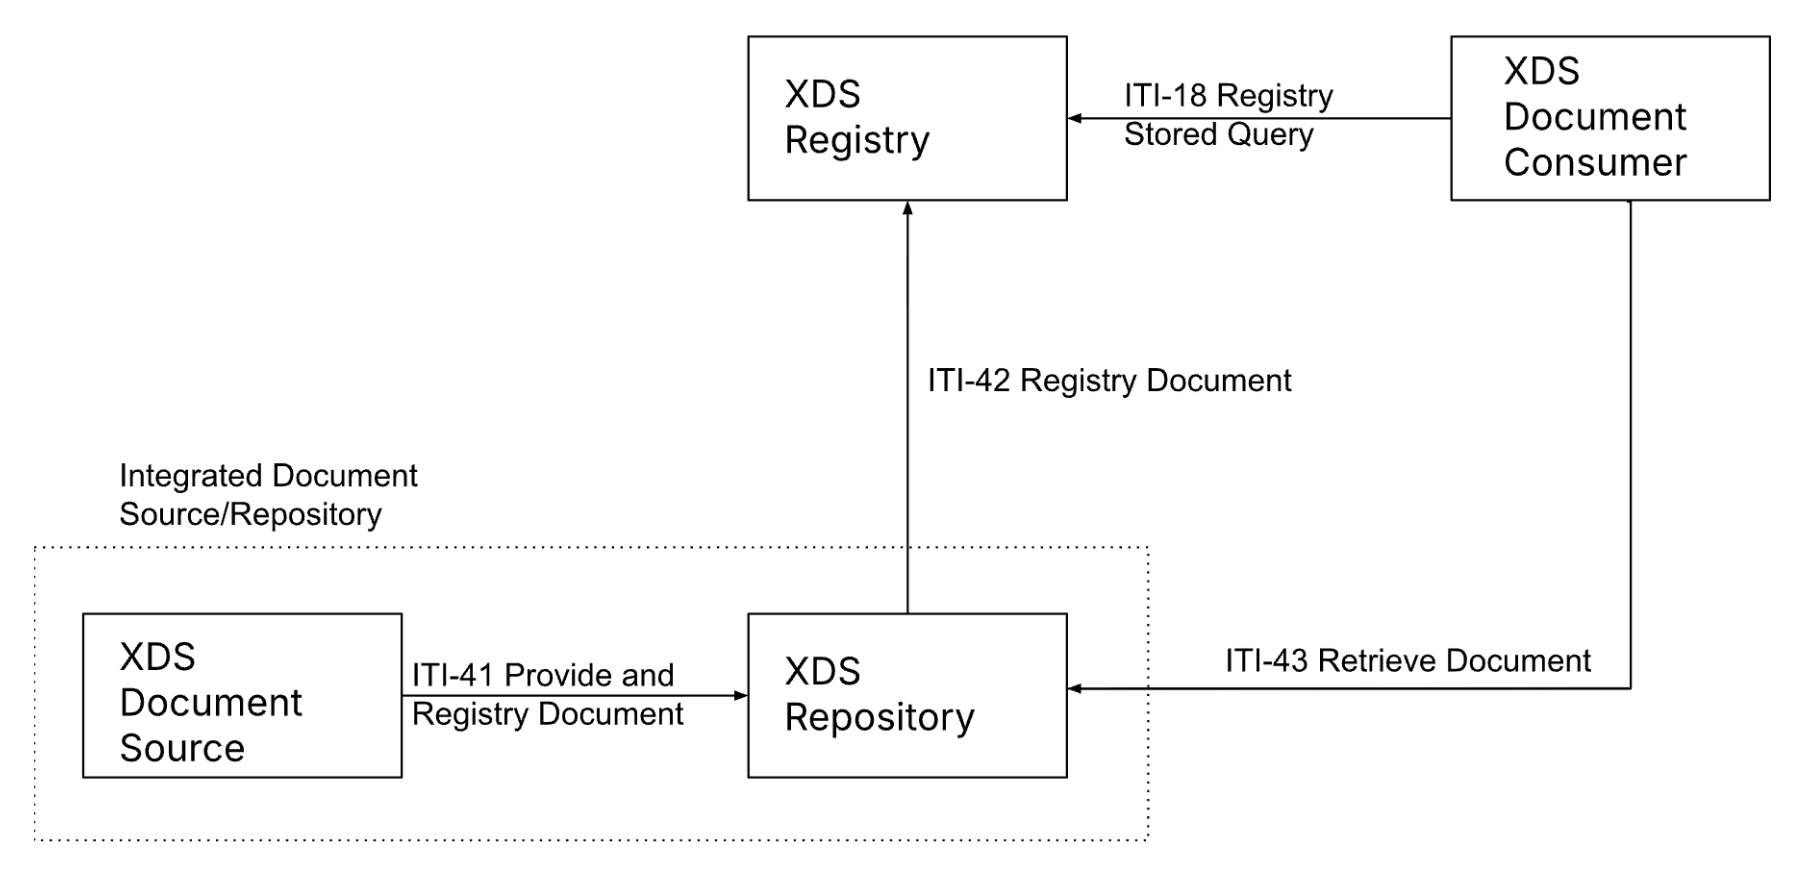
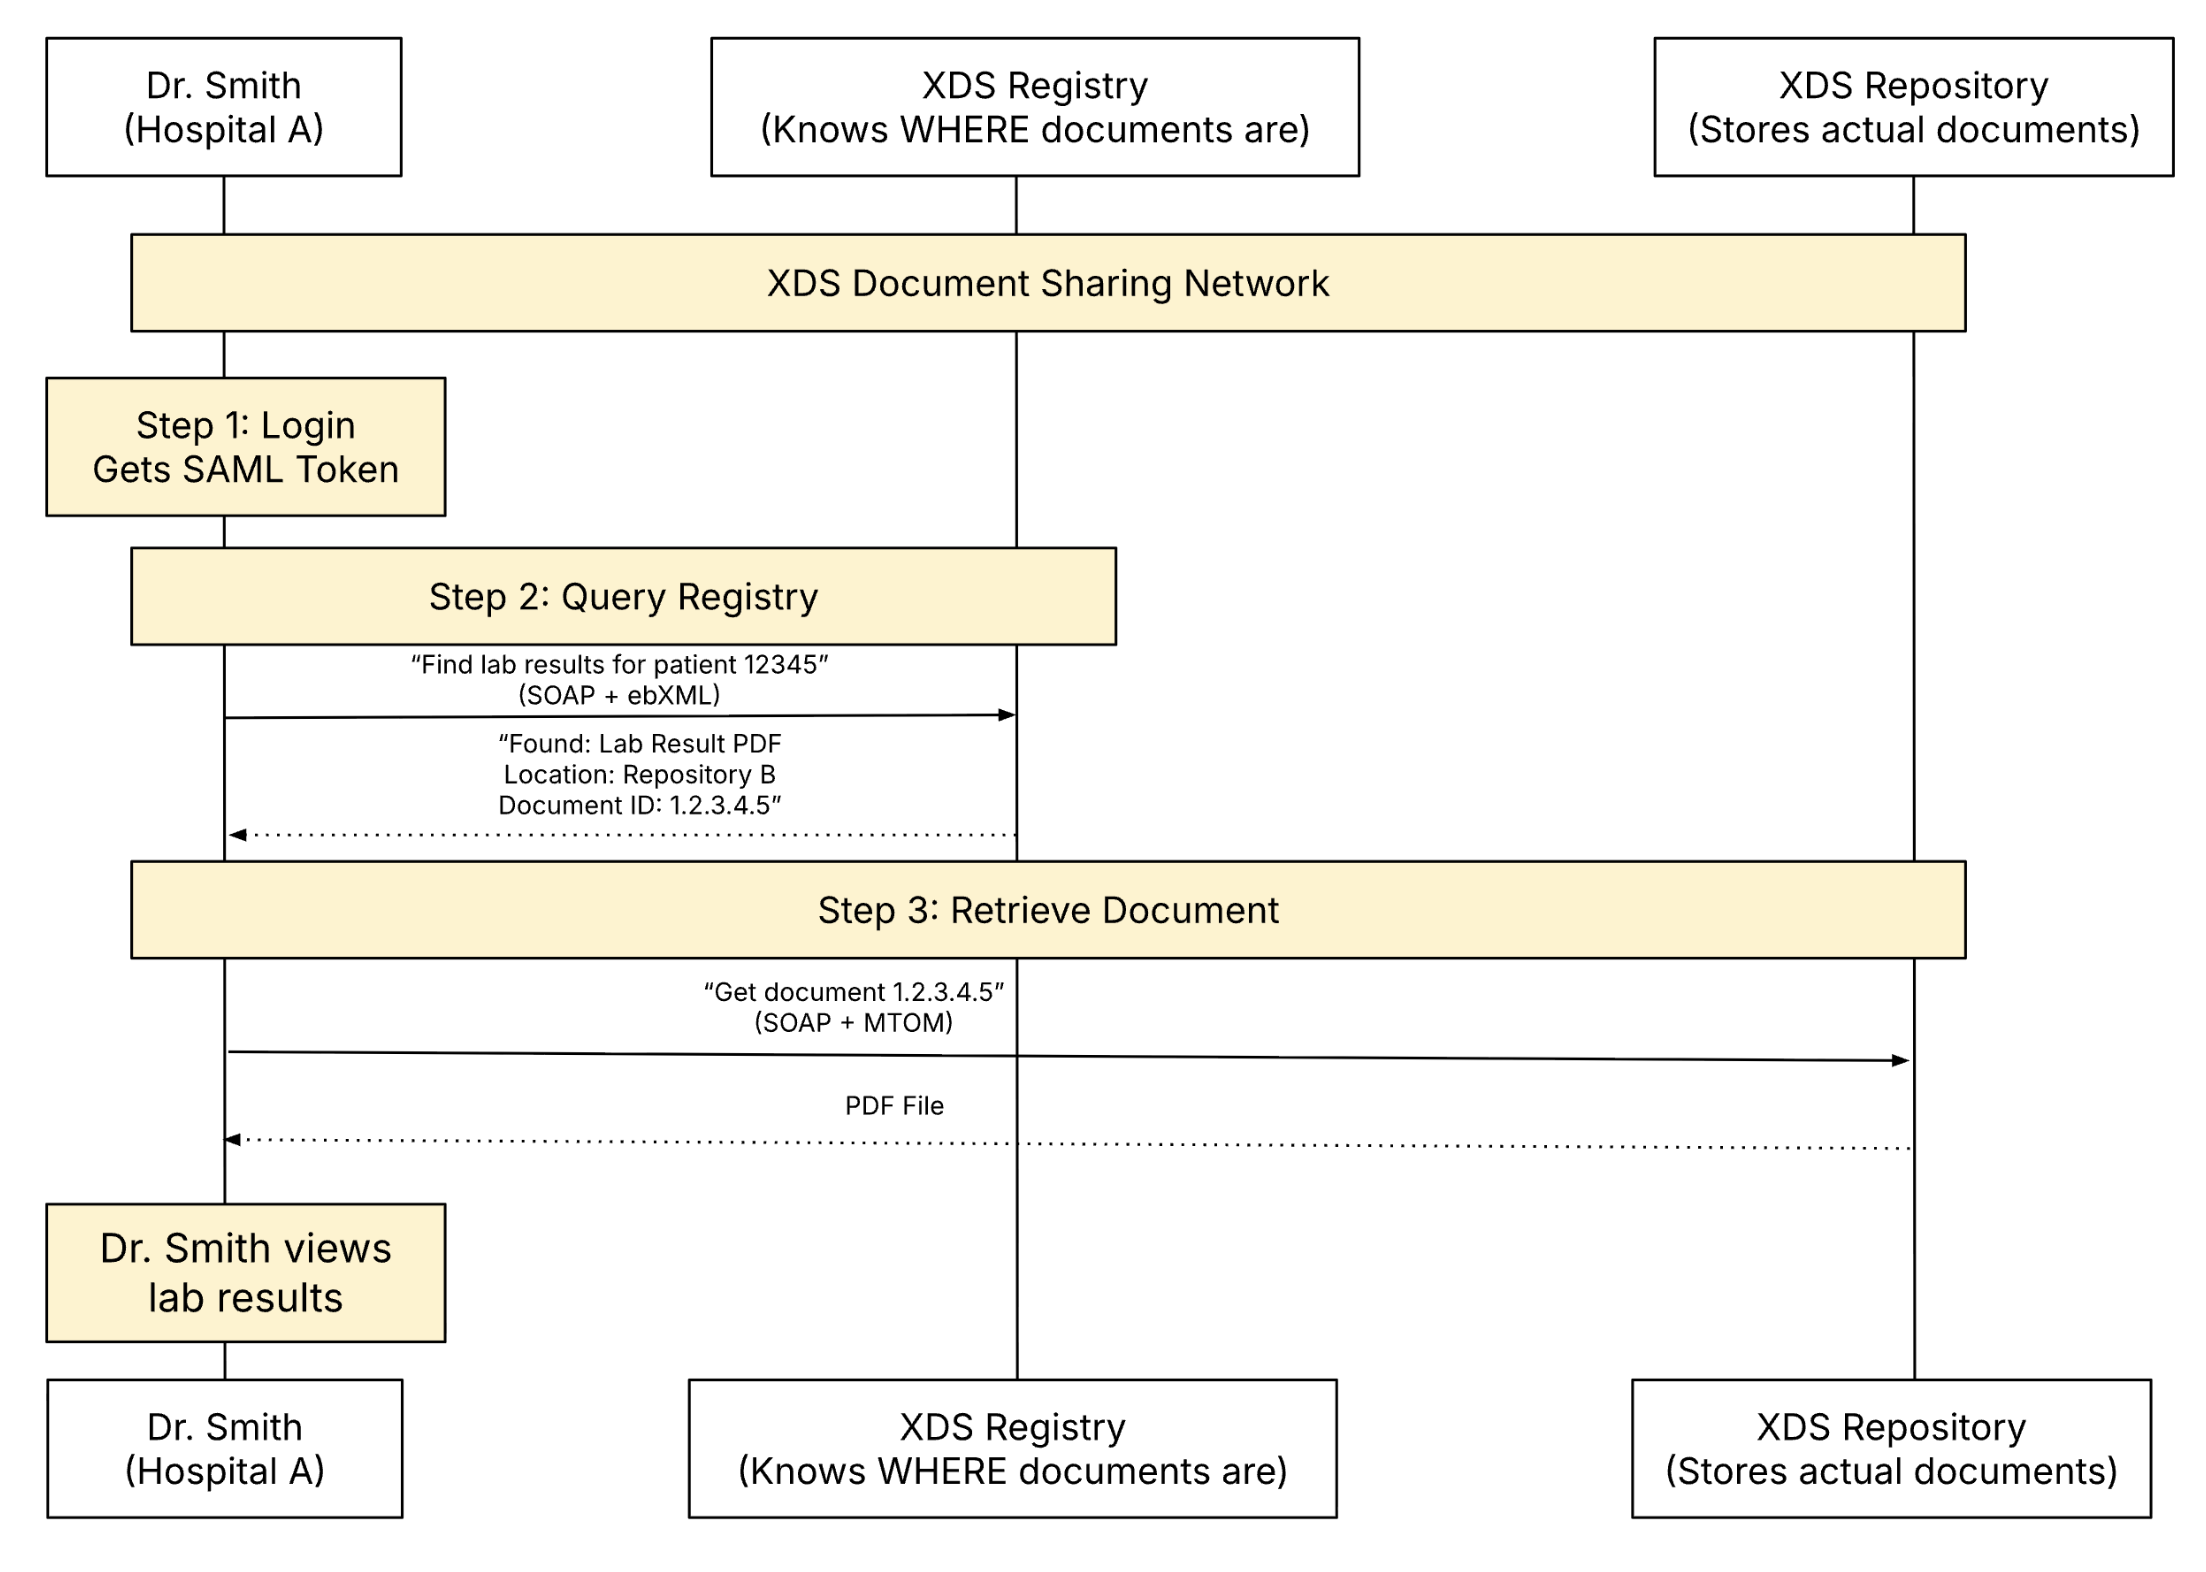
Once you know these roles, the exchange flow is pretty straightforward and is done using four transactions (rules). When a document is created, the Source submits it to the Repository using the Provide and Register Transaction (ITI-41).

The Repository stores the document and then registers its metadata with the Registry using the Register Document Set-b (ITI-42).

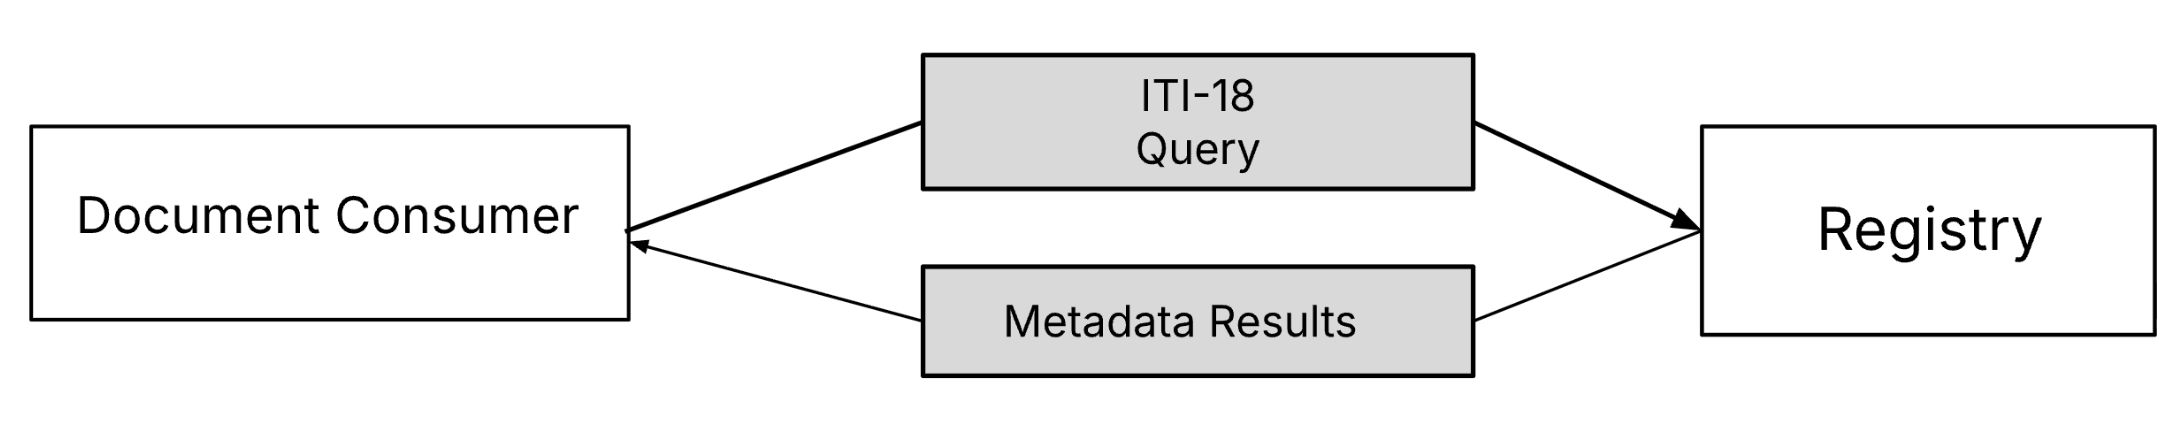
Later, when another system needs that document, the Consumer queries the Registry using a Stored Query (ITI-18). The Registry replies with matches and, importantly, tells the Consumer which Repository holds each document.
The Consumer then retrieves the document directly from the Repository using Retrieve Document Set Transaction (ITI-43).

That’s the full loop. The document is stored once, indexed once, and then discovered and retrieved whenever it’s needed.
XDS has a surprisingly good testing ecosystem. The easiest way to explore it is the NIST XDS Toolkit, which includes:
Clone the repo and build the image:
git clone https://github.com/medblocks/xds-starter.gitAnd then run:
docker build -t xdstools .Run the container:
docker run --rm -it \
  -p 8080:8080 -p 8888:8888 -p 8443:8443 \
  -v $PWD/cache:/your/external/cache/location \
  xdstools
First run may take a few minutes while Docker pulls dependencies.
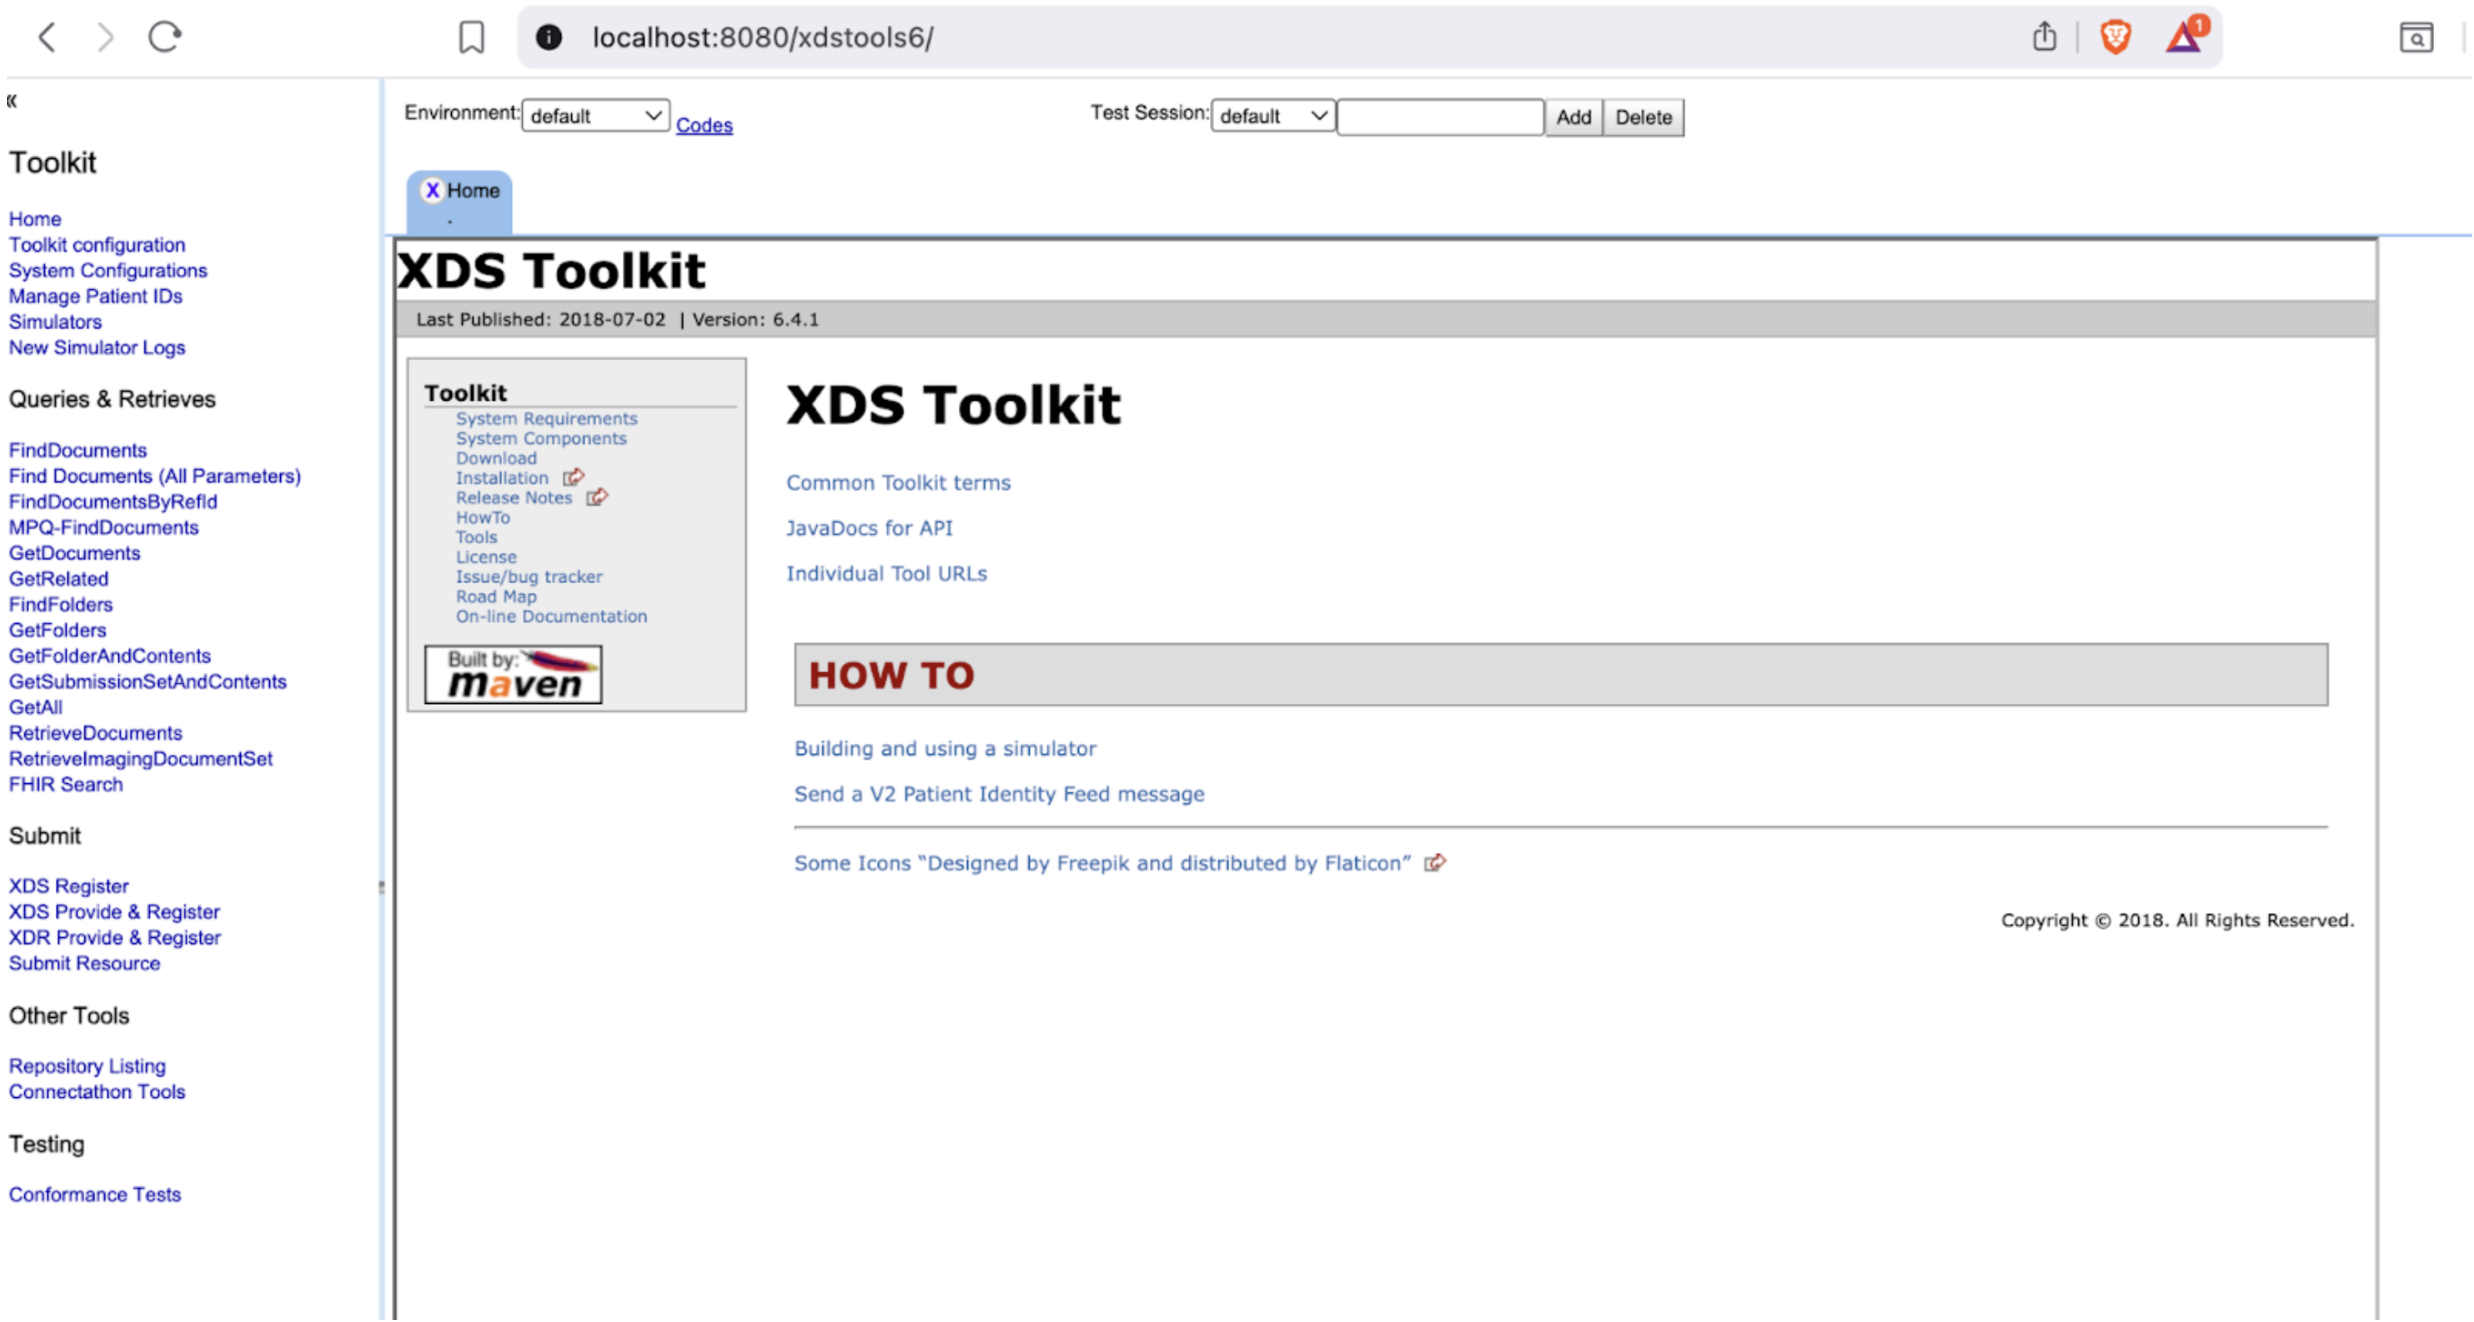
Open:
http://localhost:8080/xdstools6/You’ll land on the XDS Toolkit dashboard. This is where you’ll create simulators, wire them together, and send transactions.
Sign-in Note: If you are prompted to sign in (for example, you see “You are not signed-in. Sign In”), use the password easy.

We’re going to simulate the two backbone actors: Registry and Repository.
Confirm it’s working using the Postman request Check Registry (expect HTTP 200).
http://localhost:8080/xdstools6/rest/simulators/default__testreg
Note: The simulator names (e.g., default__testreg for the Registry and default__testrepo for the Repository) can be found in the Simulator tab in the XDS Toolkit web interface, under the ID column.
Repeat the same:
Confirm it using Postman Check Repository (expect HTTP 200).
http://localhost:8080/xdstools6/rest/simulators/default__testrepo
At this point, you have a Registry and Repository, but they don’t know about each other yet.
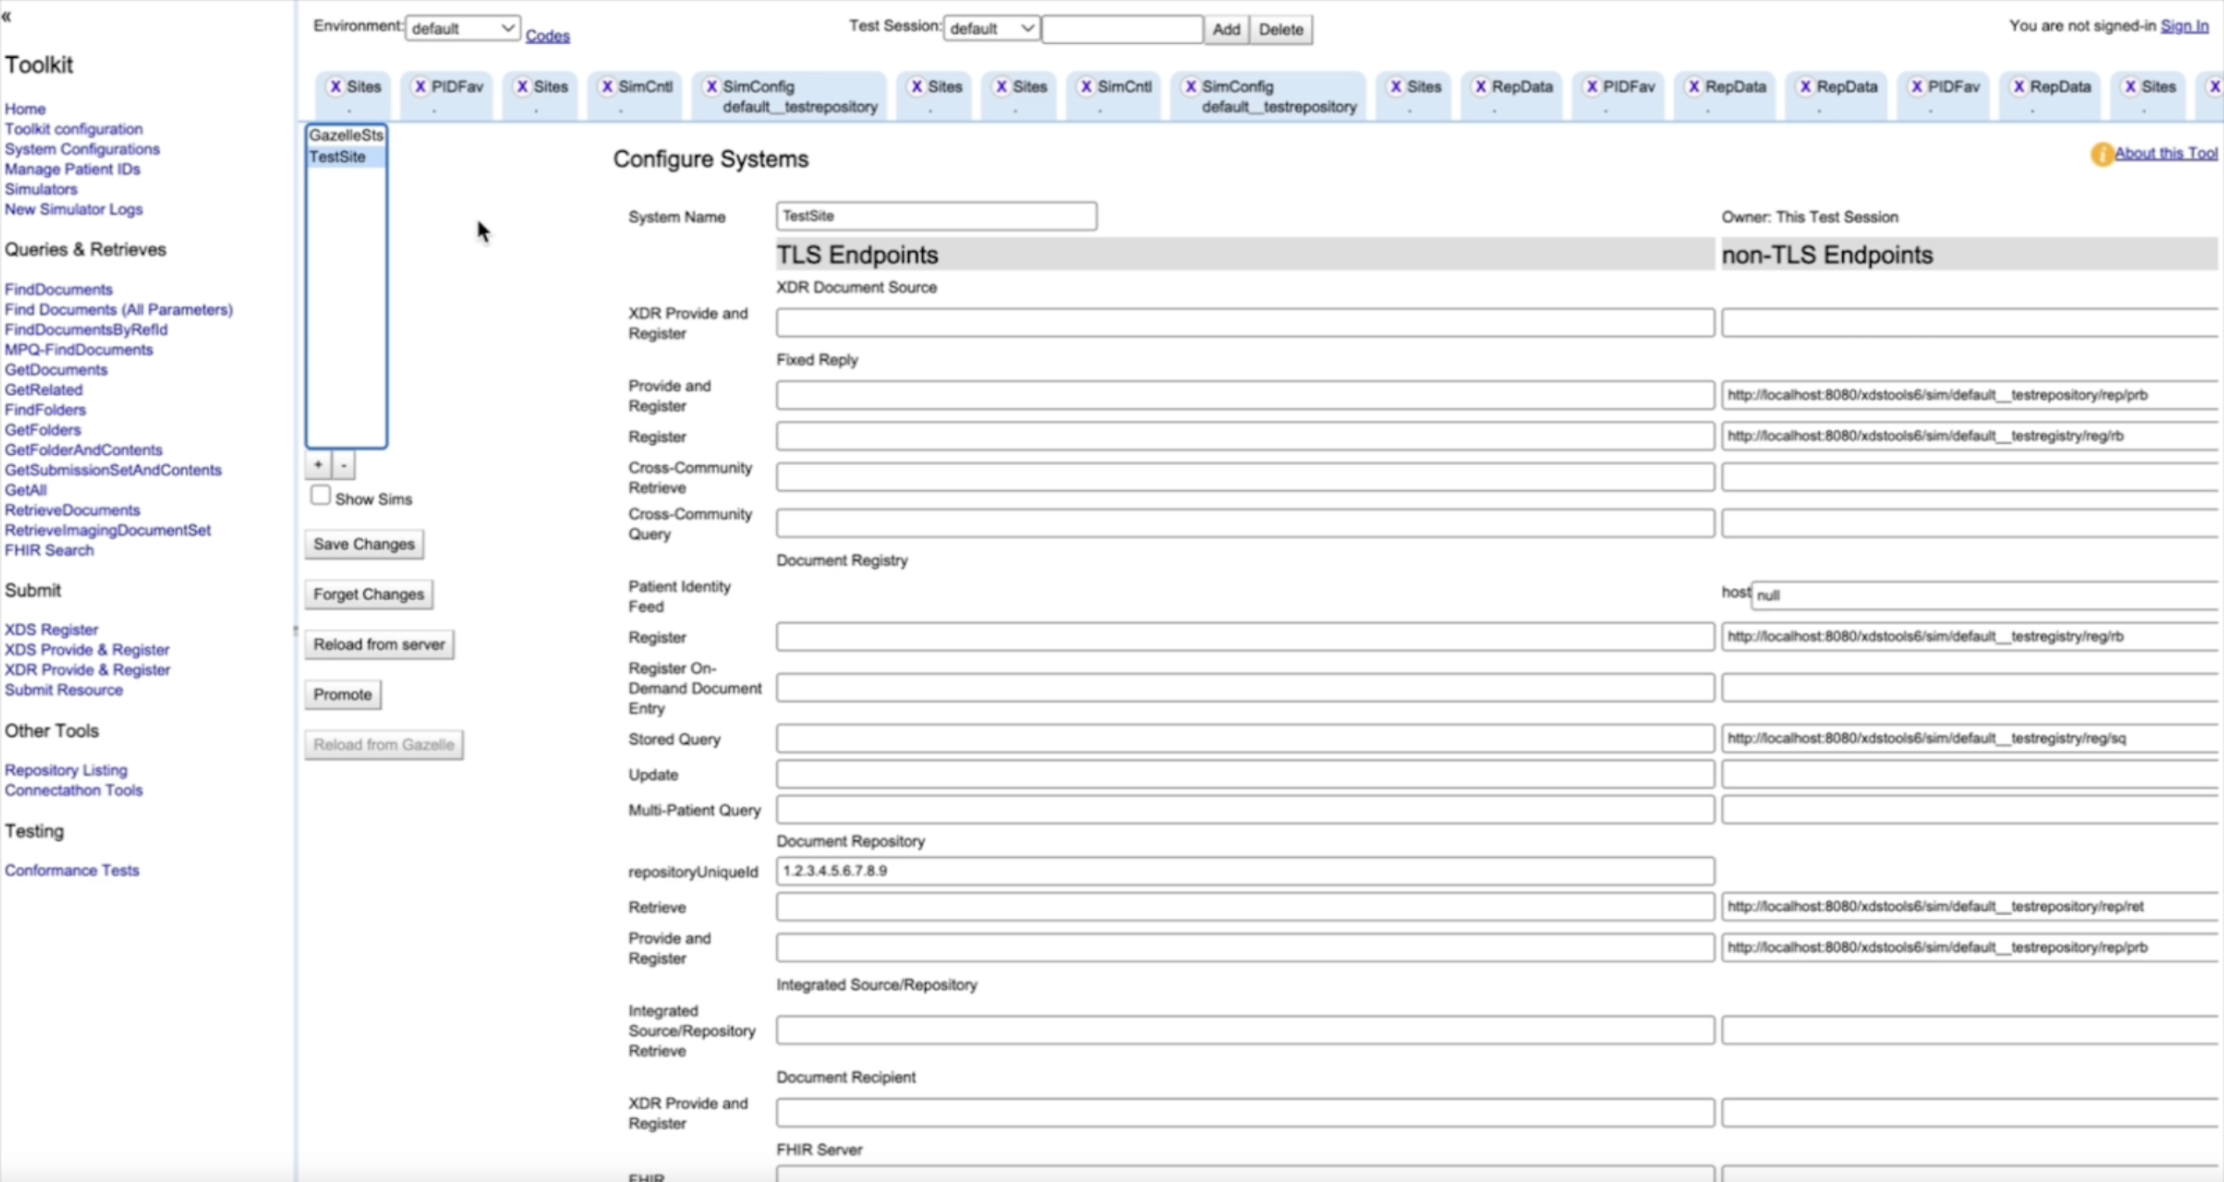
A System Configuration tells your Repository where its Registry is, and defines the endpoints used for transactions.
Also, uncheck the option “Validate Against Patient Identity Feed.” Then, paste the copied Register endpoint into the Register endpoint field in the Repository Simulator.
Click Save Changes. Now your local XDS exchange is “real” in the sense that the actors are correctly connected.
Now we’ll run the actual loop: Provide & Register → Query → Retrieve
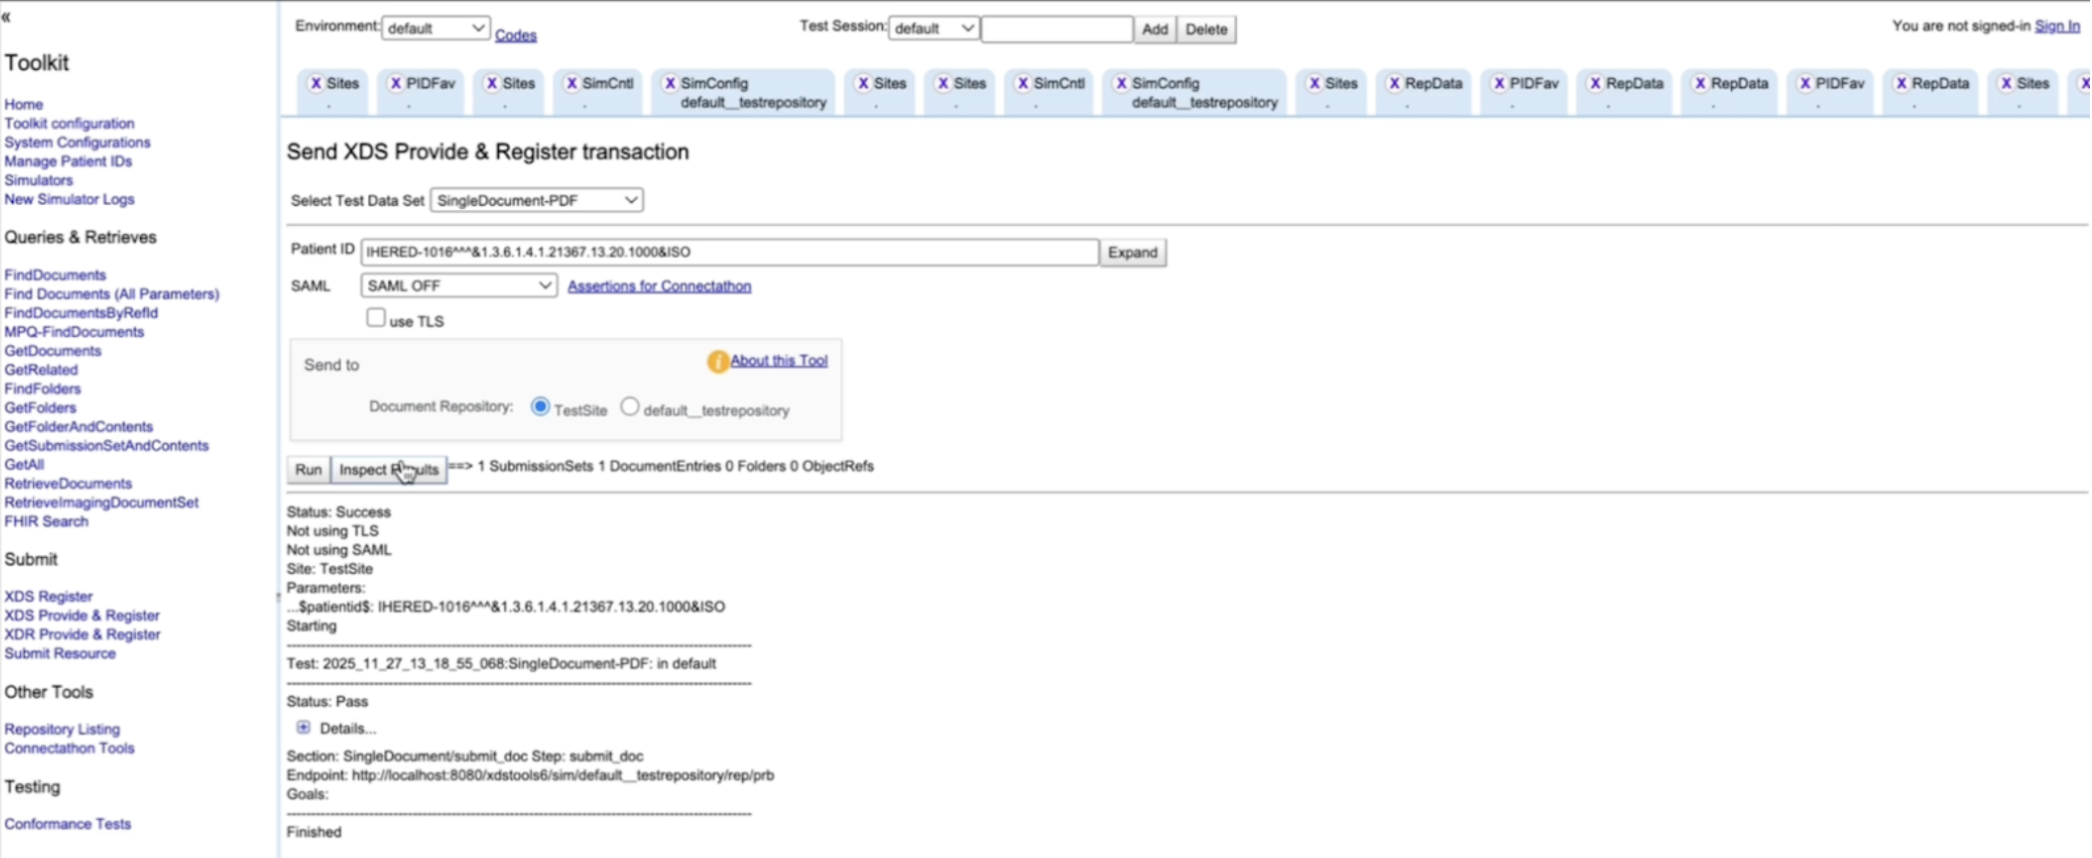
This submission happens via ITI-41, which triggers ITI-42 behind the scenes (Repository registers metadata with the Registry).
In the Toolkit UI:
If successful, you’ll see a success response and can inspect SOAP request/response logs. If you hit a 500 error (common first-time gotcha) It’s usually permissions on the cache folder. Fix it with:
sudo chown -R $USER:$(id -gn) cache/Try the submission again. **A note on SOAP:**XDS transactions are SOAP web services. SOAP is just XML-based messaging for structured requests and responses. The toolkit UI and Postman wrappers help you avoid writing SOAP manually while you learn the concepts.
Now we confirm the document is discoverable by searching the Registry. In Postman:
Note: The simulator names (e.g., default__testreg for the Registry and default__testrepo for the Repository) can be found in the Simulator tab in the XDS Toolkit web interface, under the ID column.
Request:
Method: GET
URL: http://localhost:8080/xdstools6/rest/simulators/default__testreg/xds/GetAllDocs/[PATIENT_ID]
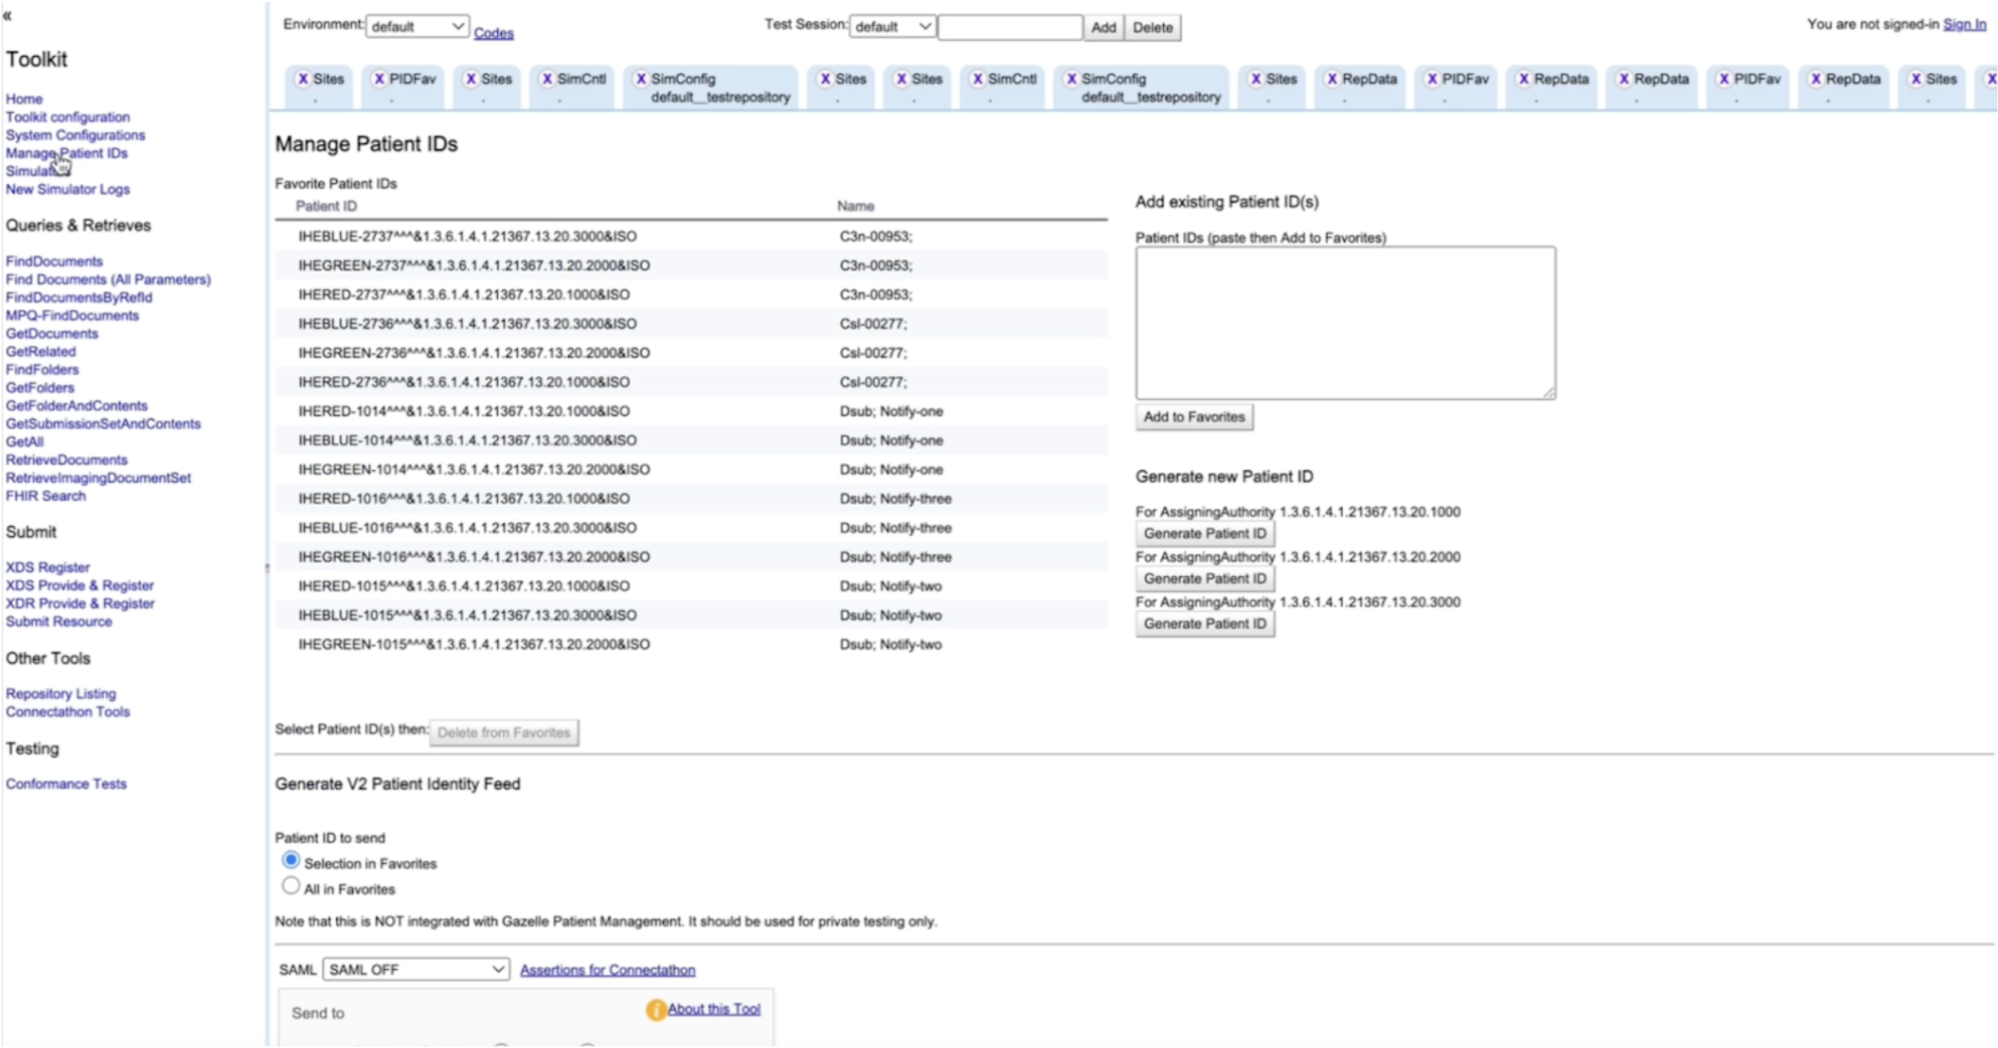
Patient ID: the same value as above Because the patient ID is in HL7 CX format, you’ll need to URL-encode it (a simple online encoder works fine).
Example:
http://localhost:8080/xdstools6/rest/simulators/default__testreg/xds/GetAllDocs/IHEBLUE-2737%5E%5E%5E%261.3.6.1.4.1.21367.13.20.3000%26ISOExpected Response:
{
   "refs": [
       "urn:uuid:11bd90eb-c4ca-45d3-8775-8e5780bd6aaa",
       "urn:uuid:6945352f-4138-4965-a144-98016dfd70d5"
   ]
}
This returns a JSON array of document entry IDs. Save one of them for the next step. Next:
Request:
Method: GET
URL: http://localhost:8080/xdstools6/rest/simulators/default__testreg/xds/GetDoc/[DOCUMENT_ENTRY_ID]
Replace [DOCUMENT_ENTRY_ID] with the ID you stored
Example:
http://localhost:8080/xdstools6/rest/simulators/default__testreg/xds/GetDoc/urn:uuid:6945352f-4138-4965-a144-98016dfd70d5Expected Response:
This returns XML metadata containing document information. Inside the XML, locate the document unique ID (the value for XDSDocumentEntry.uniqueId). This unique ID is what you’ll use to retrieve the actual payload.
The unique ID can be found in the XML response within the rim:ExternalIdentifier element where identificationScheme="urn:uuid:2e82c1f6-a085-4c72-9da3-8640a32e42ab" (which represents XDSDocumentEntry.uniqueId).
Example unique ID: 1.2.42.20260111080243.2
This returns XML metadata. Inside it, locate the document unique ID (the value for XDSDocumentEntry.uniqueId). That unique ID is what you’ll use to retrieve the actual payload.
Now fetch the document from the Repository. In Postman:
Request:
GEThttp://localhost:8080/xdstools6/rest/simulators/default__testrepo/document/[DOCUMENT_UNIQUE_ID]Replace [DOCUMENT_UNIQUE_ID] with the value extracted from the metadata XML (the XDSDocumentEntry.uniqueId value).
Example:
http://localhost:8080/xdstools6/rest/simulators/default__testrepo/document/1.2.42.20260111080243.2You’ll receive something like:
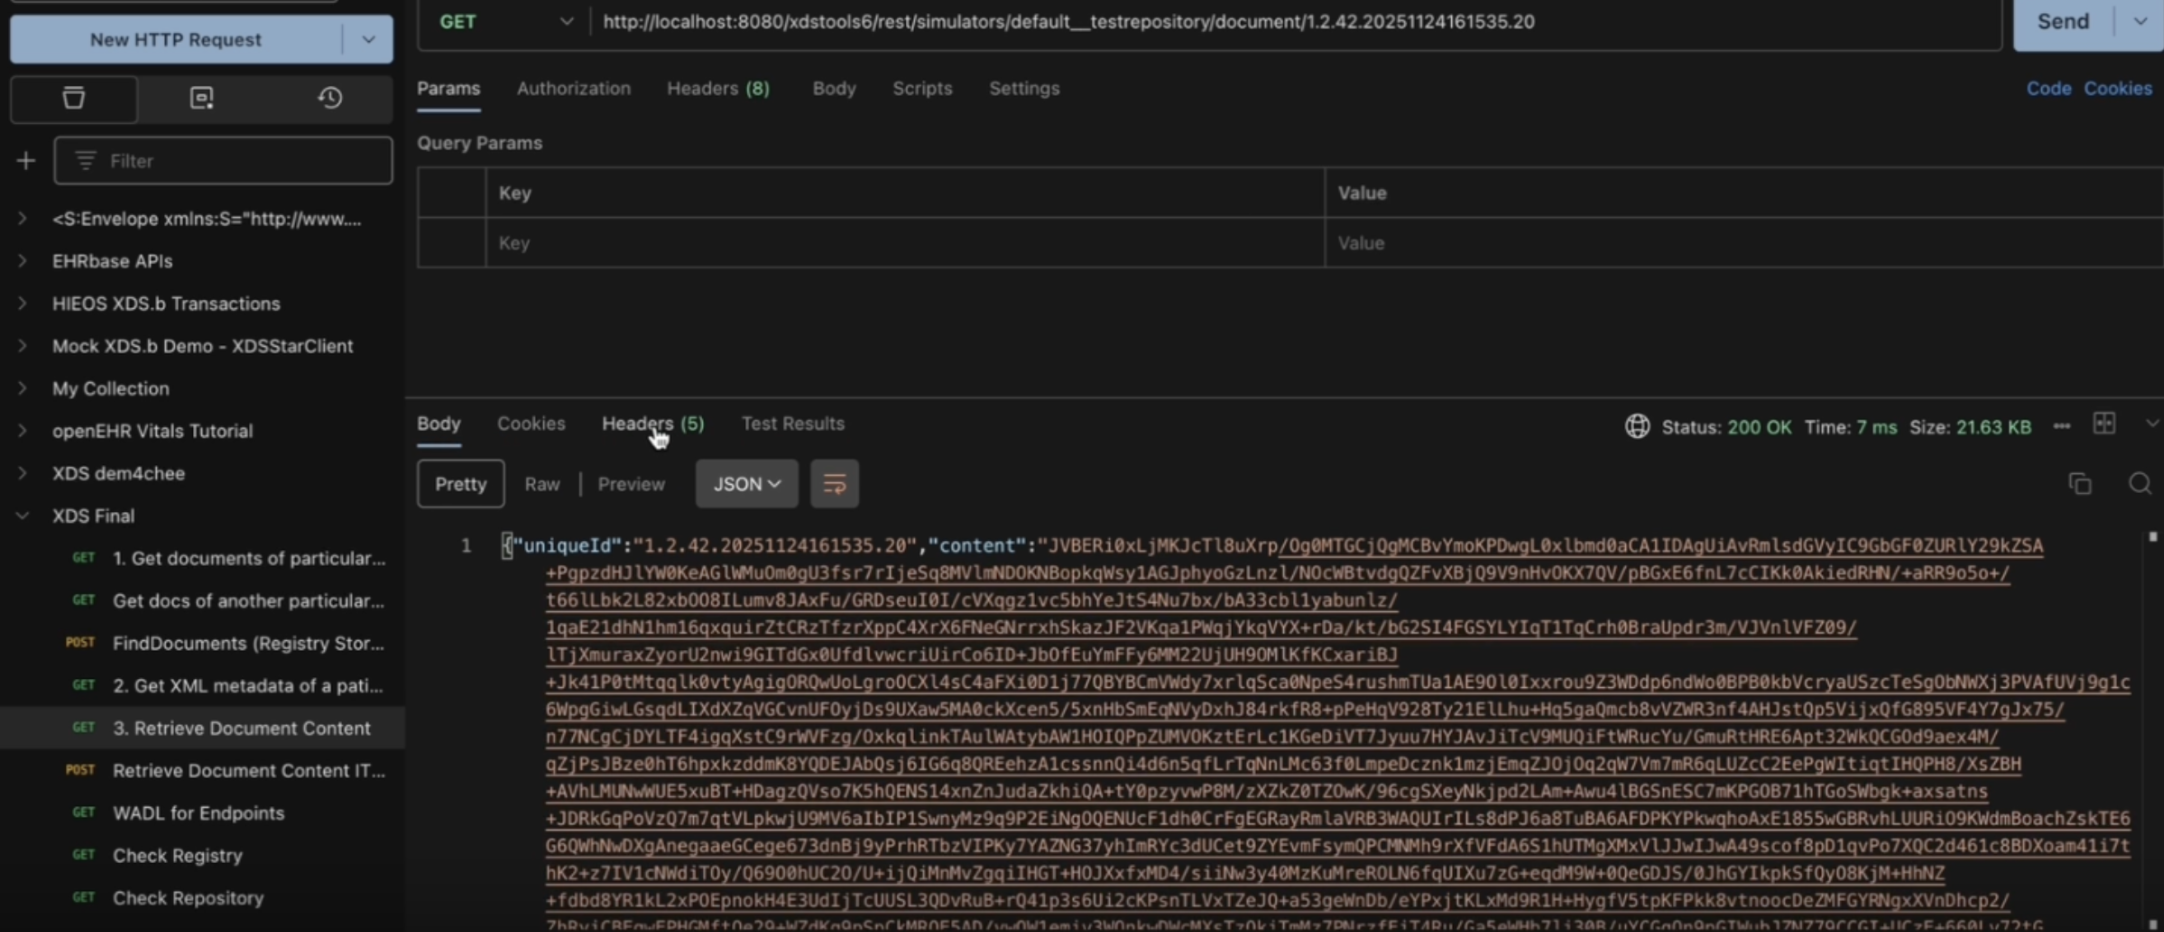
{
  "uniqueId": "1.2.42.20251124161535.20",
  "content": "BASE64_ENCODED_CONTENT_HERE",
  "mimeType": "application/pdf"
}
The payload comes back in Base64.
Copy and save the response JSON into document_response.json in the xdstools-docker folder and run: python decode_document.py or python3 decode_document.py.
The decoded file will appear in the same folder.
#!/usr/bin/env python3
import json
import base64

# Read the JSON file
with open('document_response.json', 'r') as f:
    data = json.load(f)

# Decode the base64 content
content_base64 = data['content']
pdf_bytes = base64.b64decode(content_base64)

# Save the decoded PDF
with open('decoded_document.pdf', 'wb') as f:
    f.write(pdf_bytes)

print("Saved decoded PDF to decoded_document.pdf")

# Try to extract text (requires PyPDF2 or pdfplumber)
try:
    import pdfplumber
    from io import BytesIO

    with pdfplumber.open(BytesIO(pdf_bytes)) as pdf:
        text = ""
        for page in pdf.pages:
            text += (page.extract_text() or "") + "\n"

except ImportError:
    try:
        import PyPDF2
        from io import BytesIO

        reader = PyPDF2.PdfReader(BytesIO(pdf_bytes))
        text = ""
        for page in reader.pages:
            text += (page.extract_text() or "") + "\n"

    except ImportError:
        print("Install PyPDF2 or pdfplumber: pip install PyPDF2 pdfplumber")
        text = ""

if text:
    with open('decoded_document.txt', 'w', encoding='utf-8') as f:
        f.write(text)
print("Text extracted and saved to decoded_document.txt")XDS was created because patient care often involves more than one organization, and clinicians need a reliable way to find and pull the right clinical documents from other organizations when they need them. It offers a clean way to make documents discoverable and retrievable across boundaries without forcing everyone onto the same system or into a single central database. That design choice is why it has held up for so long in real health networks.
But the real lesson is bigger than the transactions. XDS works when the surrounding pieces are treated as first-class concerns. That means consistent patient identity, good metadata, clear rules about who can publish and who can consume, and the operational discipline to keep registries and repositories reliable. The technology gives you the rails, but the exchange only becomes dependable when the people and processes around it are designed just as carefully.
Catalonia wanted an openEHR Clinical Data Repository for 8 million people. Medblocks worked with IBM and vitagroup to design the sync layer for hospitals.
We walk you through building a FHIR server on top of Couchbase's NoSQL database, covering challenges, technical decisions, architecture, and local setup.

Learn to build a Python FHIR Facade using FastAPI and PostgreSQL to expose legacy EHR data as FHIR APIs supporting read search operations and interoperability
No comments yet. Be the first to comment!