eClinicalWorks Integration Guide
eClinicalWorks is one of the largest privately held healthcare IT companies, serving more than 180,000 physicians and nurse practitioners and over 850,000 medical professionals across 110,000+ facilities worldwide. Founded in 1999 to digitize communication between providers, pharmacies, and labs, the platform now spans more than 50 medical specialties from dental, vision, and behavioral health to ambulatory surgery centers and urgent care. Their V12 + AI release pairs the core EHR with AI-driven tooling like Sunoh.ai for ambient clinical documentation, Image AI, and the healow Genie contact center, alongside an integrated stack covering practice management, revenue cycle, value-based care, population health analytics, and patient engagement through the healow app (self-scheduling, telehealth, secure messaging). The cloud-based platform, gives providers a single chart that ties together encounters, labs, imaging, and care history from across the eClinicalWorks network. Integrate with eClinicalWorks to plug your app into that network.
This is a step-by-step guide to registering a patient-facing FHIR app against eClinicalWorks and taking it from sandbox to live practices. We use the healow Clinical API path with SMART Standalone Launch, 3-legged OAuth, and JWKS-based (asymmetric) client authentication.
eClinicalWorks splits its FHIR program across two developer portals, picking the right one matters:
| Portal | What it’s for |
|---|---|
| connect4.healow.com | Patient-centric apps standalone launch, patient logs in via the healow patient portal. |
| fhir.eclinicalworks.com/ecwopendev | Provider-centric apps, EHR-launch, and backend / bulk services. |
Setup Guide
Step 1: Create a developer account
-
Go to the healow Developer Portal and click Sign Up.
-
Complete the four-step registration form:
- Contact: first name, last name, job title, phone, work email.
- Company: company name, full address, website URL.
- Other details: industry, primary business, top 3 competitors. healow really does ask for competitors, it’s part of their authenticity check, not a marketing question.
- Security: three security questions, then accept the Terms & Conditions.
-
healow emails a verification link. Click it and set your password.
-
Sign back in with your credentials. In practice the developer account is active immediately after email verification, you can register a clinical app right away.
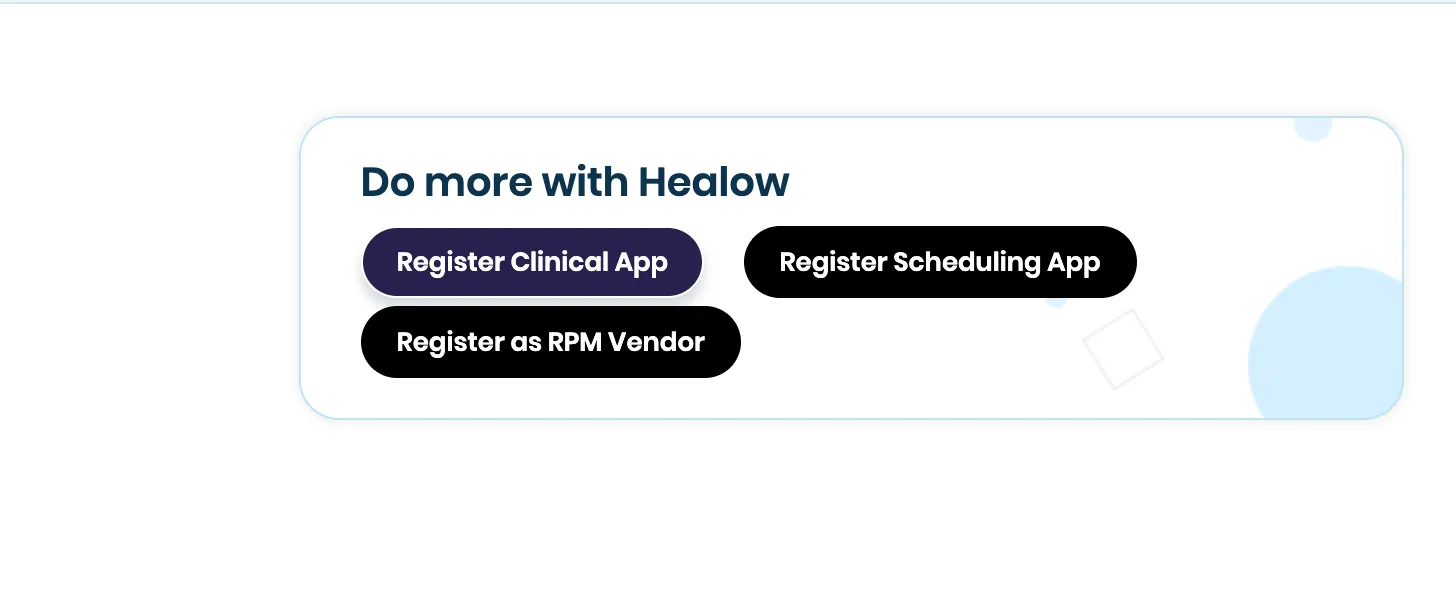
Step 2: Register your Clinical App
- After login you land on the developer console. Click “Register Clinical App”. Use “Register Scheduling App” only if you specifically need the appointment-booking API, clinical record retrieval lives under the Clinical App.
- Fill the basic app information:
- App name, description, icon. The name and description are shown to the patient on the consent screen, keep them clean and accurate.
- Launch type: Patient-centric. This is what routes login to the healow patient portal instead of the eClinicalWorks EHR login.
- Authentication method: Asymmetric (JWKS). healow also supports symmetric (client secret), but asymmetric is the SMART-preferred method and the only one we recommend , your private key never leaves your environment.
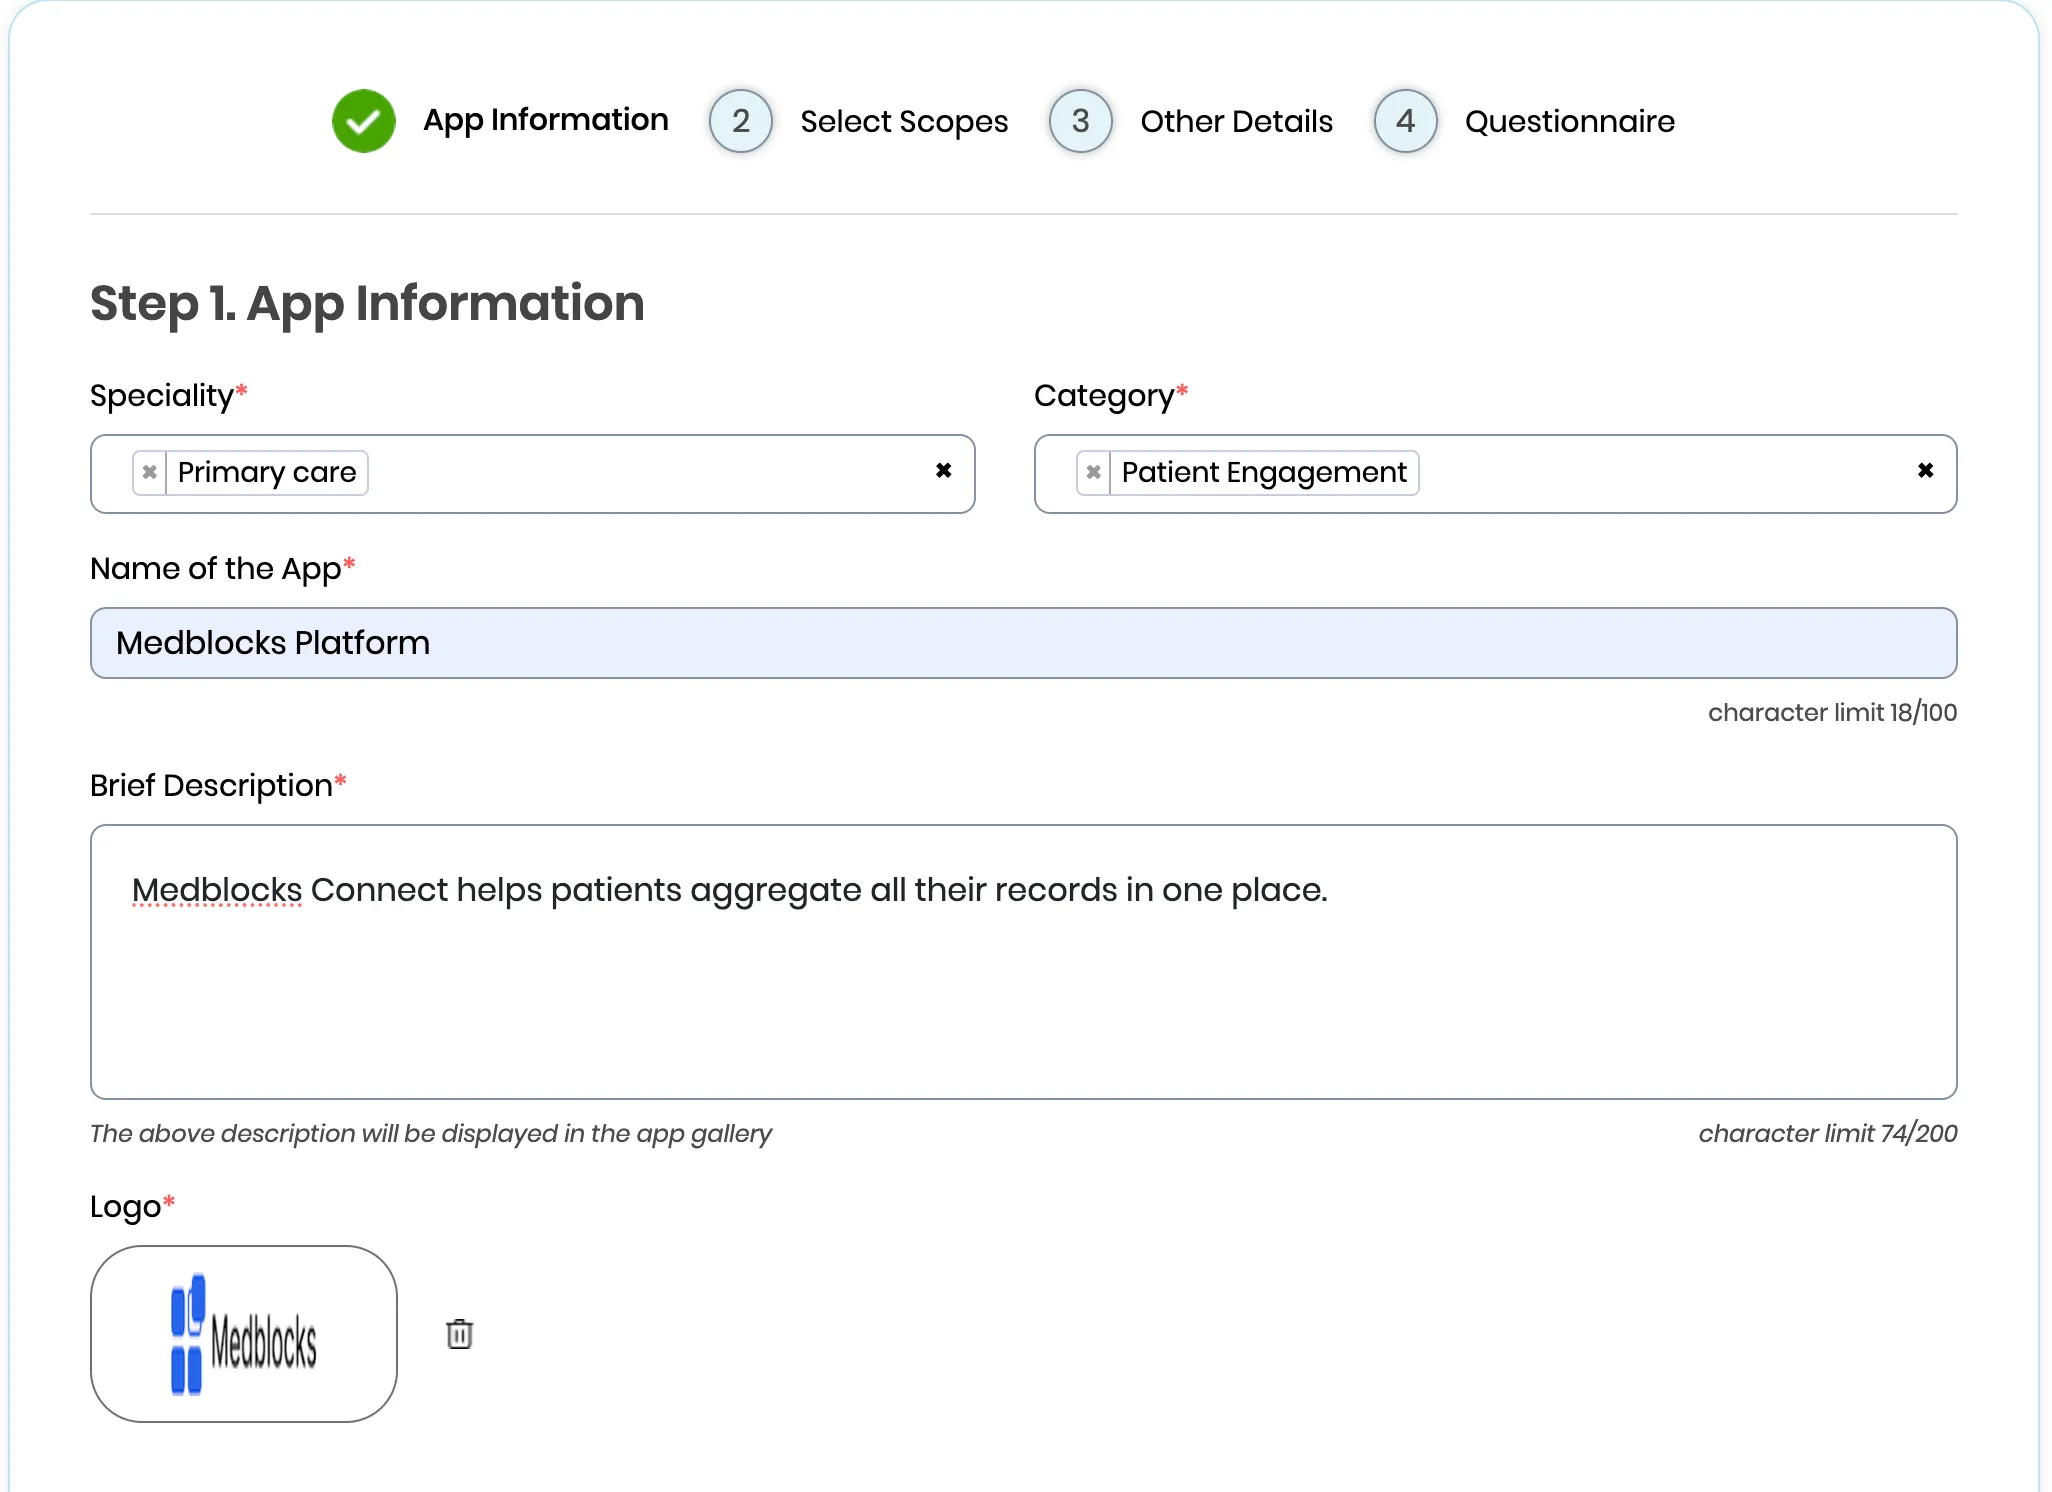
- Save the draft. You’ll fill in scopes, redirect URIs, and JWKS URL in the next steps.
Step 3: Select scopes
For patient-facing standalone apps, healow uses patient/-prefixed SMART scopes, the patient logs in via the healow patient portal and authorizes your app to read their own records.
The scope picker is a single flat list, healow gives you an “All” checkbox right at the top of the list.
- After saving the App Information step, the wizard advances to Step 2. Select Scopes. The left pane shows every patient-facing scope healow exposes (32 entries), and the right pane is your empty “Selected Scopes” basket.
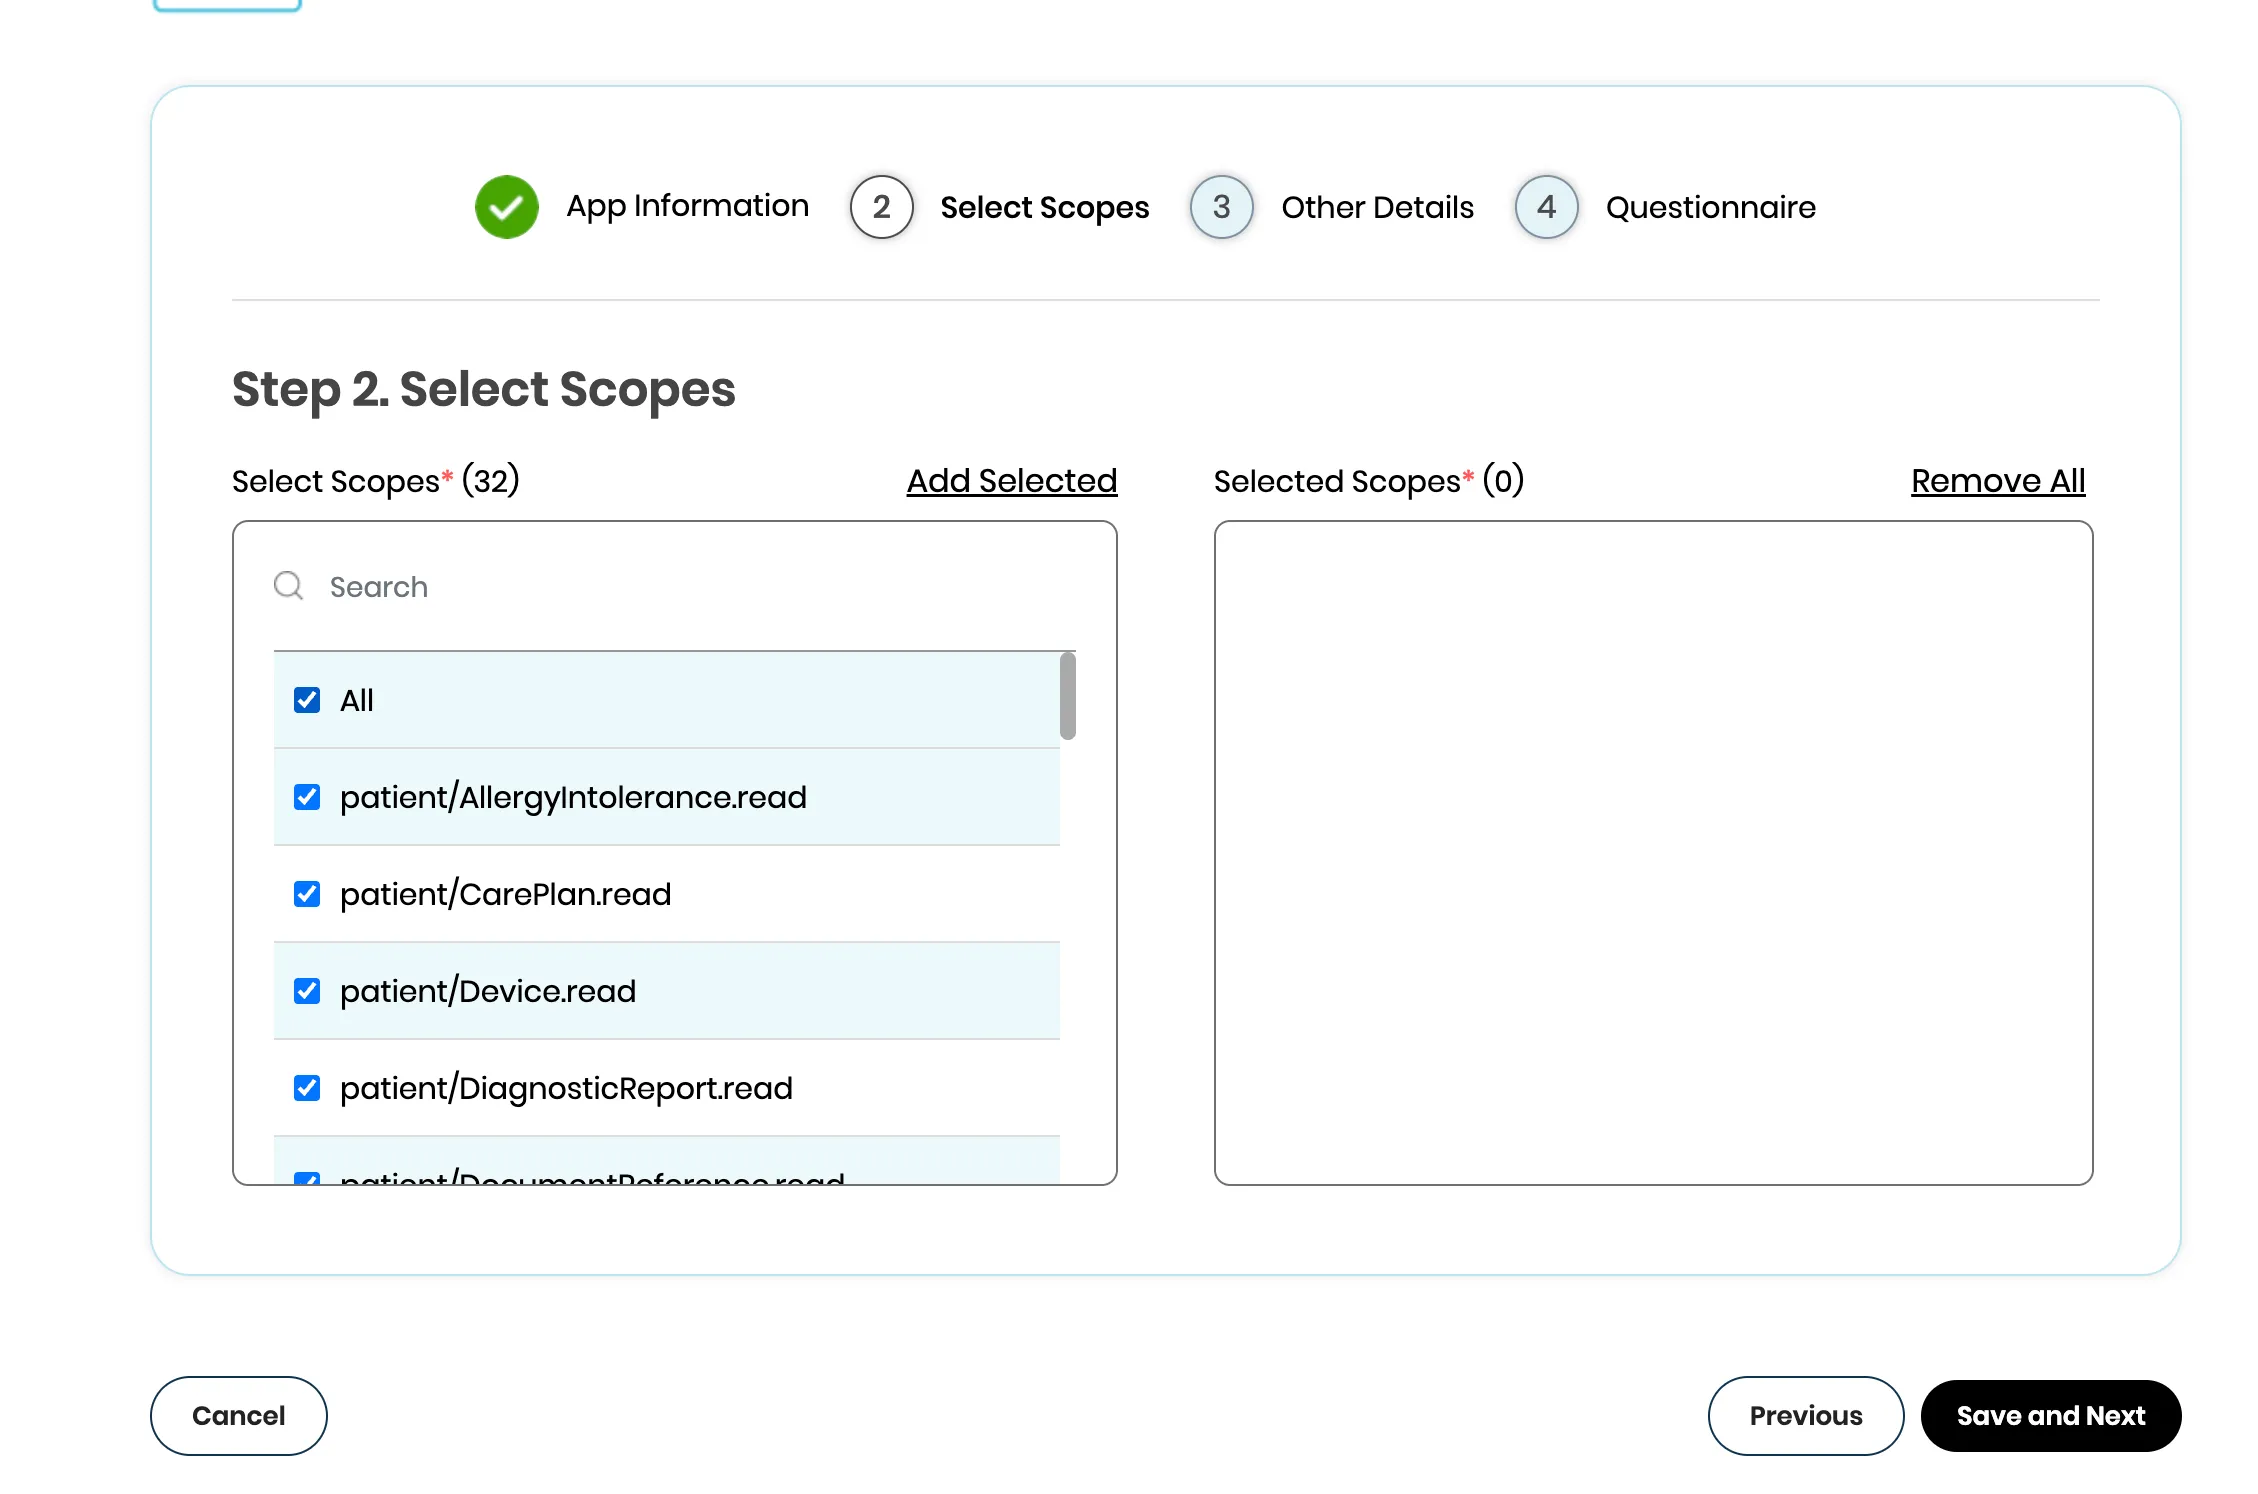
-
Tick the “All” checkbox at the top of the left pane. Every patient/<resource>.read scope below it is selected in one click. If you only need a subset, untick “All” and pick individually, the search box at the top of the left pane filters by name. Extra scopes you never read just bloat the consent screen the patient sees.
-
Click “Add Selected” in the top right of the left pane. The chosen scopes move into the right “Selected Scopes” basket, the header should now read Selected Scopes* (32).
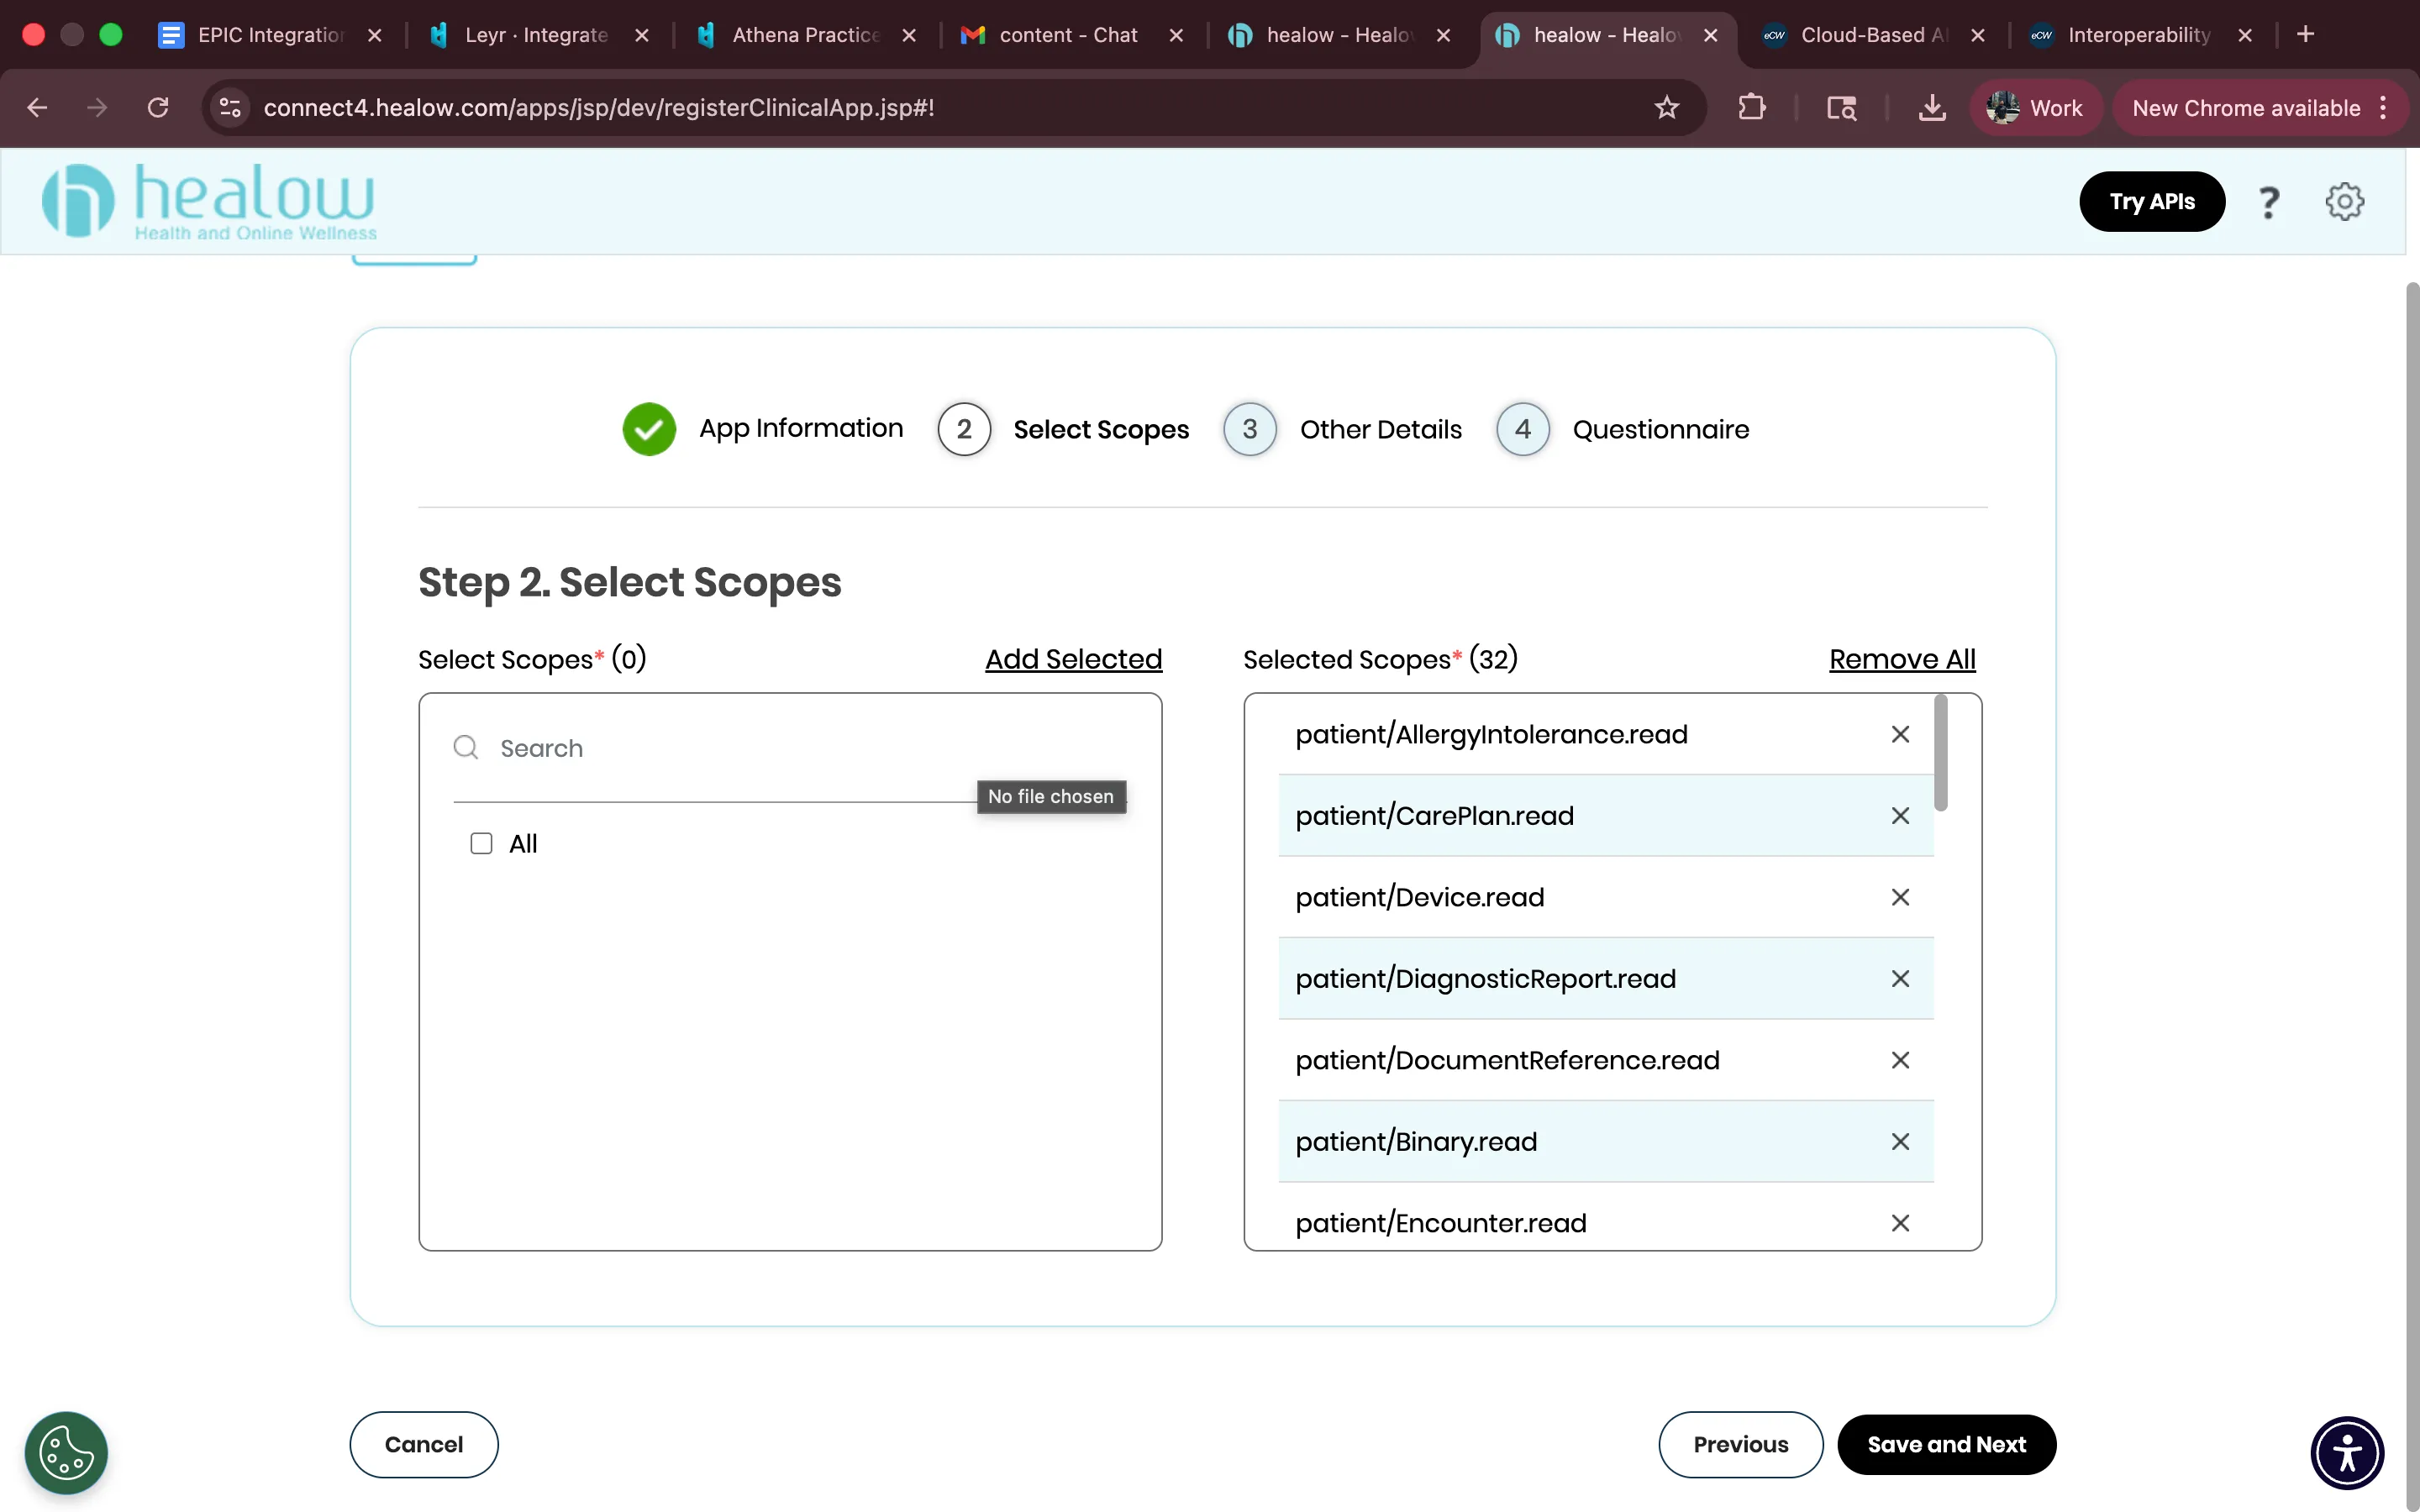
- Click “Save and Next” to advance to the Other Details step. The wizard does not auto-save; leaving this page without clicking Save and Next discards your selection.
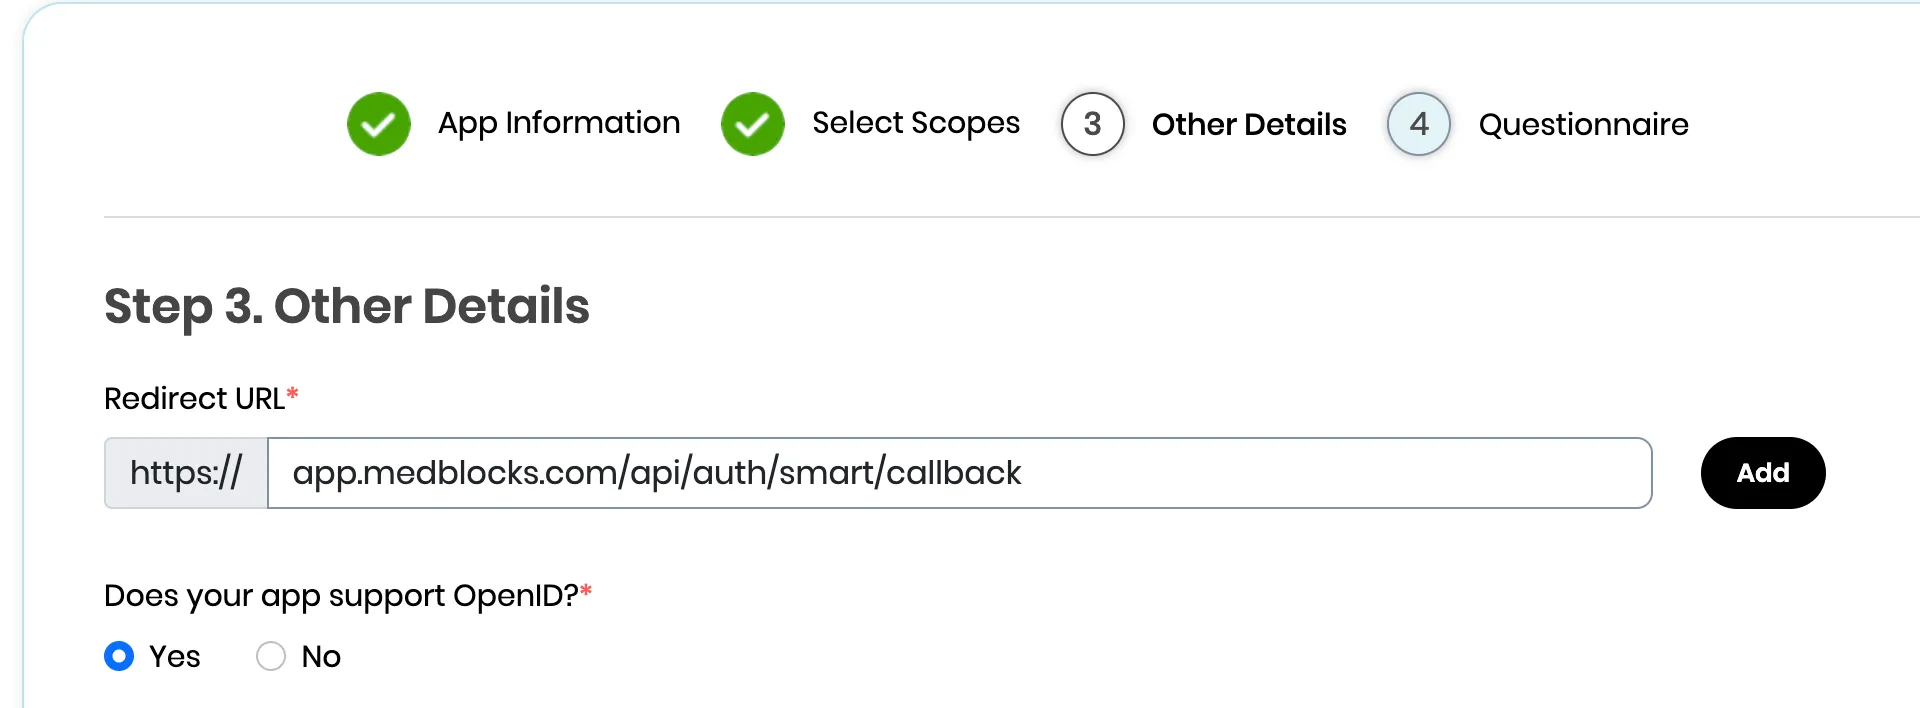
Step 4: Configure redirect URIs
-
Add your post-login redirect URIs. With Standalone Launch these are the callback URLs healow sends the patient back to after they authorize your app, so every URL your server listens on needs to be registered. You’ll typically want at least two:
- for production e.g., https://app.medblocks.com/api/auth/smart/callback if you are integrating using the medblocks platform.
- staging URL if you have one.
-
Multiple redirect URIs are supported, but they must match exactly at authorize time, a trailing slash mismatch returns a 400.
Step 5: Set up authentication
healow’s clinical API offers two client types, and within one of them, two auth methods. The choice cascades:
Confidential vs Public. A public app holds no credential and authenticates only via PKCE, appropriate for browser SPAs or native mobile apps that can’t safely keep a secret. A confidential app holds a credential (client secret or private key) and proves its identity at the token endpoint. We pick confidential because (a) Medblocks Platform has a backend that can hold a credential safely, and (b) refresh tokens are confidential-only, the healow docs are explicit that public apps “are not assigned with refresh token value,” which would force a fresh consent every time a 1-hour access token expires.
Symmetric vs Asymmetric (both confidential). Symmetric ships a pre-shared client_secret on every token request inside an HTTP Basic header, the credential crosses the wire on every call, and healow holds a copy by definition. Asymmetric registers a public key with healow and signs a client_assertion JWT with the matching private key, nothing secret ever leaves your environment. We pick asymmetric because (a) the private key never crosses the network, so a healow-side breach can’t impersonate us; (b) key rotation is mechanical via JWKS (publish the new key alongside the old.
- In the app settings, confirm Authentication Method = Asymmetric, after choosing the confidential app.
Generate your private key
- Generate an RSA key pair locally with OpenSSL:
openssl genrsa -out privatekey.pem 2048Do NOT use any online “generate JWK” websites for this. Your private key is what signs your authentication tokens. If anyone else has a copy of it, they can impersonate your app. Generate it on your machine, store it securely (environment variable or secrets manager), and never commit it to git.
- Your app needs to read this private key and serve the public portion as a JWKS at the /.well-known/jwks.json route. Here’s a minimal example with Node.js using the jose library:
import { createPrivateKey } from "crypto";
import { exportJWK, calculateJwkThumbprint } from "jose";
import { readFileSync } from "fs";
import express from "express";

const app = express();
const privateKeyPem = readFileSync("privatekey.pem", "utf-8");
const privateKey = createPrivateKey(privateKeyPem);

// Derive the public JWK from the private key
const publicJwk = await exportJWK(privateKey.export({ type: "spki", format: "pem" }));
publicJwk.alg = "RS384";
publicJwk.use = "sig";
publicJwk.kid = await calculateJwkThumbprint(publicJwk, "sha256");

app.get("/.well-known/jwks.json", (req, res) => {
  res.json({ keys: [publicJwk] });
});

app.listen(3000, () => console.log("Listening on port 3000"));- healow requires `alg: “RS384”` and `use: “sig”` this is the **only** signing algorithm accepted on the asymmetric path. Use a stable `kid`, a JWK thumbprint works well because it’s deterministic and survives redeploys.
-
Paste your public JWKS URL into the portal. The URL must be served over HTTPS from a publicly reachable host, and must return a JSON document with a keys array. healow whitelists the JWKS URL on its servers if you change the URL later, you have to update the registration before the next token exchange.
-
When you sign JWTs for healow’s token endpoint, set the JWT header’s kid to the one in your JWKS. healow fetches your /.well-known/jwks.json, matches on kid, and verifies the signature. Include the `kid` even when you only have one key today, the moment you add a second key for rotation, requests without a `kid` become ambiguous, and healow will reject them with `invalid_client`.
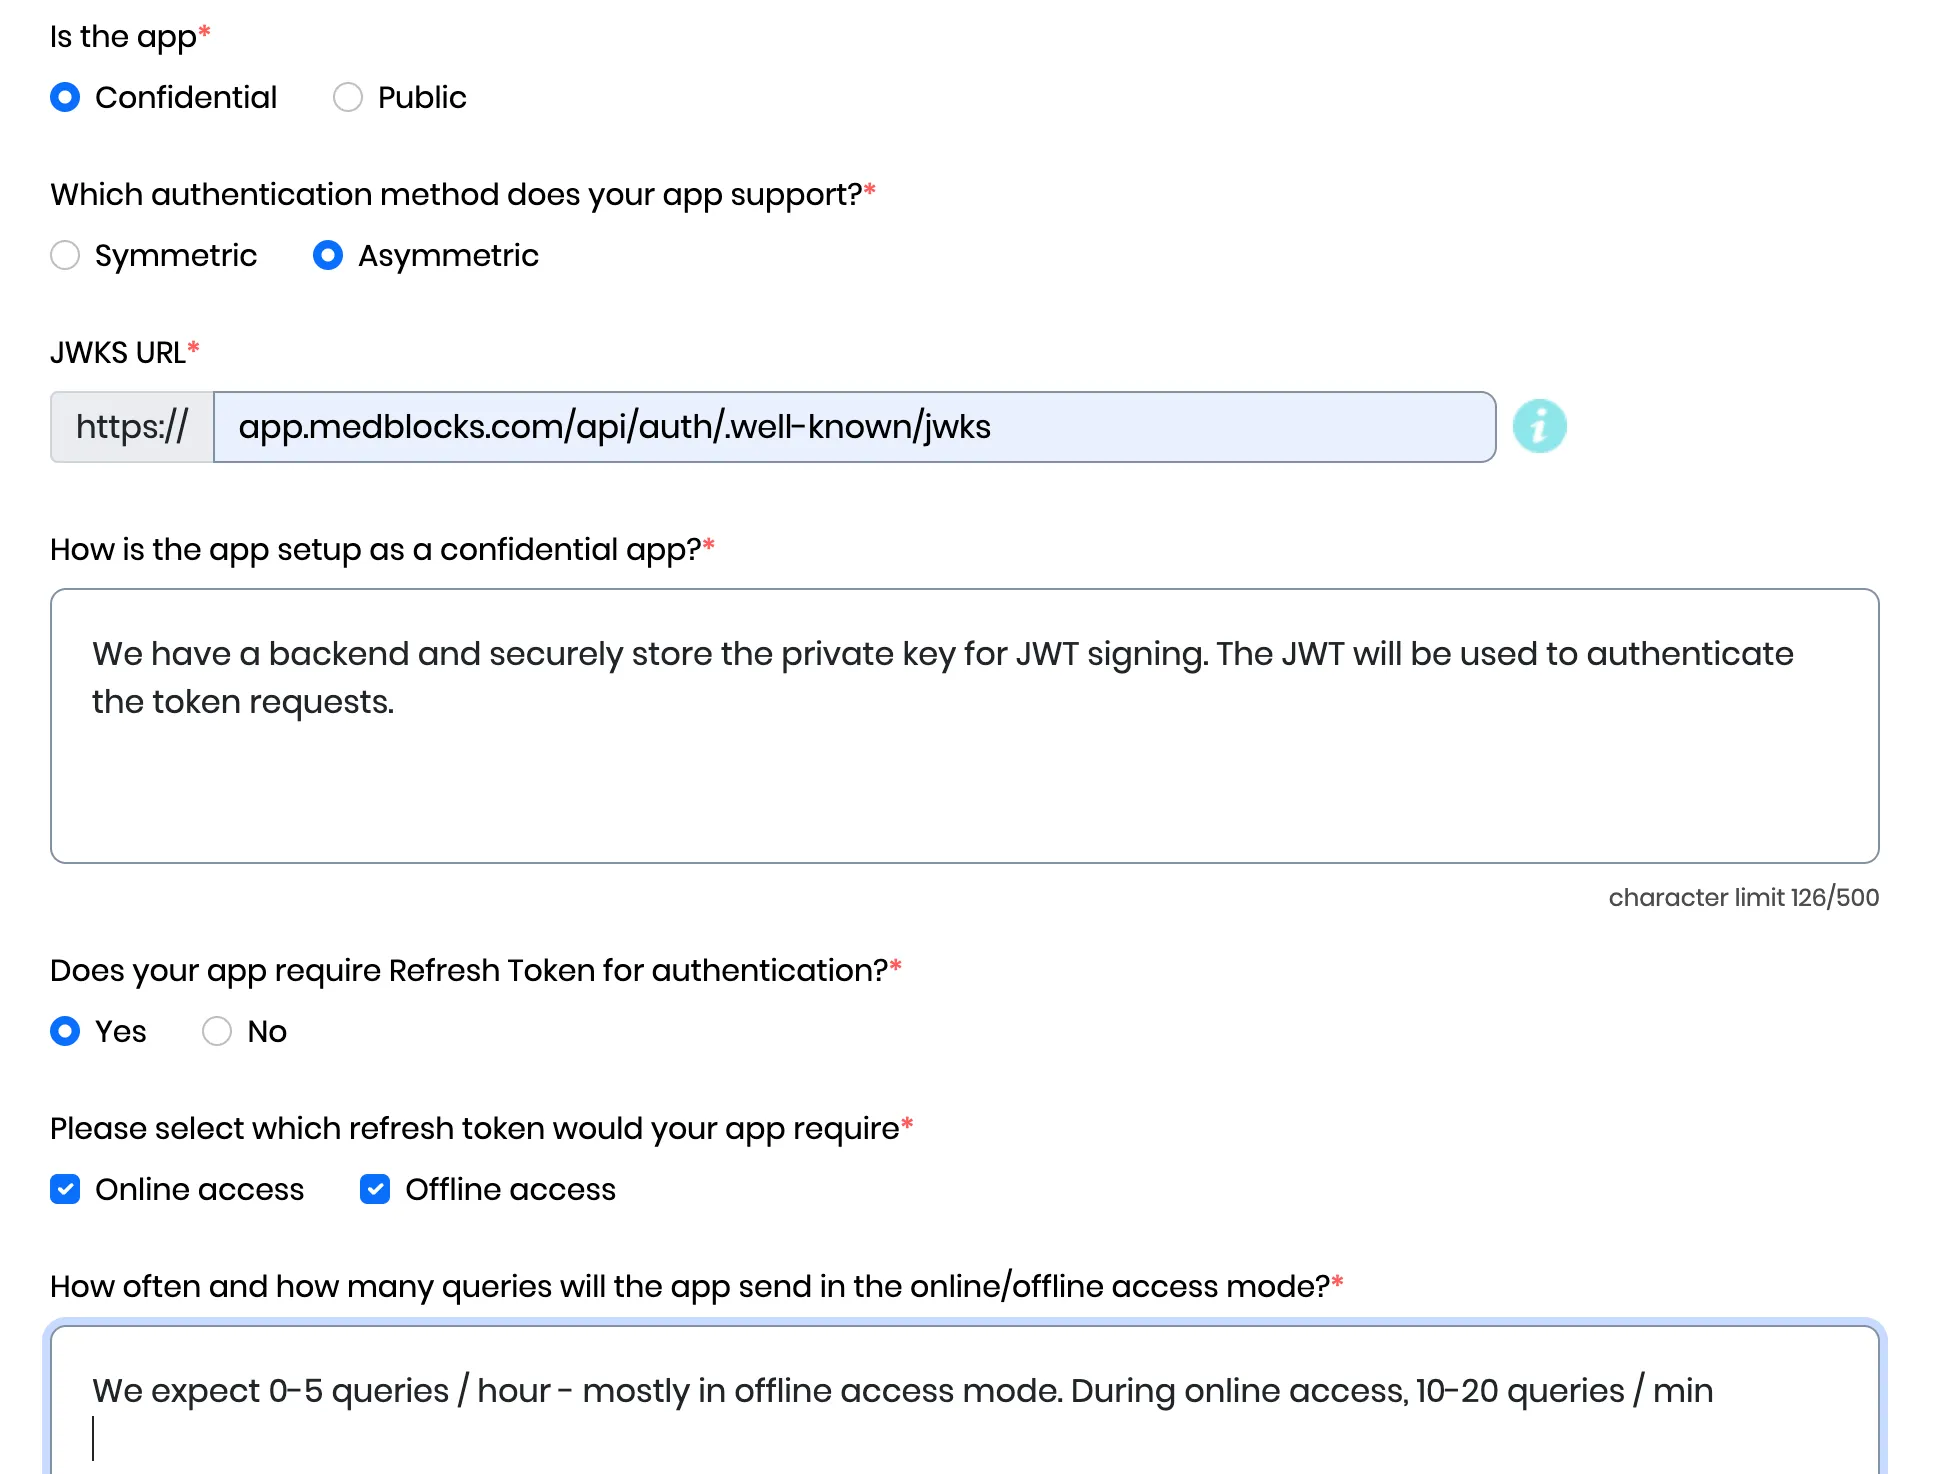
Note: If you are integrating using the medblocks platform, there’s no need to create a private key and host it. Simply use, https://app.medblocks.com/api/auth/.well-known/jwks
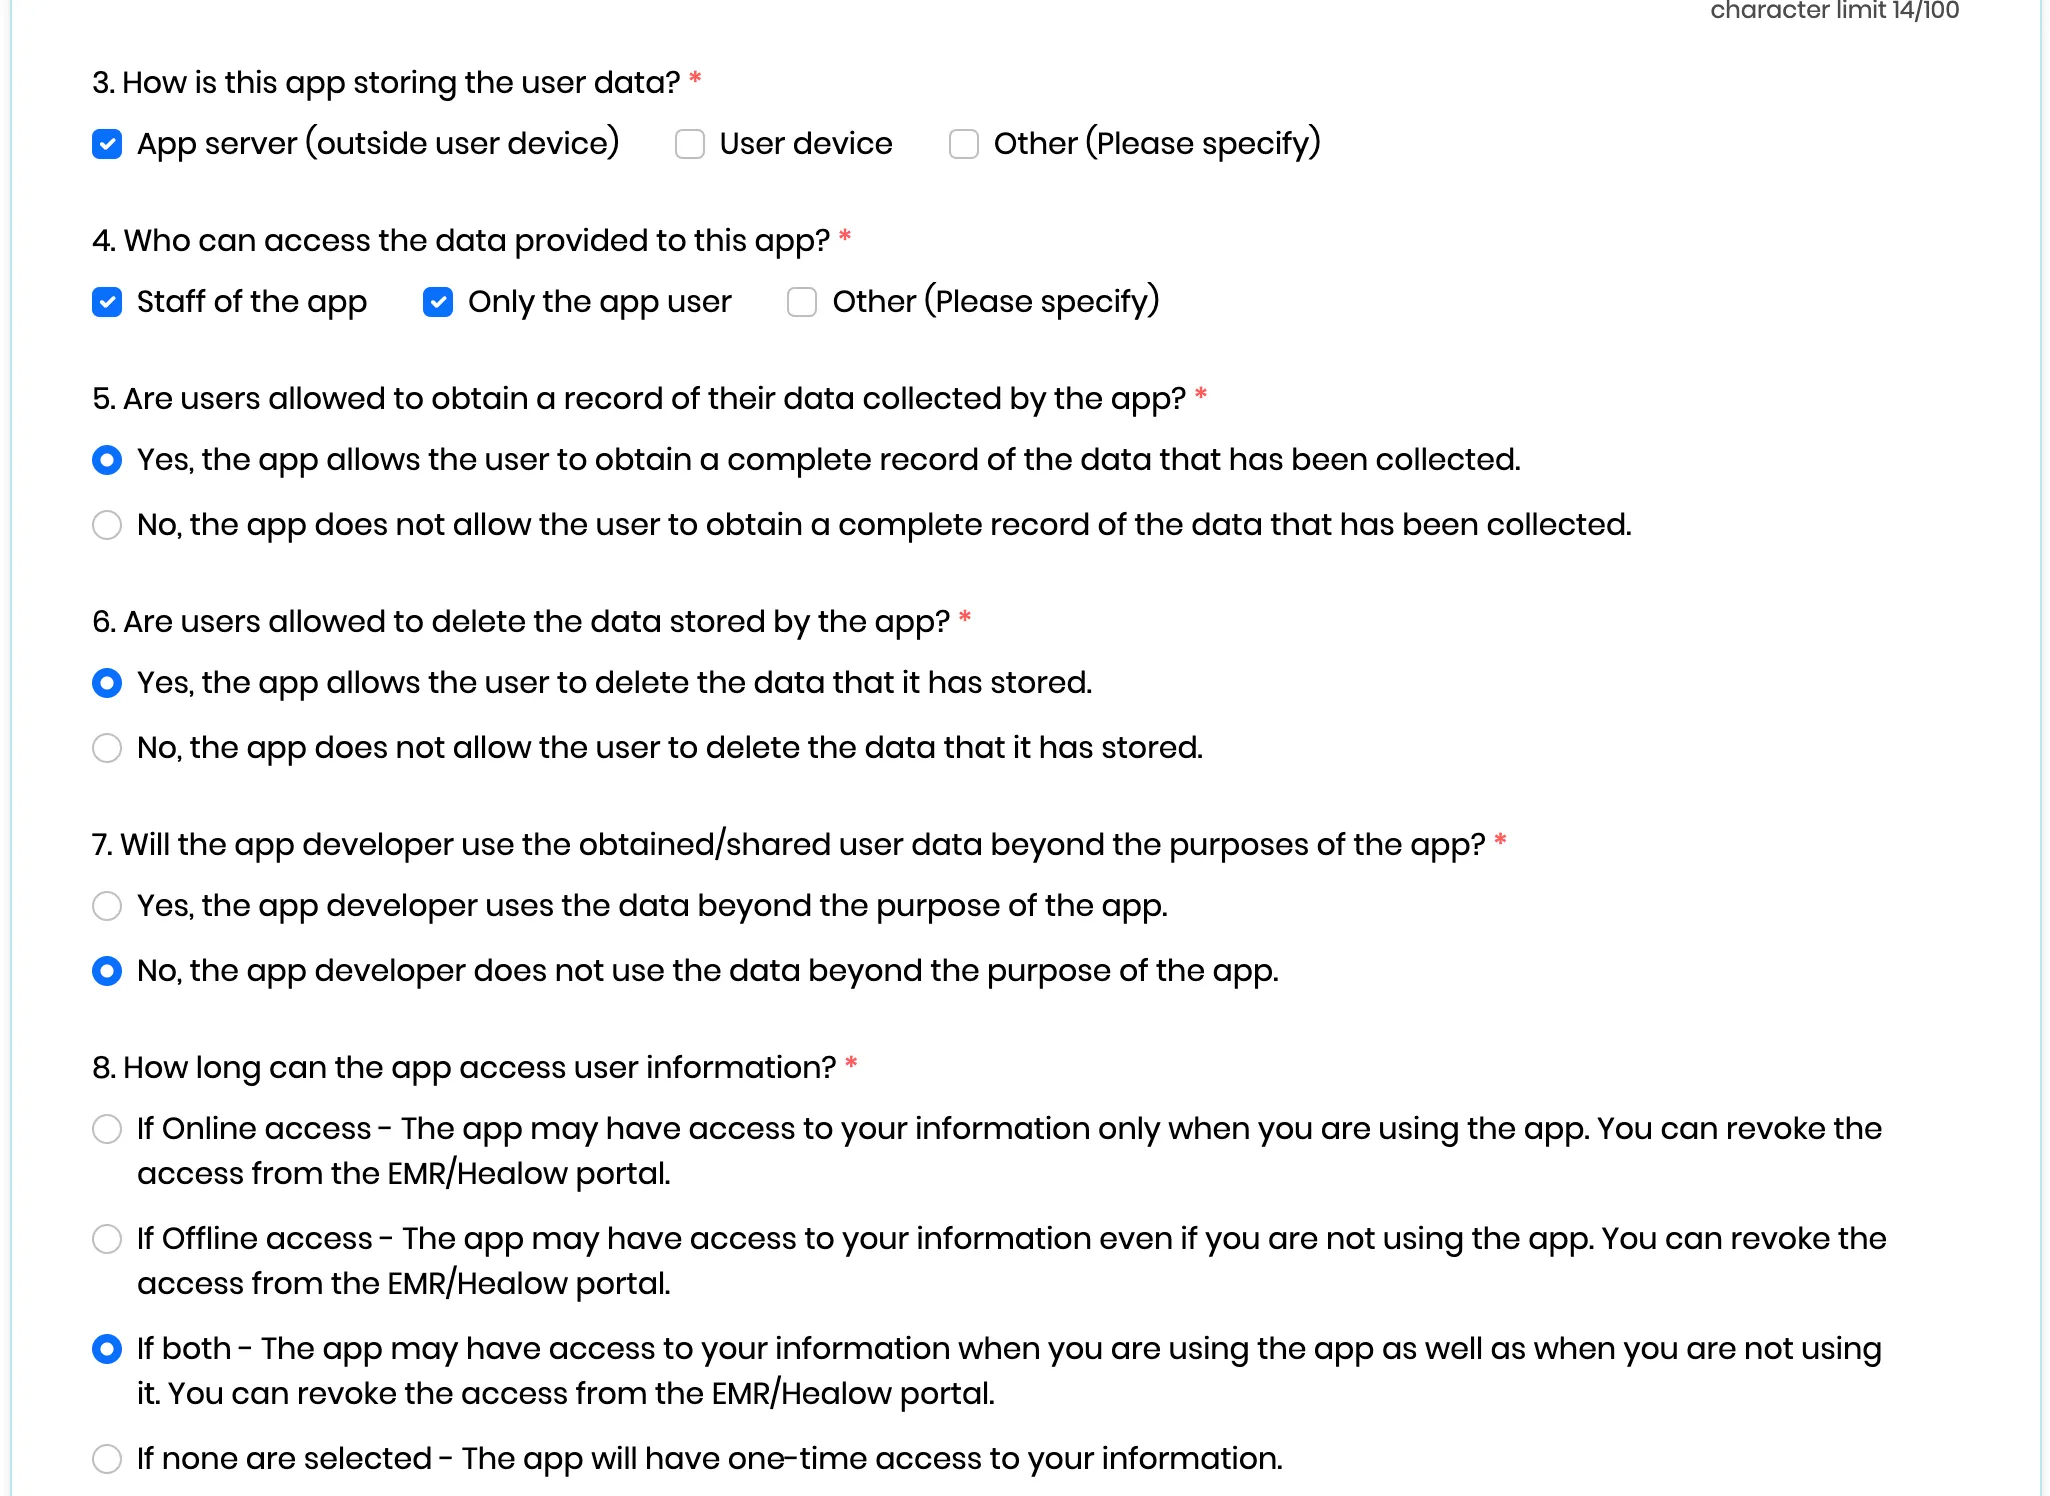
Step 6: Fill the Questionnaire
The final wizard step is a healow data-use questionnaire, your answers feed directly into the consent screen the patient sees before authorizing your app, so be honest. Mismatches between what you state here and what your app actually does are how apps get pulled from the App Gallery.
- Click “Submit” at the bottom of the form. healow’s docs describe a Dev Portal Team review-and-approve step, but in practice the app is created and usable immediately, your client ID is issued on submit, and you can start hitting the sandbox right away.
Step 7: Test in the sandbox
healow ships a single shared sandbox tenant, no per-practice provisioning required.
| Value | |
|---|---|
| Sandbox practice code | JAFJCD |
| FHIR base URL | https://{fhir_base_url}/fhir/r4/JAFJCD |
| Test patients (password e@CWFHIR1) | AdultFemaleFHIR, AdultMaleFHIR, ChildFemaleFHIR, ChildMaleFHIR |
-
Launch your app, kick off the OAuth flow with
aud = https://{fhir_base_url}/fhir/r4/JAFJCD, and log in as one of the test patients on the healow consent screen. -
Exchange the code at the token endpoint with a client_assertion JWT signed by your private key (alg: RS384, kid matching your JWKS, client_assertion_type=urn:ietf:params:oauth:client-assertion-type:jwt-bearer). You should get back an access token (expires_in: 3600), a 90-day refresh token (because you requested offline_access), and an id_token.
-
Hit
GET {fhir_base_url}/fhir/r4/JAFJCD/Patient/{id}withAuthorization: Bearer ...and confirm you get a US Core Patient resource.
**CORS is not supported.** Token exchange and FHIR calls must run server-side. If you’re integrating via Medblocks Platform this is already handled, don’t try to call healow directly from a browser.
Step 8: Go to production
Production is a separate clinical app entry, not a toggle on your sandbox app, credentials are cleanly separated from day one.
-
Click Register Clinical App again and fill the same fields, with these differences:
- Environment: Production.
- Redirect URIs: HTTPS only, no localhost in production.
- JWKS URL: a separate production JWKS is recommended so the two keyrings can rotate independently.
-
Click Submit. As with the sandbox app, the production app is created immediately and healow issues your production client ID on submit. Keep it in a separate environment / secret store from your sandbox client ID, there is no shared identifier between the two.
-
Swap the FHIR base URL in your app from the sandbox practice code to the per-practice production base URL (see Step 8).
Step 9: Going live with practices
Healow’s model is practice-driven: each eCW practice opts your app in on their side using your production client ID, and that gives you an endpoint scoped to their practice code.
-
Patients (or the practice) can find your app via the healow App Gallery (/apps/jsp/dev/odaAppList.jsp). Provide the practice with your production client ID and the consent screen description.
-
For each connected practice, look up the FHIR base URL via the Clinical FHIR Endpoints search at connect4.healow.com/apps/jsp/dev/r4/fhirEndpoints.jsp search by practice name, copy the resulting
{fhir_base_url}/fhir/r4/{practice_code}. The practice code is part of the URL path, so multi-tenant routing is per-URL, not via a header. -
Rate limits (effective Oct 7, 2025): 250 calls/minute per base URL, covering FHIR resource calls plus authorize and token requests. The counter is per practice code, so 5 connected practices give you 1,250 req/min in aggregate. Exceeding the limit returns HTTP 429 until the minute resets.
-
healow withholds a patient’s data until that patient signs in via the healow patient portal and authorizes your app, so the 3-legged OAuth flow from Step 4 is the only consent gate you need. A patient can revoke that access at any time, treat it as a normal state in your UI, not an error.
With your client ID, JWKS, and production credentials issued, you’re ready to test and launch your integration with eClinicalWorks via Medblocks Platform. Check our API specification for implementation details.