Passing the Inferno FHIR CRD tests: discovery, TLS, and JWT validation
In the previous lessons, we covered prior authorization, CDS Hooks, and the three flows under CMS-0057-F: CRD, DTR, and PAS. In this lesson, we’re going to build an actual discovery endpoint and test it against HealthIT.gov’s CRD test kit.
First, we go to inferno.healthit.gov and click on Start Testing Now. That will take you to a full list of test kits Inferno hosts, everything from US Core to Bulk Data to CRD.
Setting up a local server
Before we can run the test kit, we need to get a server running locally. For the tutorial we followed in this lesson, you’ll need bun installed, a code editor with an AI coding assistant like Claude Code, ngrok, and a browser. You’re free to build a server any other programming language or framework if you wish.
First we’ll start a bare project, for that run these three commands one after the other:
mkdir crd-tutorial
cd crd-tutorial
bun init -y
That gives you a package.json, a tsconfig.json, and an index.ts with a placeholder. Swap the placeholder for something you can see running:
console.log("hello world");Run it with bun index.ts and you should see hello world as the output which means the server setup is complete.
We can build CRD, DTR and PAS for you
We already do this for health plans and their vendors. Reach out if you want help with the build, or just want to talk through your setup
Book a CallCreate a test session on the Inferno CRD test kit
From the list of test kits, find Da Vinci Coverage Requirements Discovery (CRD) Test Kit. Open it, select the v2.2.1 test suite, and click Create Test Session.
What the test suite checks
The v2.2.1 server suite is organized into three groups.
Discovery checks the response from your server’s /cds-services endpoint, the list of hooks you support and how they’re described.
Hook Response Demonstration checks that your server can respond to a single hook invocation with a properly formed card or system action. It’s a basic sanity check that the response shape is right.
Hooks is where things get more specific. For each hook type you give Inferno a request body for, it makes the call and checks that the response actually covers the behavior required for that hook, and not just that it’s shaped correctly, but also that it does what a payer’s server is expected to do for that particular hook.
We’re only dealing with Discovery in this lesson. The other two groups depend on having actual coverage logic behind your hooks, which we’ll cover later.
Building the discovery endpoint
When an EHR wants to know what your server supports, it sends a GET request to /cds-services, and your server answers with a list of every hook it implements.
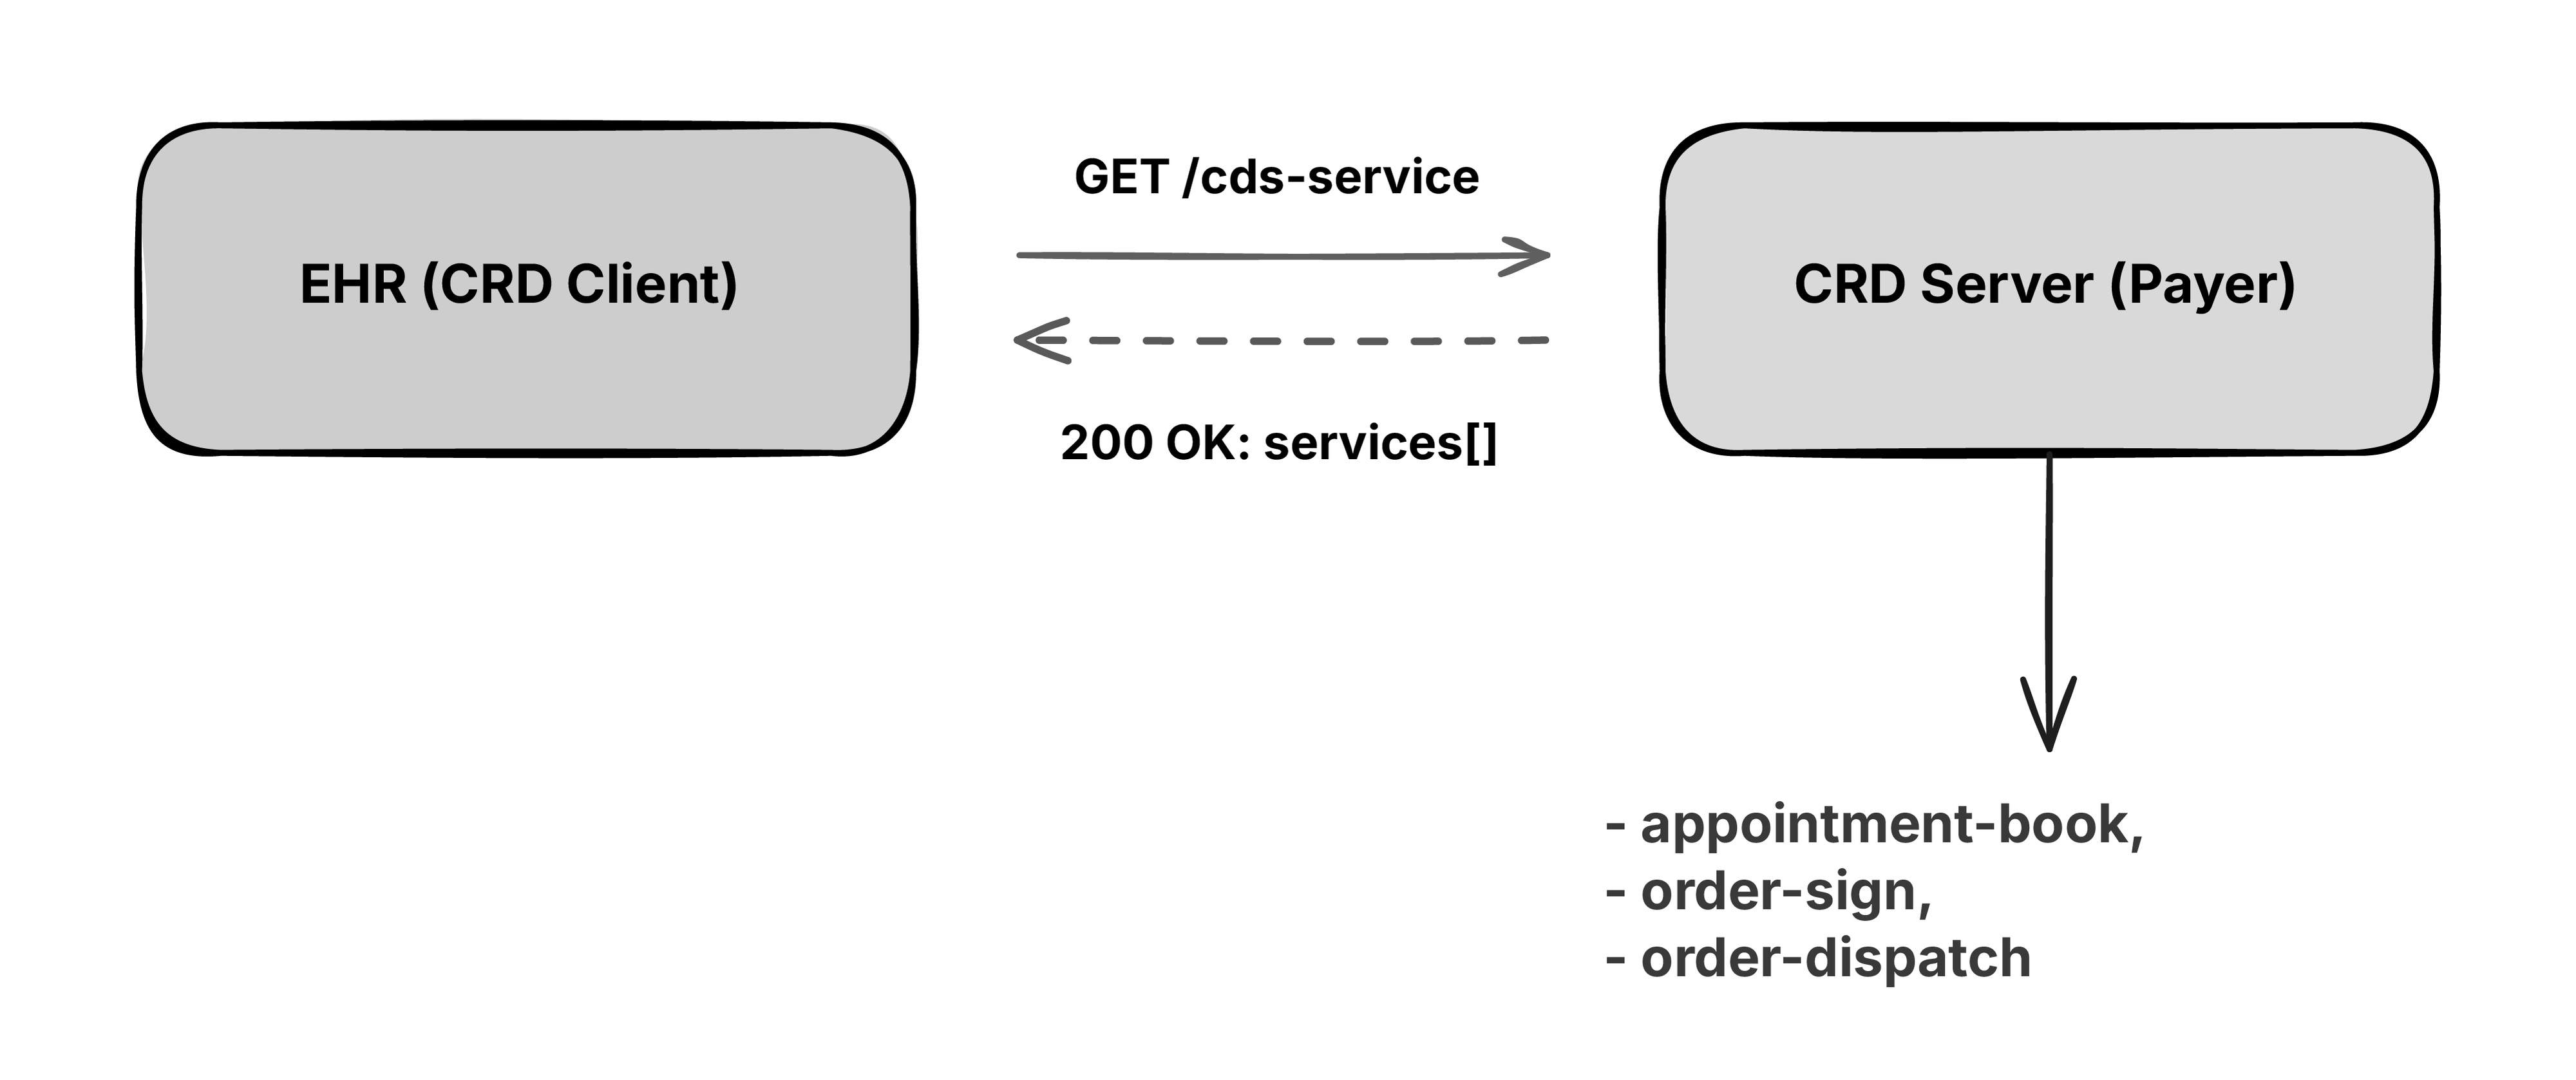
There are many hooks defined in the spec but not every hook is compulsory. The CRD implementation guide splits its six hooks into primary and secondary. The primary hooks, appointment-book, order-sign, and order-dispatch, are the ones a CRD server is expected to support. The secondary hooks, encounter-start, encounter-discharge, and order-select, are optional. For this lesson, we’re only building the three primary ones.
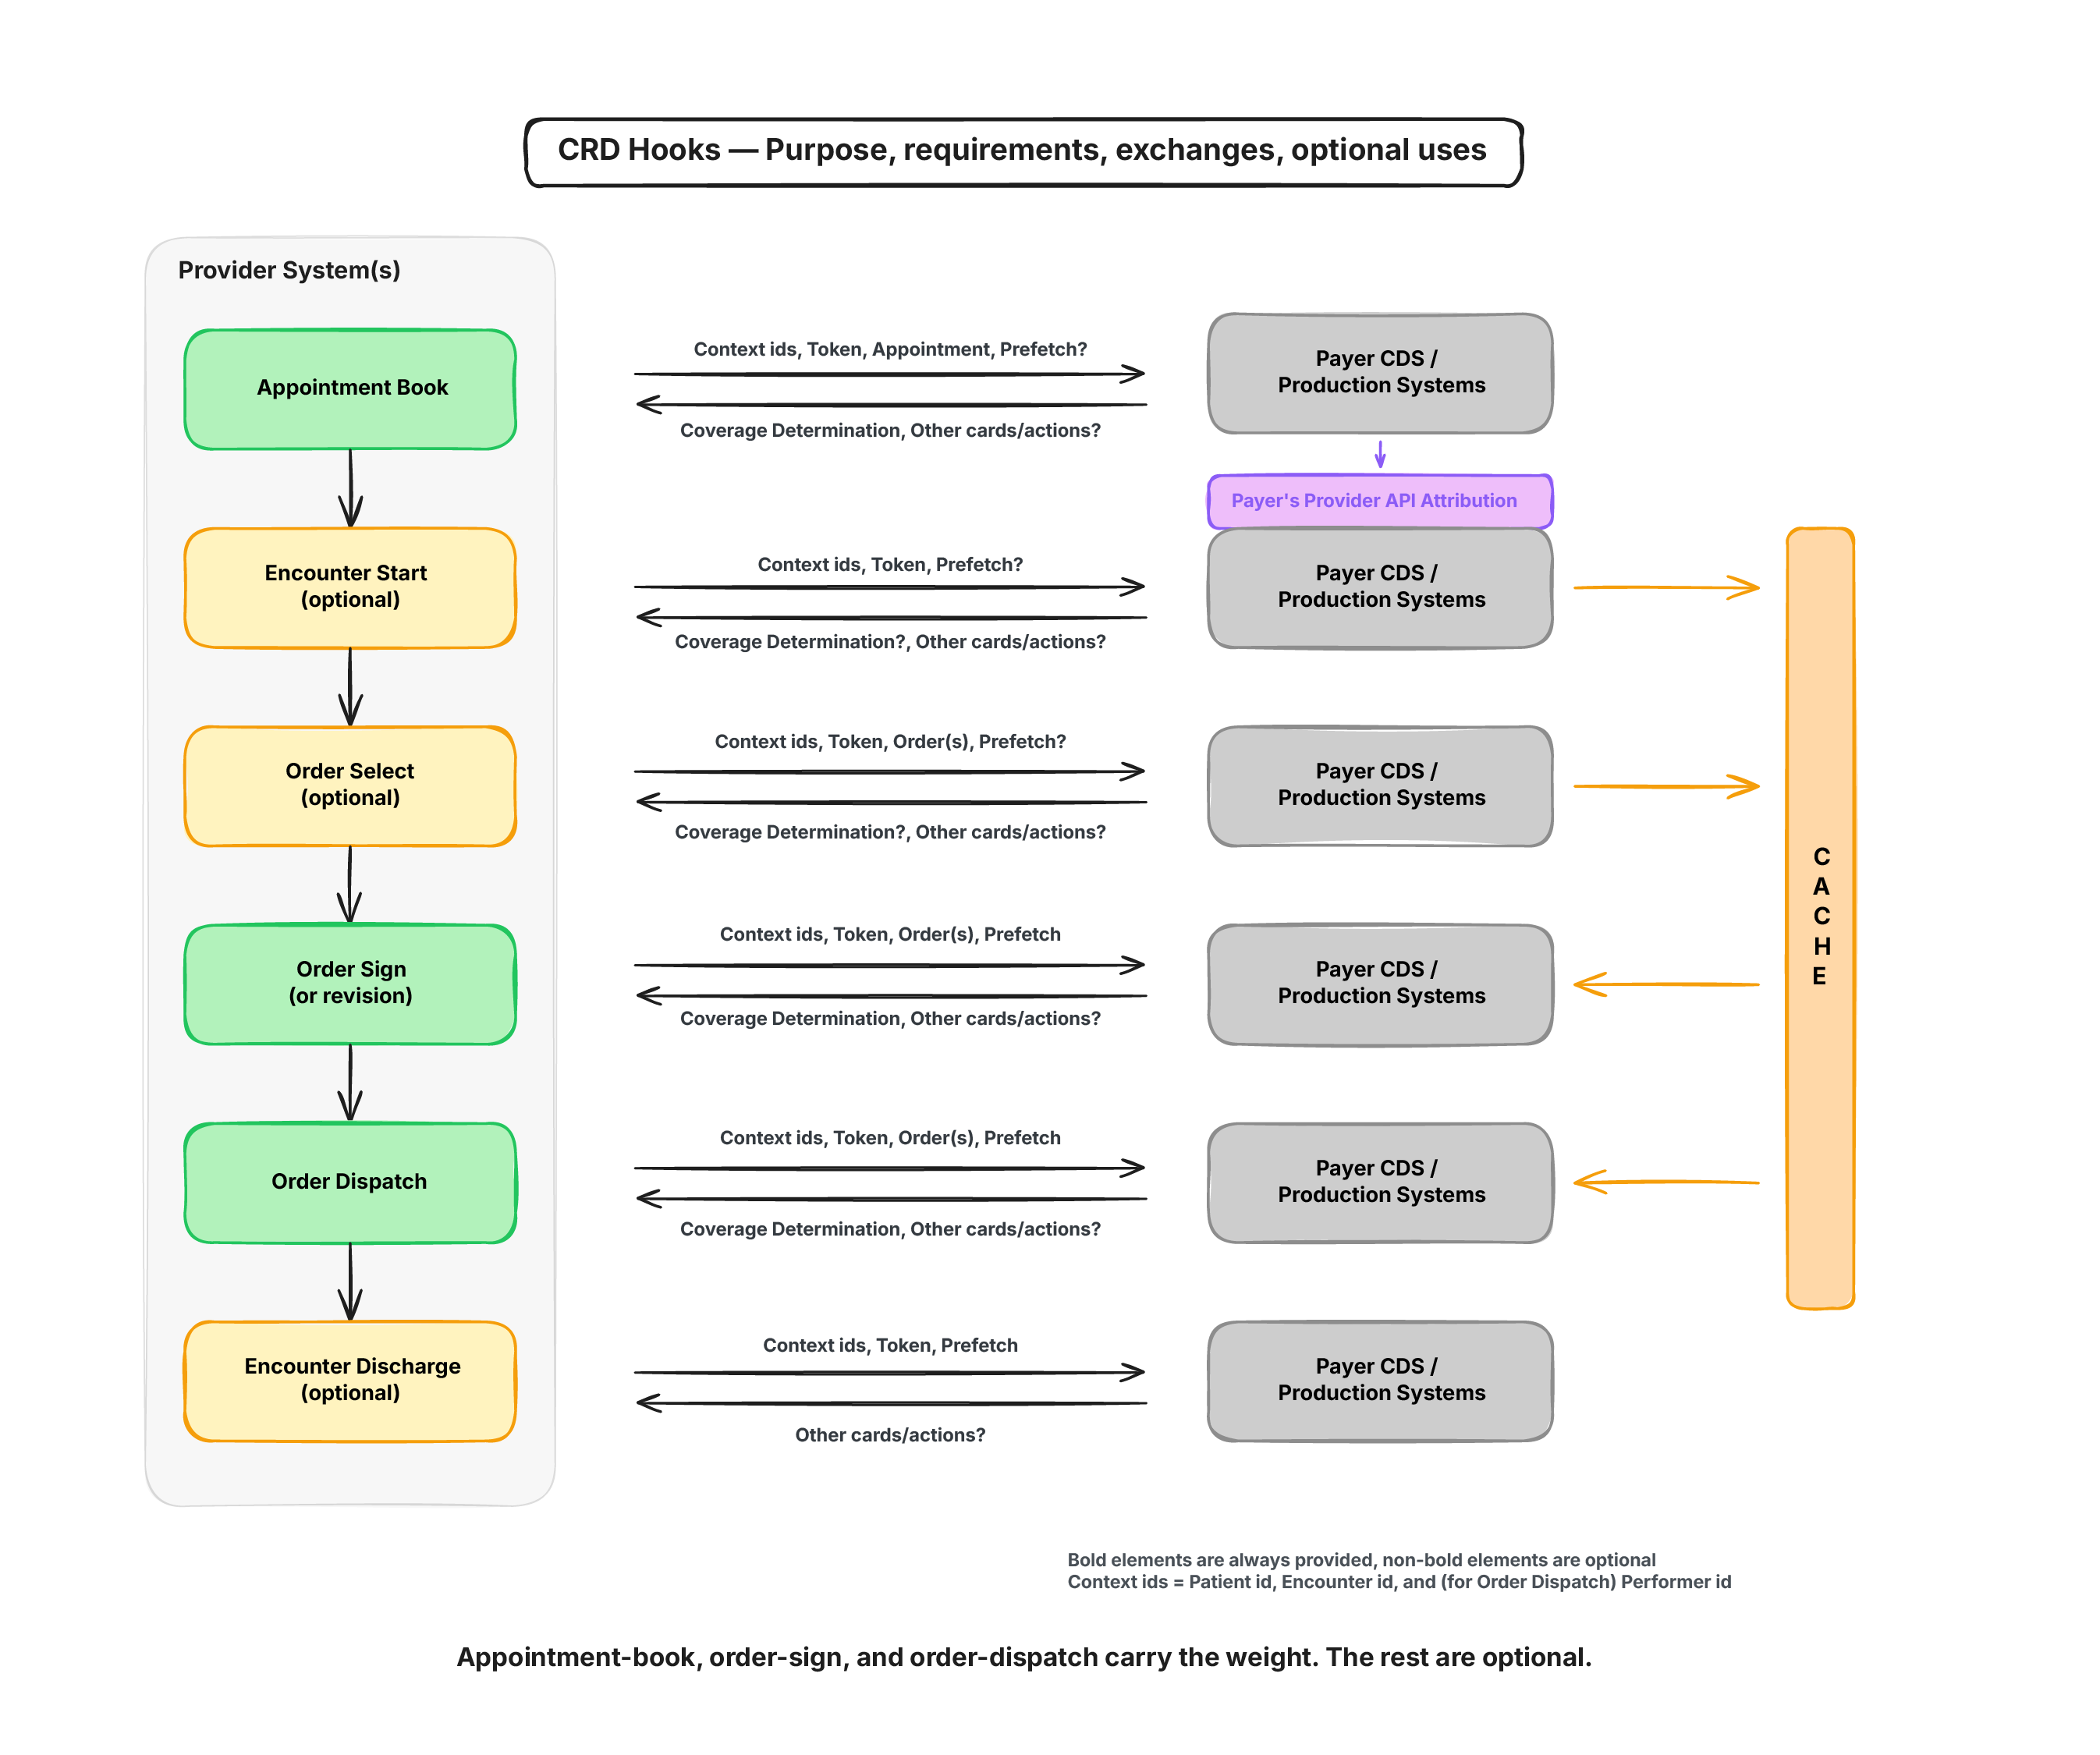
Each of those hooks also comes with a prefetch declaration, meaning your server tells the EHR up front which FHIR resources to send along with every hook call. The foundational requirements page has the full set of standard prefetch templates for each hook.
We’ll write the endpoint by opening Claude Code in the project and giving it a prompt like this:
Create a CDS discovery endpoint on port 3000.
Support the following hooks:
1. appointment-book
2. order-sign
3. order-dispatch
The prompt basically asks Claude or any AI agent to create a CDS discovery endpoint that supports the three mandatory hooks, we’ll ignore the optional ones.
Before we test the endpoint, we also need to set up authentication. Right now this endpoint would respond to a request from anywhere, we need to put an authentication layer in between. CDS Hooks expects a bearer token, a JWT, on every request. In this case, Inferno signs its test tokens against a JWKS it hosts itself at a known URL, so you already have what you need to check against it. So we’ll give this prompt to Claude:
Only valid JWT from JWKS from
https://inferno.healthit.gov/suites/custom/crd_server_v221/jwks.json
should be allowed. Deny everything else.
This pulls in the Jose library, points it at that JWKS URL, and checks every incoming request against it before the handler runs. A missing or invalid token gets a 401. A valid one gets the full discovery response.
In production, you won’t have this URL handed to you this cleanly, it’s something you’d get from a health plan or EHR vendor during onboarding, the same way we talked about in the vendor architecture lesson. Here, Inferno documents its own JWKS URL, so we can wire it in up front instead of discovering it mid-flow.
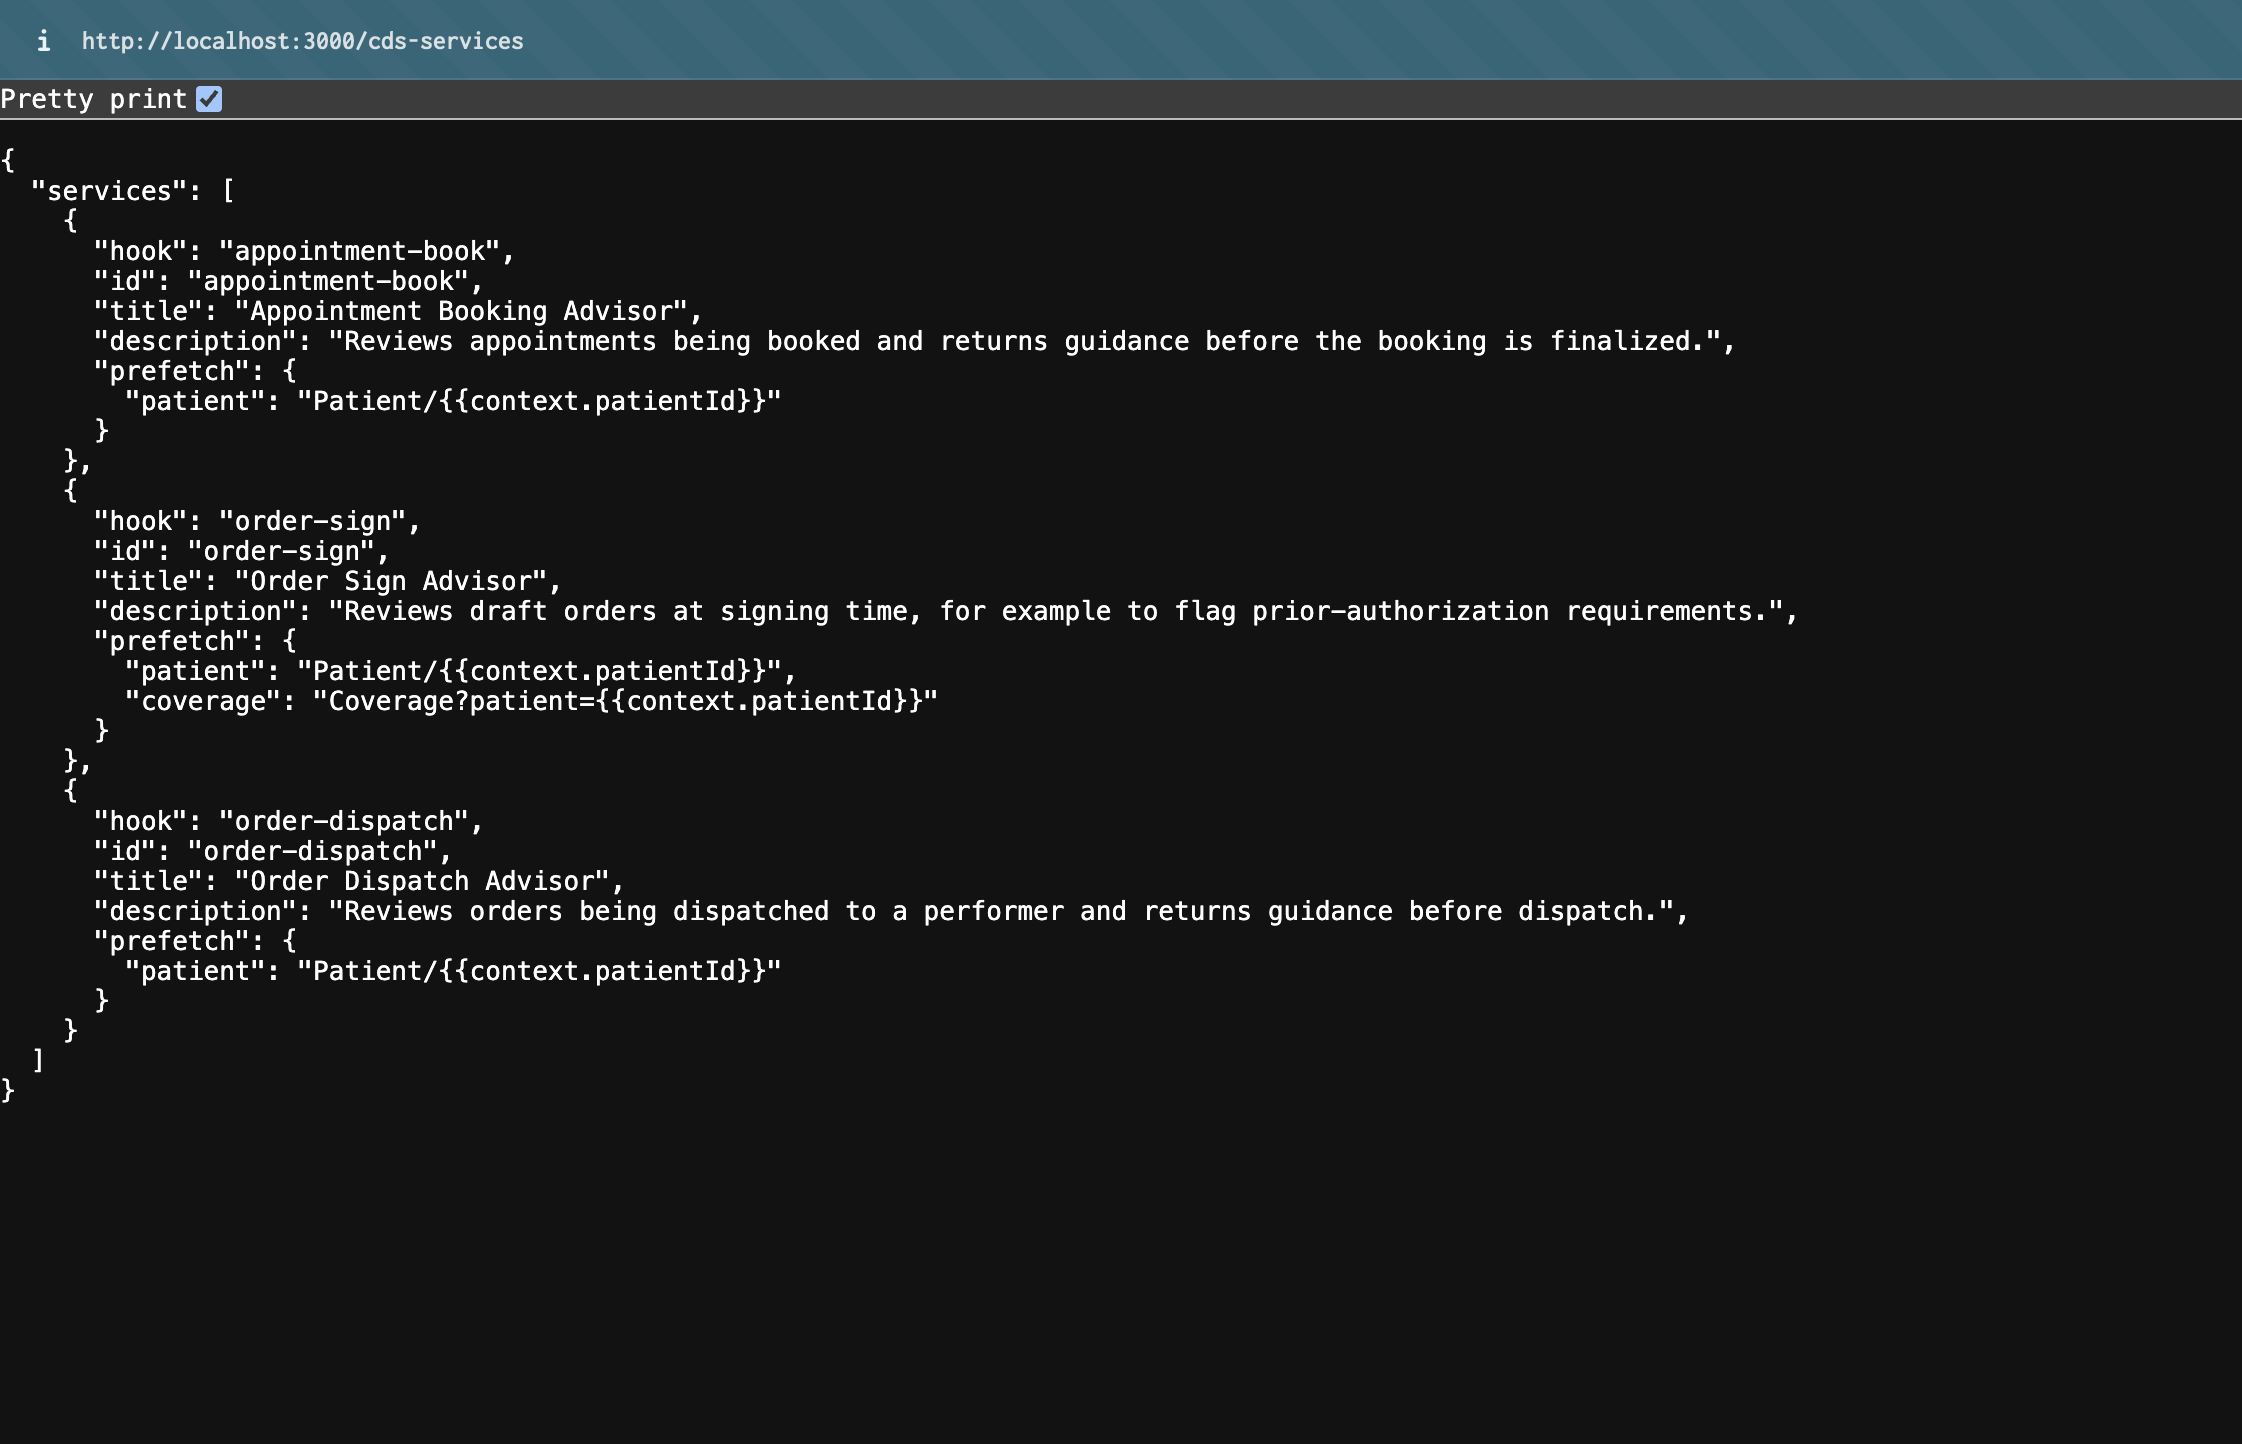
Once it’s running, hit localhost:3000/cds-services directly in the browser. You should see a services array with one entry per hook, each carrying an id, a hook, a description, and a prefetch object.
Getting past localhost
Inferno requires TLS 1.2, and localhost over plain HTTP doesn’t offer that. We’ll put ngrok in front of your local server to get a real HTTPS URL.
ngrok http 3000ngrok is a tunneling tool. It gives your local machine a public URL that forwards straight through to whatever port you point it at, so a service like Inferno can reach a server running on your own laptop as if it were sitting on the open internet.
ngrok prints a forwarding URL, something like https://<random-string>.ngrok-free.app, that maps to localhost:3000. Hit /cds-services on the forwarded URL the same way you did locally, confirm you get the identical response, and keep that URL handy for the test form.
If you don’t have it installed, go to ngrok’s download page and grab the build for your OS.
Testing with and without authentication
Open the Da Vinci CRD Server v2.2.1 Test Suite and fill in the form.
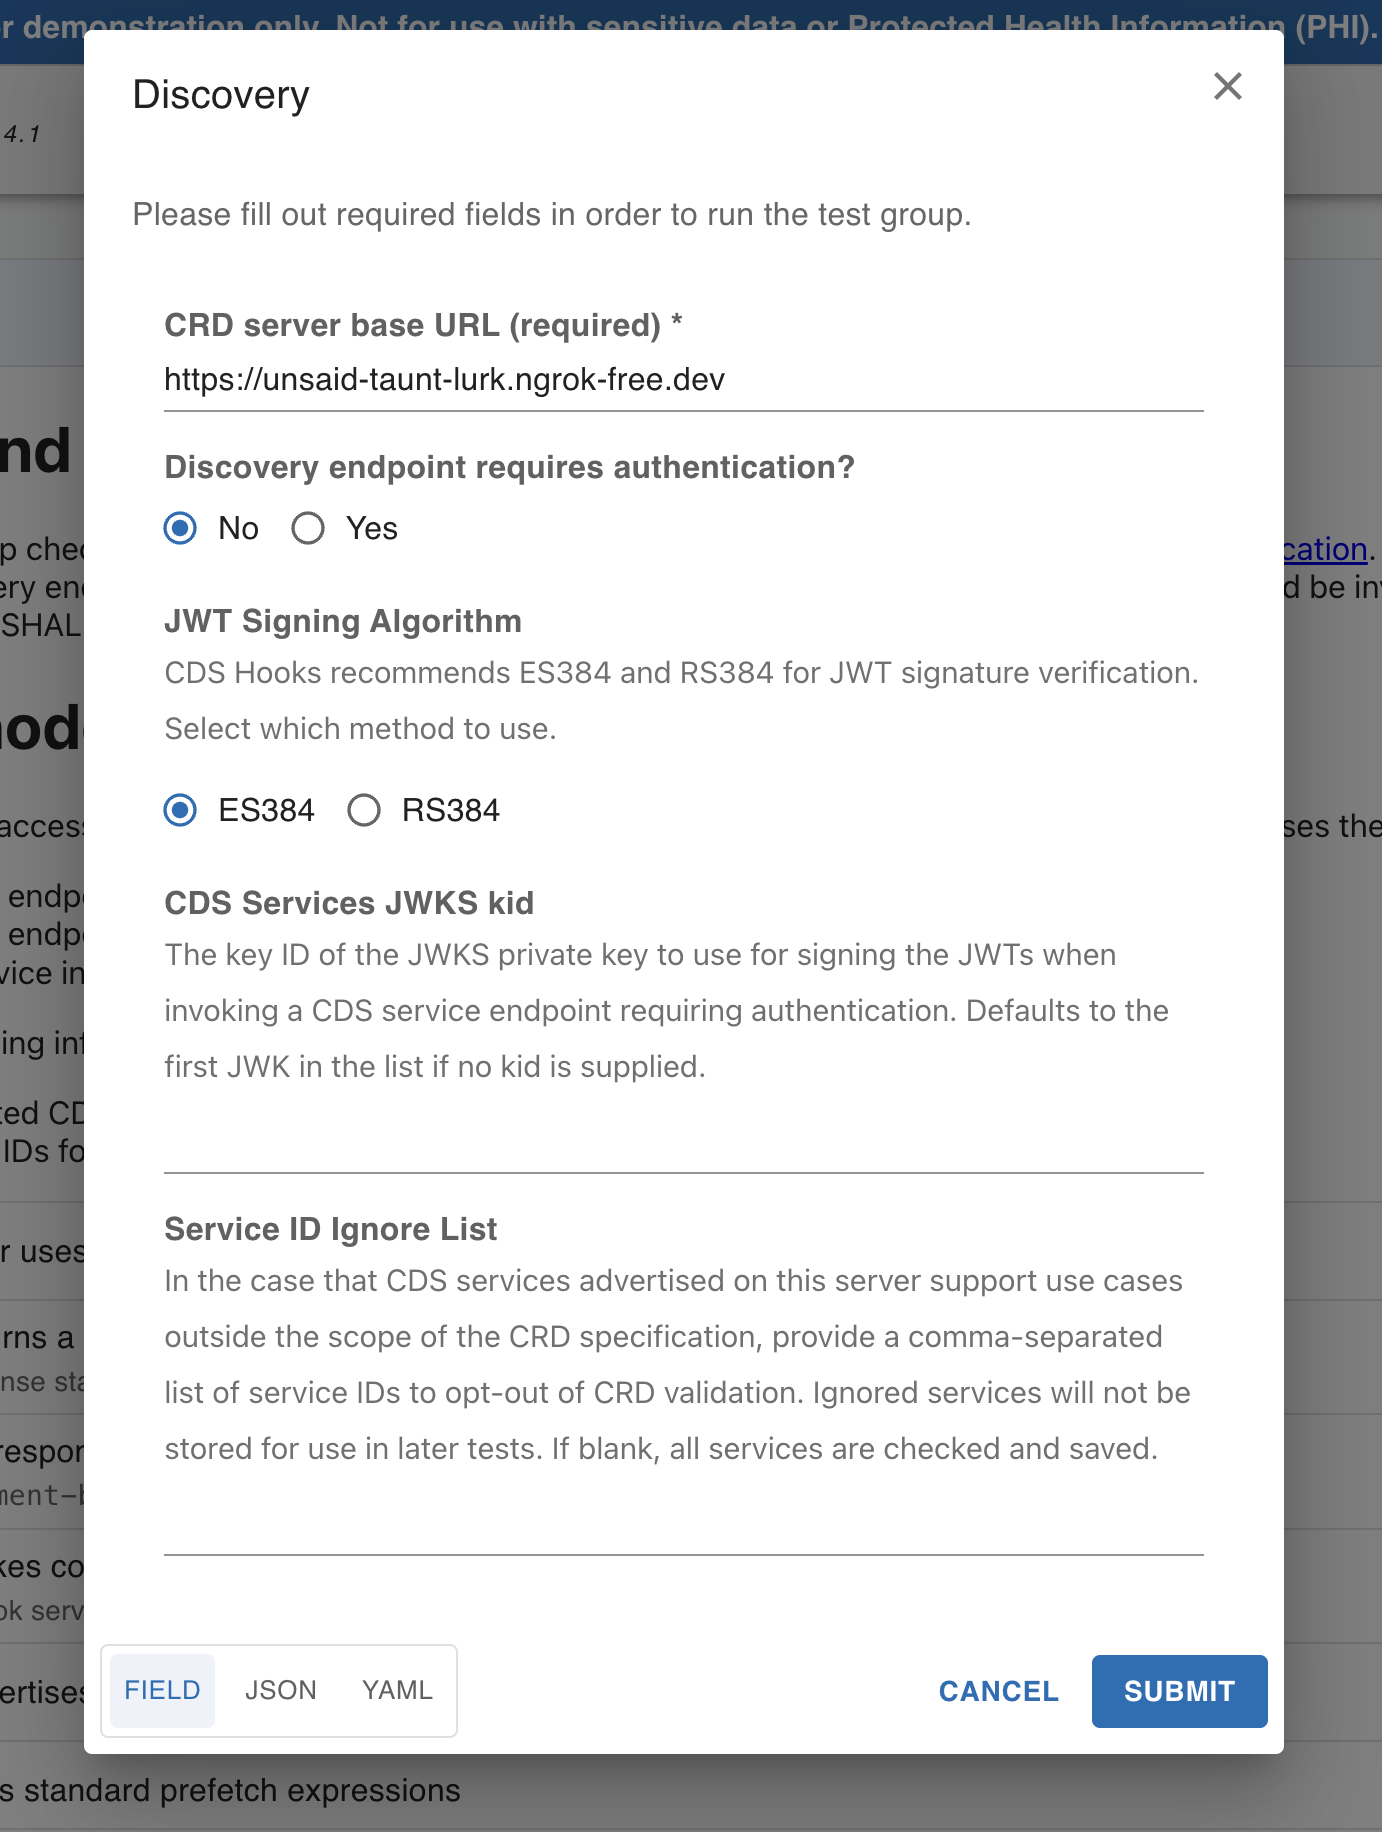
Paste your ngrok URL into CRD server base URL. Since your server already enforces the JWKS check, this is where the Discovery endpoint requires authentication? toggle comes in. Leave it on No for the first run. For JWT Signing Algorithm, ES384 is the default and the one your endpoint expects, so leave that as is. CDS Services JWKS kid can stay blank, Inferno will just use the first key in its JWKS. The Service ID Ignore List and the service ID field for the Demonstrate a Hook Response test don’t apply here, those belong to the other two groups in the suite, not Discovery.
Click submit. With authentication set to No, Inferno calls your endpoint without a token, and your server correctly rejects it: a 401, with a message about a missing bearer token.

Now go back into the same form, flip Discovery endpoint requires authentication? to Yes and submit again. Inferno signs a token against its own JWKS using ES384, sends it along, and your server verifies it against the same JWKS URL you wired in. Two of the three checks pass this time.

The third check still fails, and the error says the appointment-book service definition is missing a required extension field. That’s expected. CRD asks for specific extensions in the discovery response.
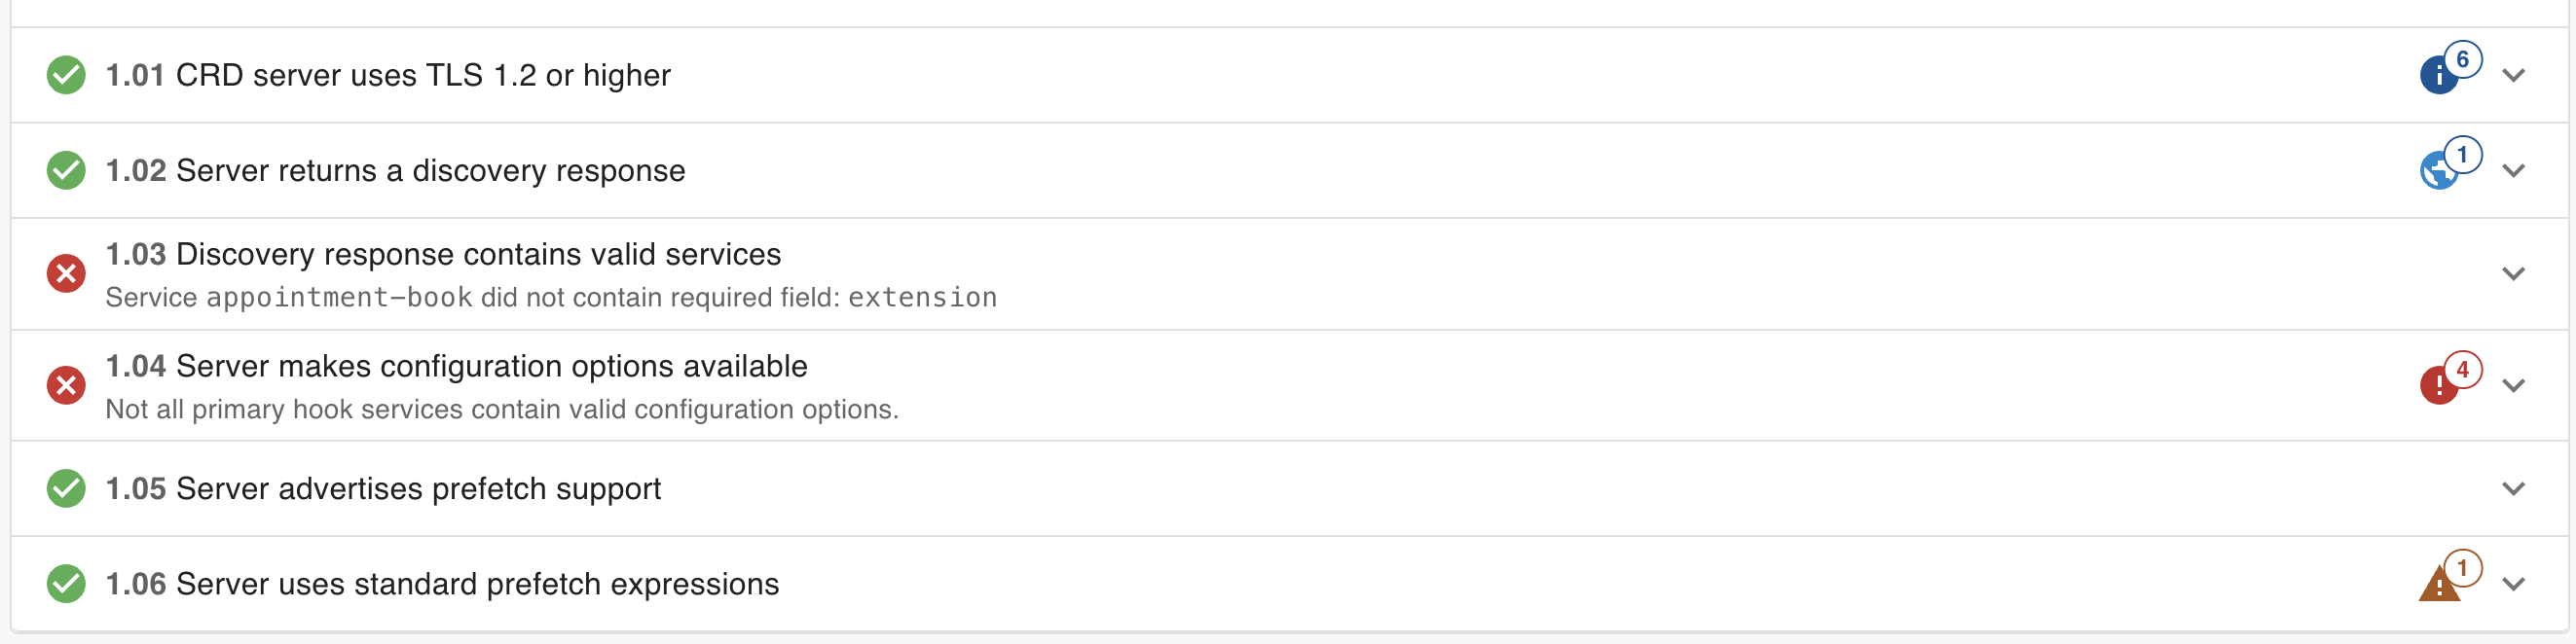
We’ll cover extensions and configuration options in the next lesson.