
Cerner
Register a Cerner (Oracle Health) Provider app for in-PowerChart SMART on FHIR launch.
Cerner (Oracle Health) Millennium exposes a SMART on FHIR R4 surface that lets a clinician open a third-party app embedded inside PowerChart from a patient’s chart. The app receives a launch context with the current patient and encounter, plus an access token scoped to that clinician. Use this for in-workflow clinical tools, not population-level extracts (see the Cerner Backend guide for that).
This is a step-by-step guide to registering a Provider-type SMART on FHIR app on the Cerner Code Console, wiring it into Medblocks, and testing the EHR launch against the public Cerner code sandbox.
For Oracle’s reference on the auth flow, see the Authorization Framework.
Sign in to Cerner Code Console
Go to code.cerner.com/developer/smart-on-fhir/apps and sign in with your Cerner Code account. You will land on My Applications.
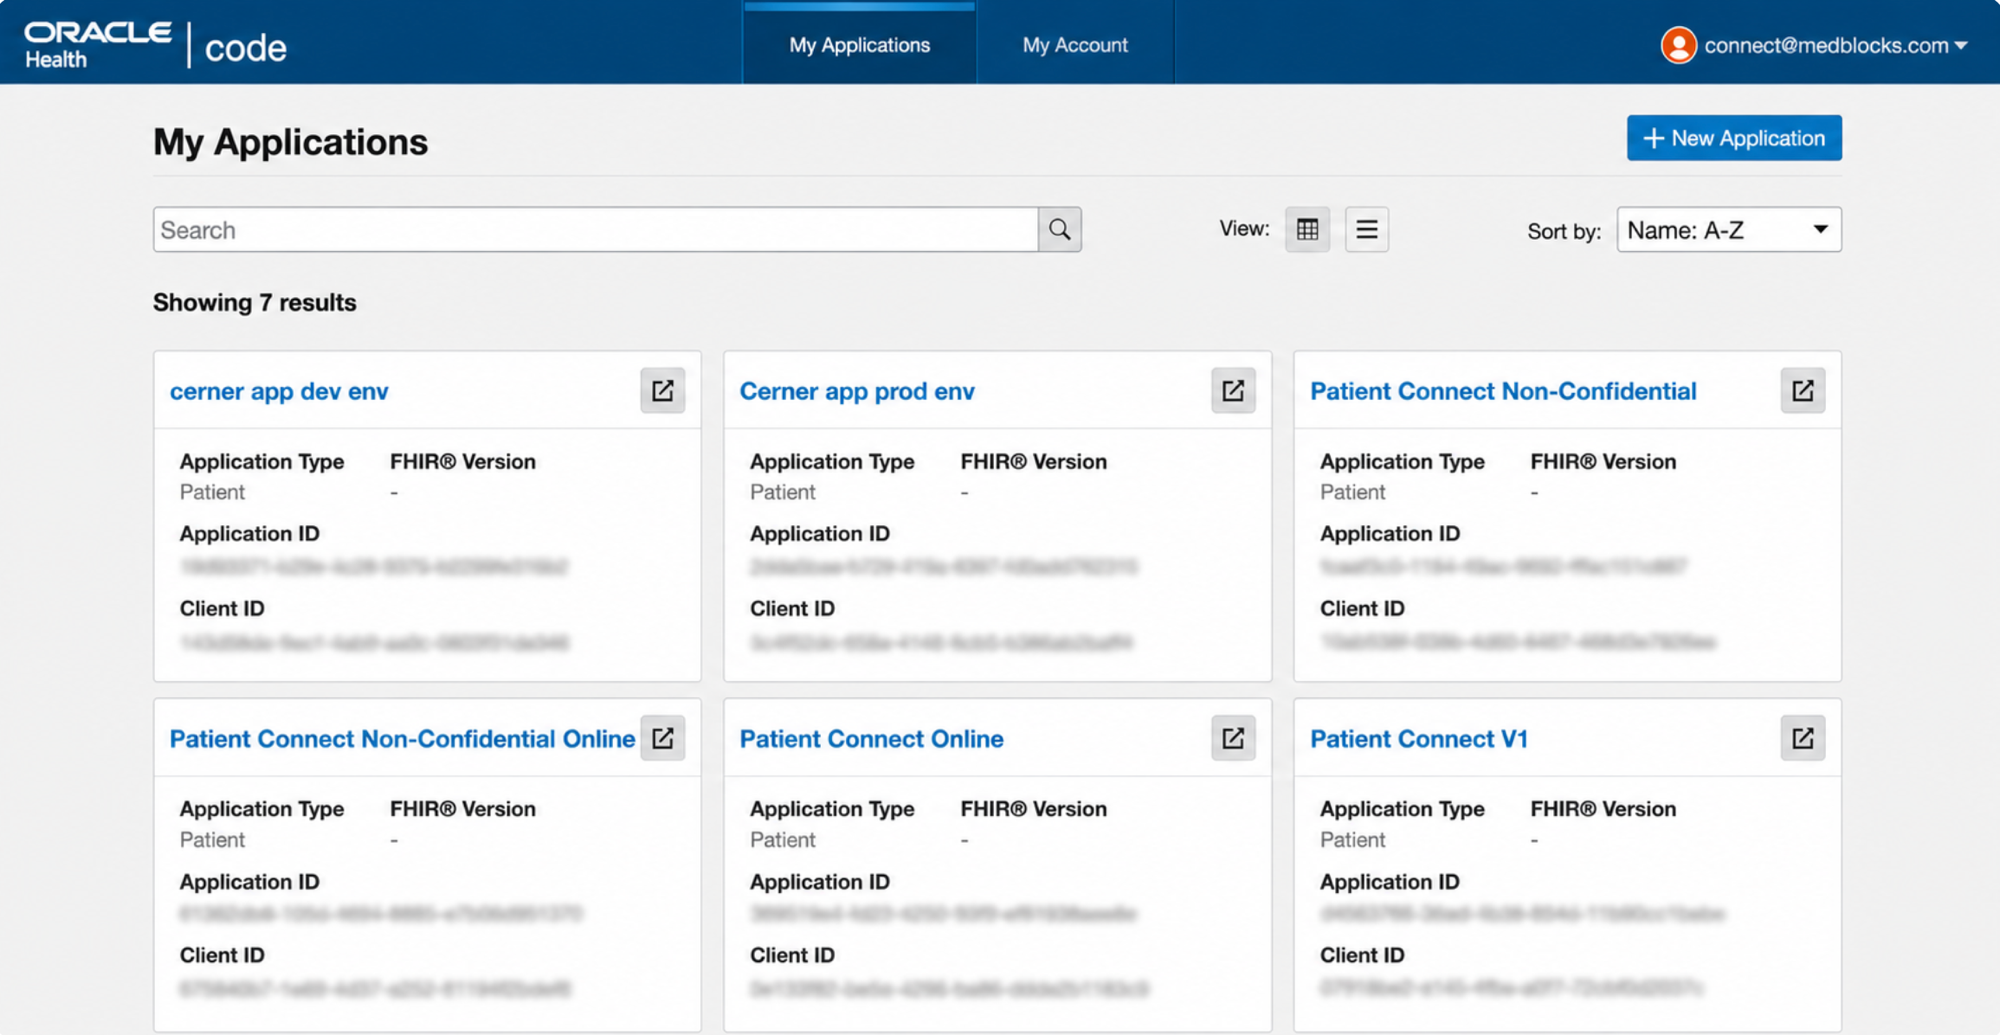
Click + New Application in the top right to start a new registration.
Basic Information and Application Type
The first step of the wizard captures the basic details that determine which products and scopes appear on the later screens.
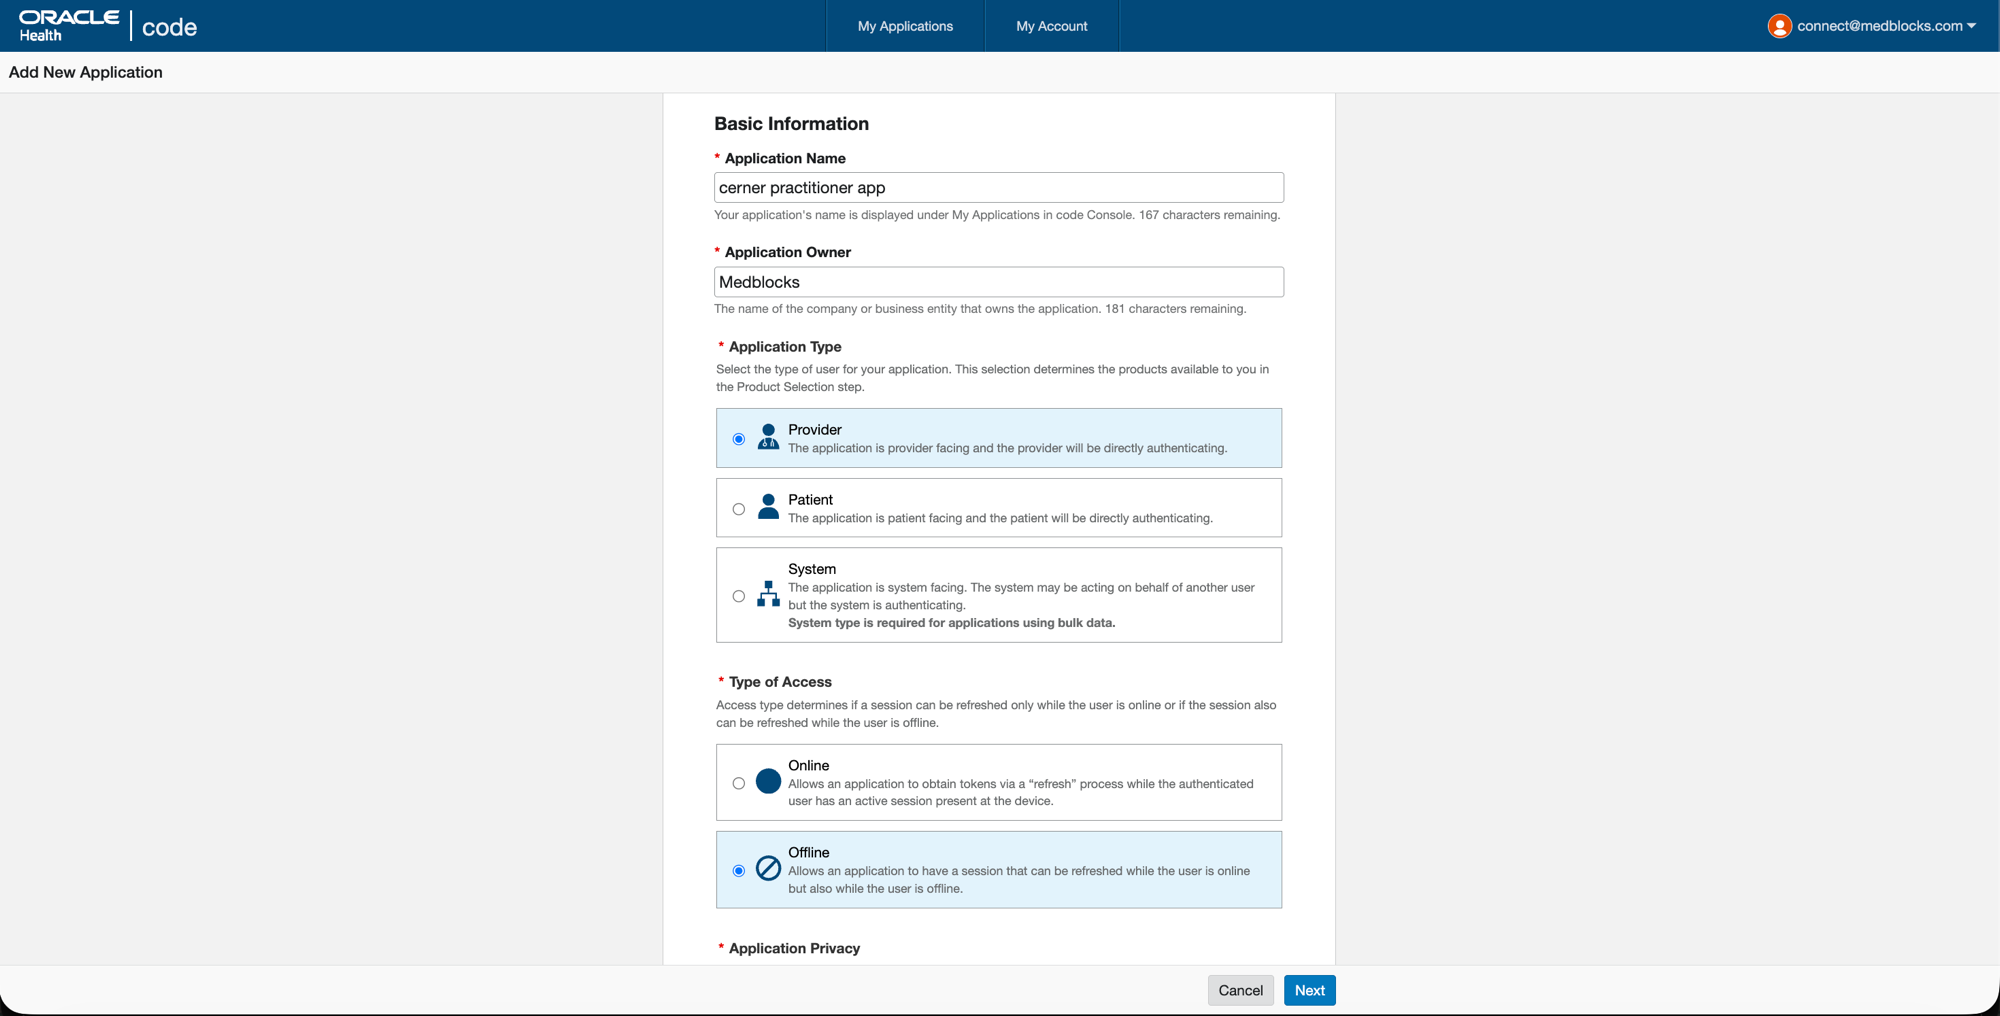
- Application Name: anything descriptive, this is the name shown to clinicians on the consent screen and inside My Applications.
- Application Owner: your company name (Medblocks for our case).
- Application Type: Provider, this is the SMART persona for a clinician launching the app in-context.
- Type of Access: Offline, gives the app
offline_accessso the launch session can be refreshed without the clinician re-authorizing each time. Pick Online instead only if you have a hard policy against refresh tokens.
Privacy, SMART Version, and URIs
Scroll down for the rest of the first step.

- Application Privacy: Confidential, Cerner will issue a client_secret you pair with PKCE.
- SMART Version: SMART v1, Cerner sandbox and most production tenants are on v1.
- Intended Users: Clinical Team.
- Intended Purposes: Clinical Tools. Add Patient-Provider Communication too if your app sends messages to patients.
- Redirect URI (the OAuth callback after authorize): primary is
https://app.medblocks.com/api/auth/smart/launch-callback. Use + Add more for additional environments:https://dev.app.medblocks.com/api/auth/smart/launch-callbackhttp://localhost:3000/api/auth/smart/launch-callback(for sandbox testing)
- SMART Launch URI (the URL Cerner opens when the clinician launches the app from PowerChart):
https://app.medblocks.com/api/auth/smart/launch/<your-org-id>for production.- For sandbox testing from your machine, use
http://localhost:3000/api/auth/smart/launch/<your-org-id>instead. Cerner only accepts one Launch URI per app, so swap this value between sandbox and prod tests. - Replace
<your-org-id>with the org id shown in Medblocks at Settings, Connections, Cerner Clinical Workflow.
- Default FHIR Version: R4.
Click Next.
Product Selection
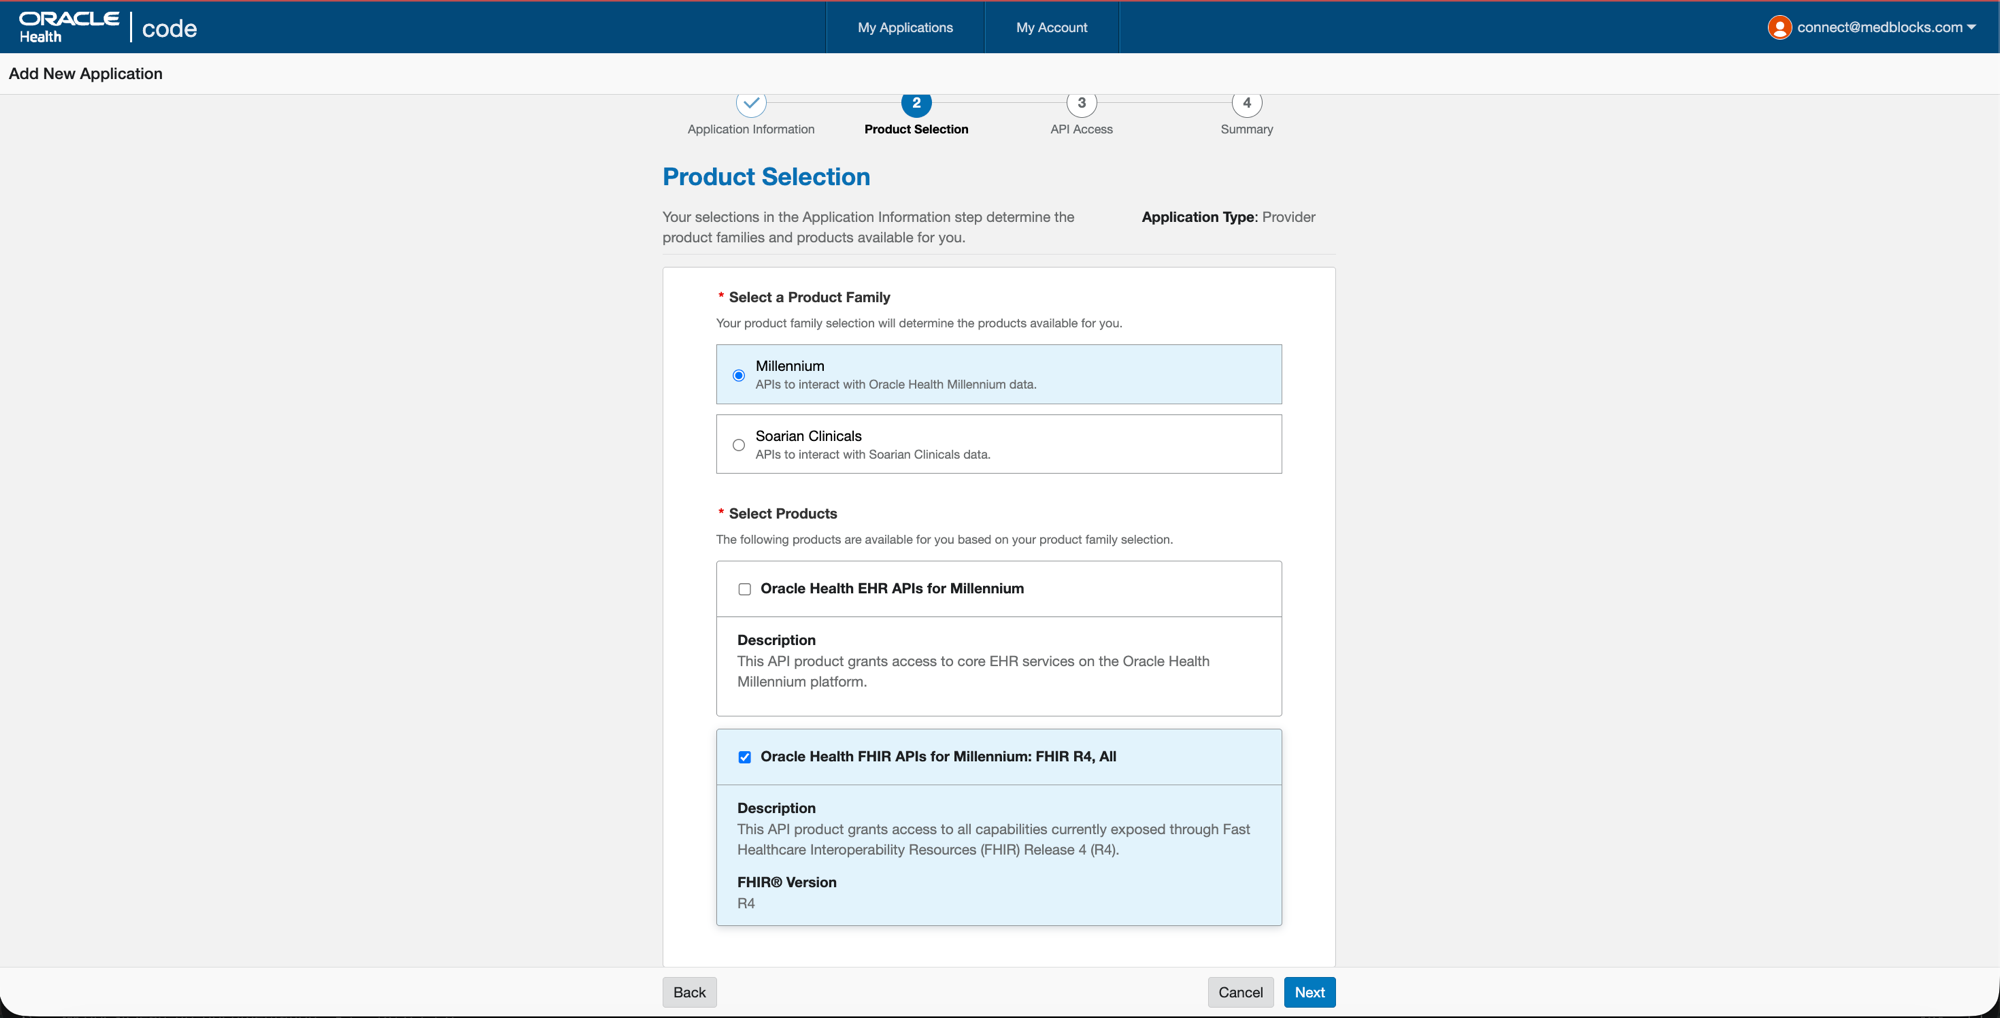
- Product Family: Millennium, this is the main Oracle Health EHR platform that 99% of customer hospitals run, and what the public sandbox uses. Soarian is a legacy platform you can ignore.
- Select Products: tick Oracle Health FHIR APIs for Millennium: FHIR R4, All, this is the FHIR R4 surface Medblocks queries. Leave Oracle Health EHR APIs for Millennium unticked, that’s Cerner’s proprietary non-FHIR APIs (CCL, MPages) and Medblocks does not use them.
Click Next.
API Access (Scopes)
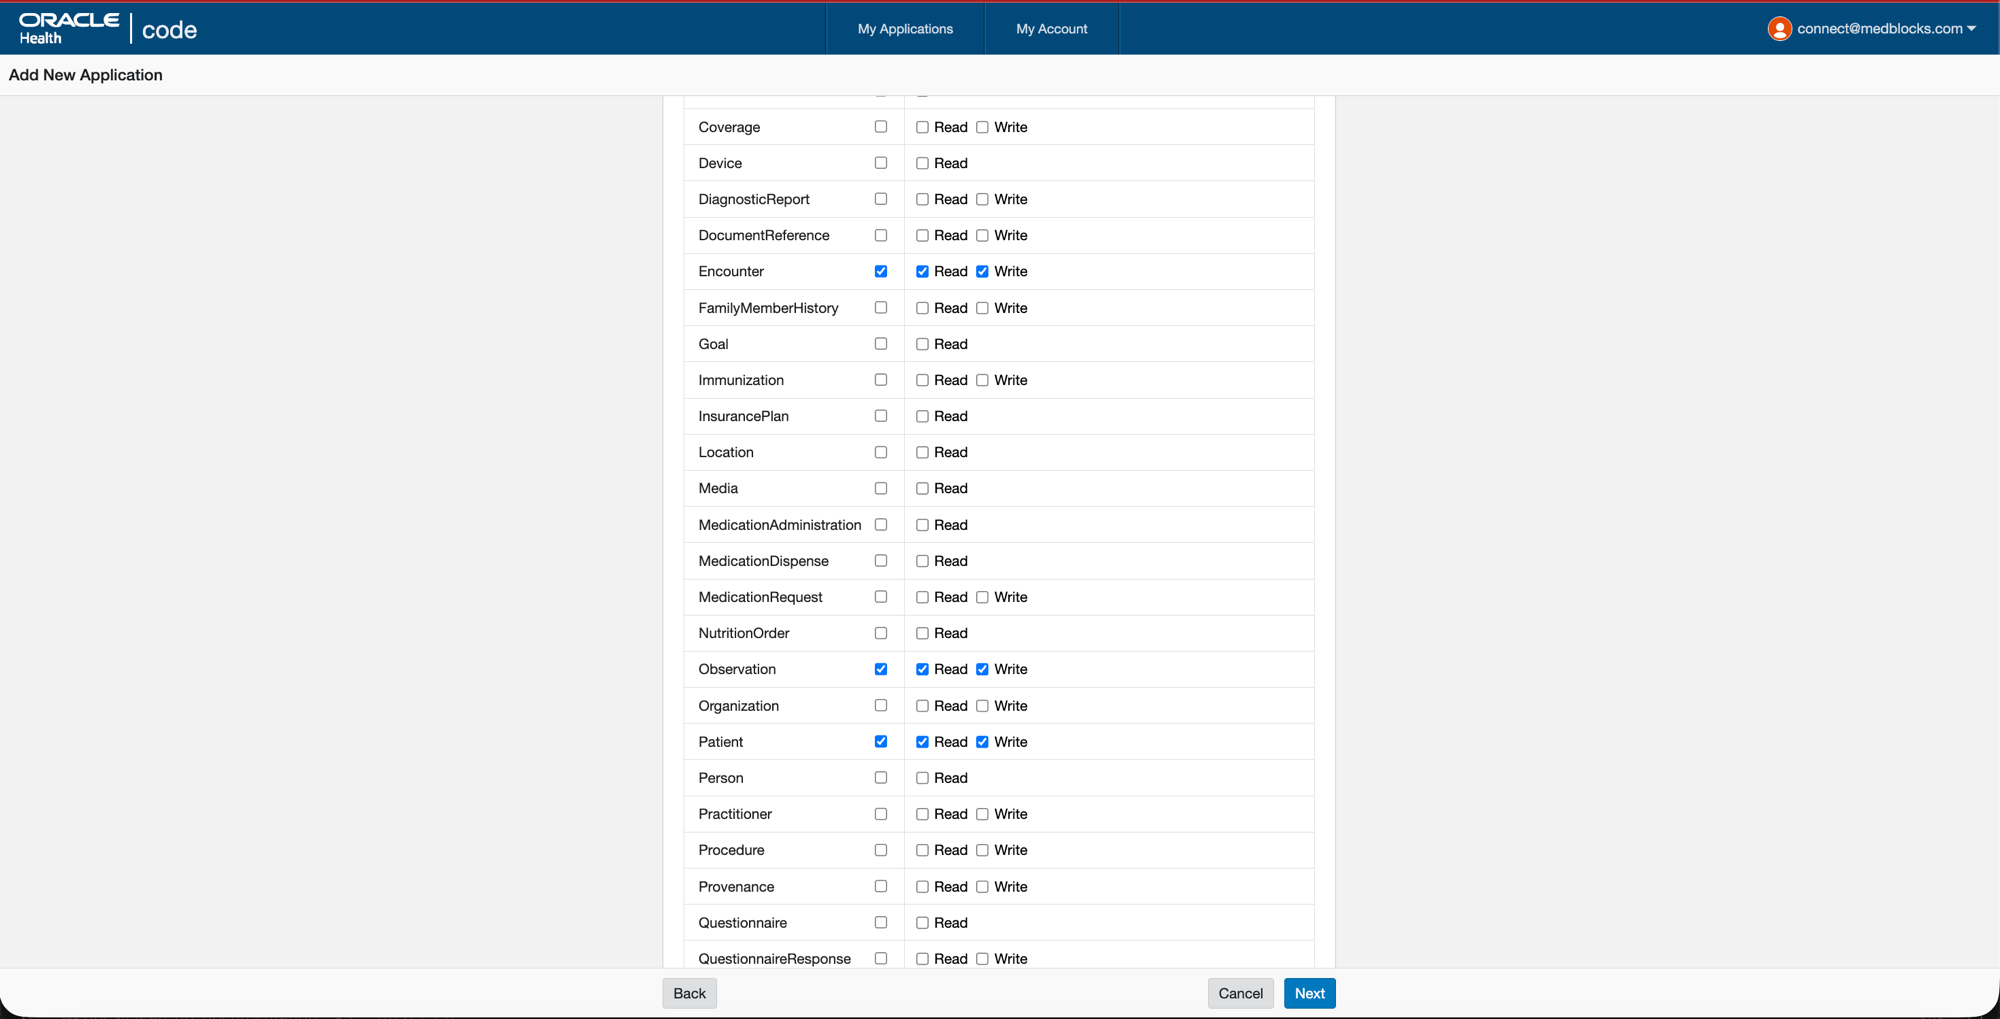
Two scope tables appear, User Product APIs (clinician scopes, user/*) and Patient Product APIs (patient scopes, patient/*).
In the User Product APIs table, tick Read (and Write if your app needs to push data back) on:
- Patient
- Encounter
- Observation
Leave everything else, including the entire Patient Product APIs table, unticked. You are launching as a provider, not a patient app. Cerner reviews any scope inflation, so request only the resources Medblocks actually uses, real production tenants typically grant only Read.
Click Next, review the summary, and Submit.
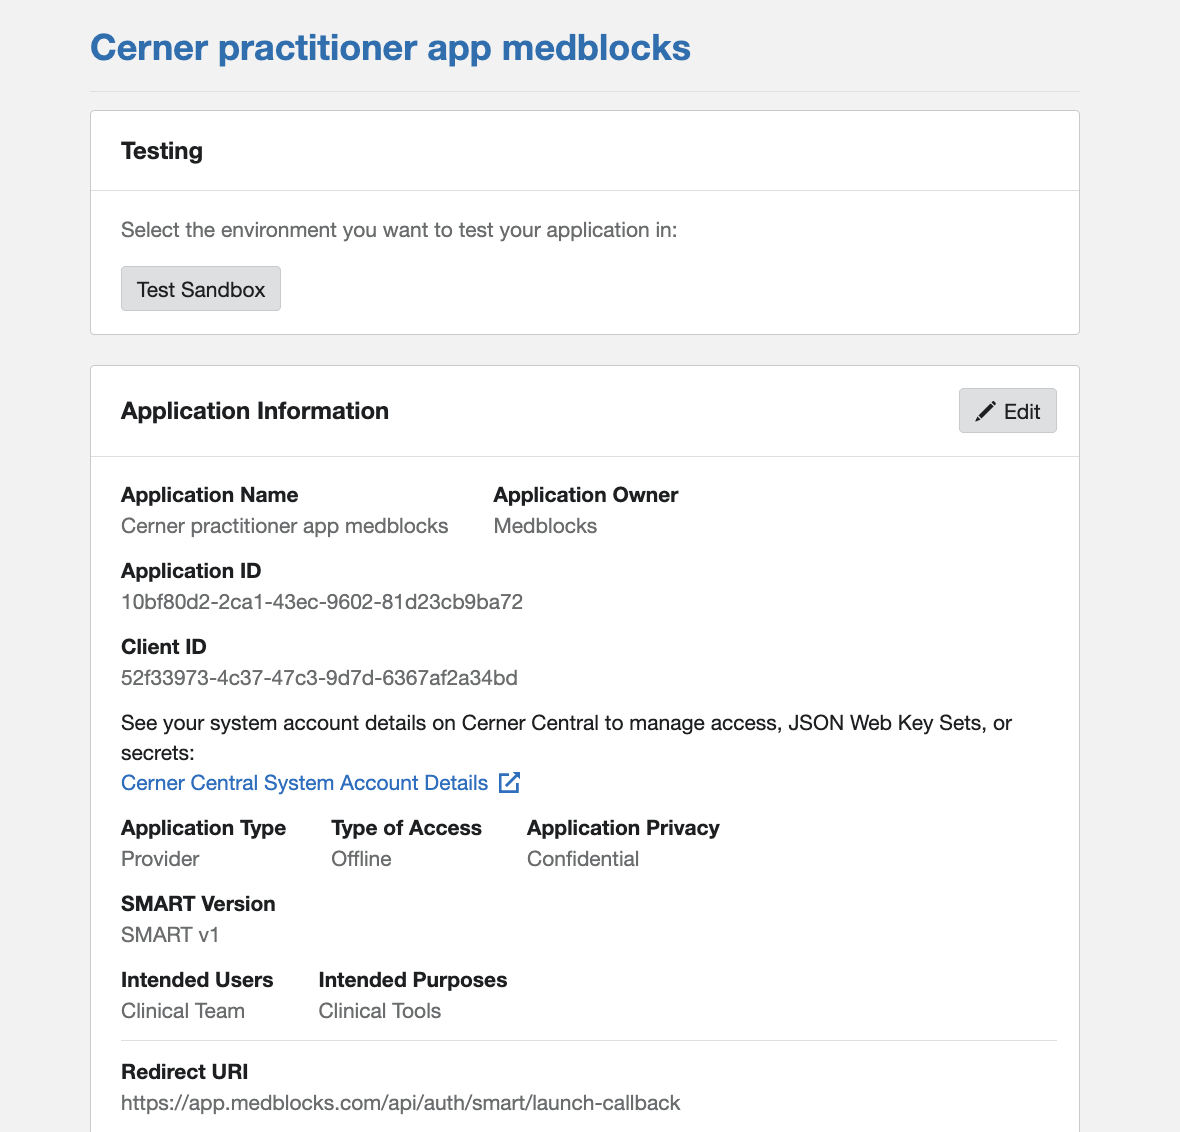
Application Details Page
After submission you land on the application detail page. This is the canonical view of everything you just registered plus the Client ID and Client Secret you need to plug into Medblocks.
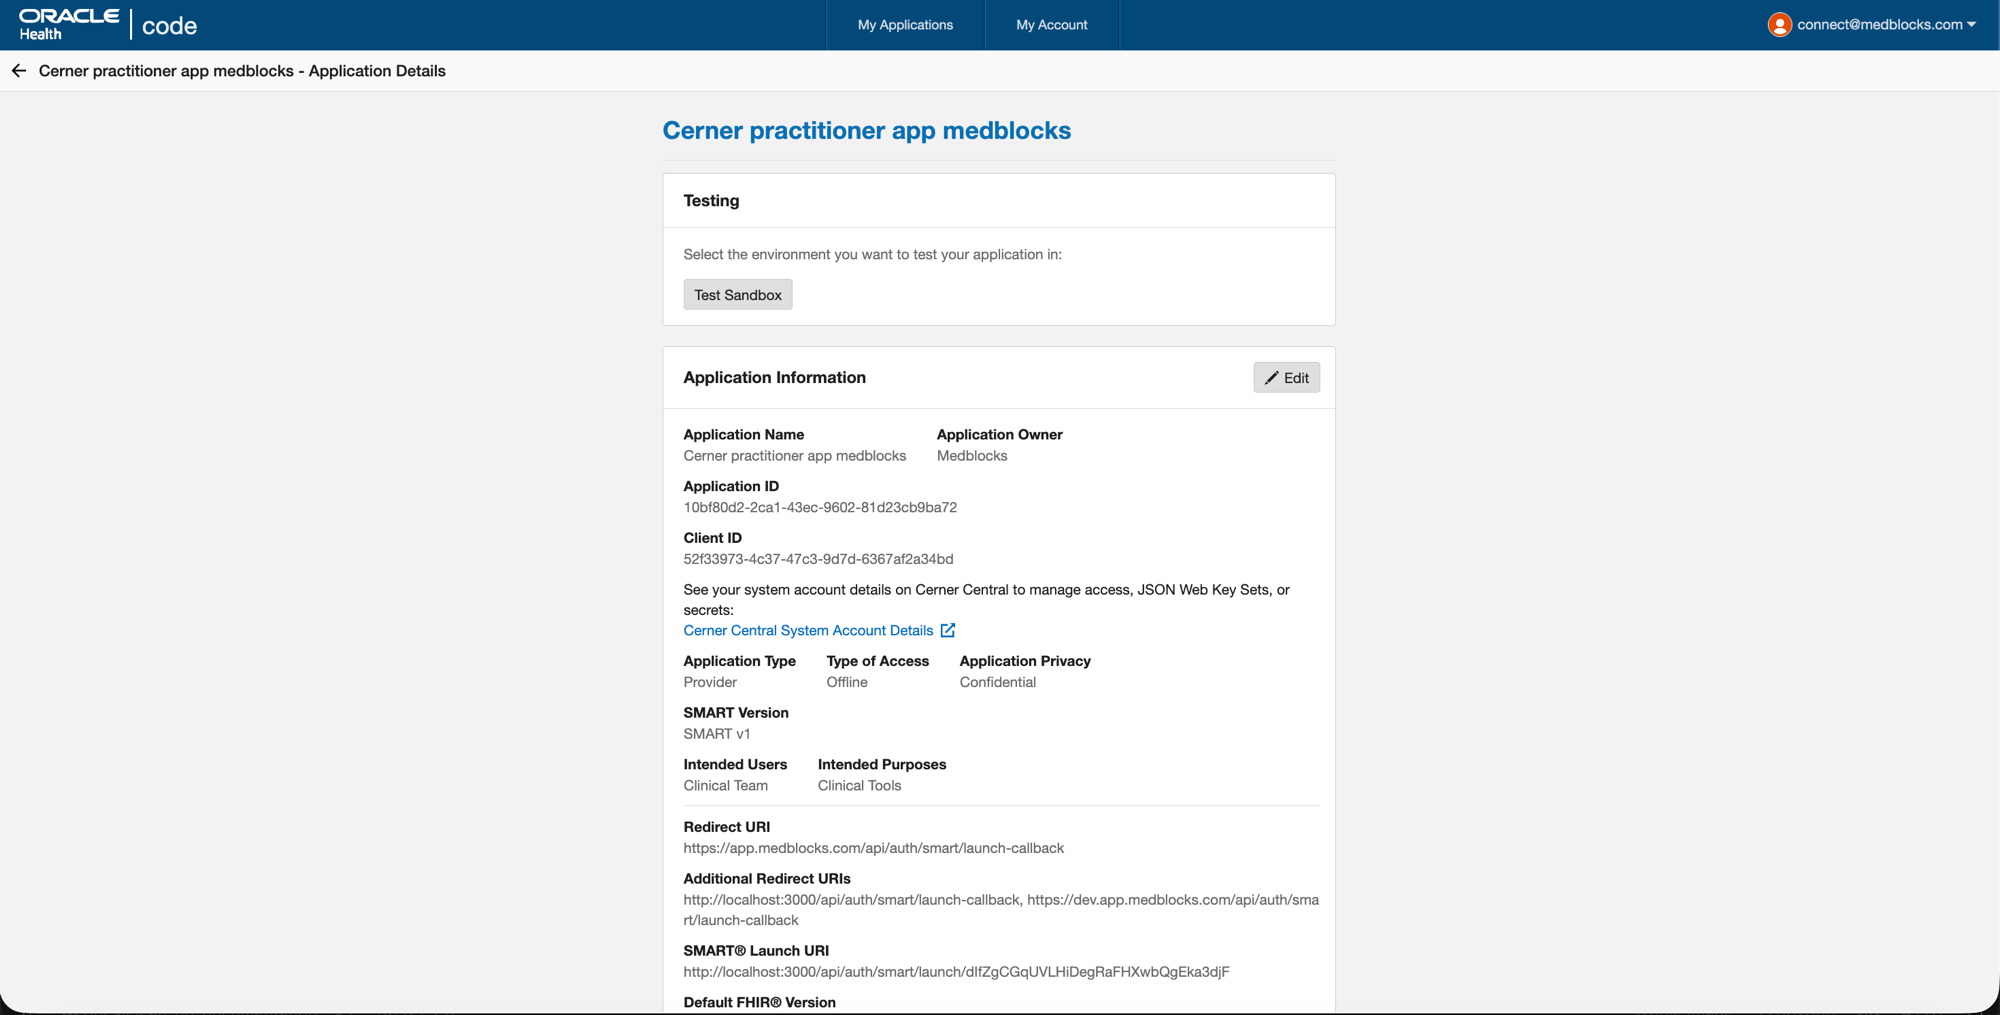
- Client ID is shown on the detail page (e.g.
52f33973-…). - Client Secret is on Cerner Central rather than the Code Console itself, follow the Cerner Central System Account Details link to view or rotate it.
The detail page also confirms the resolved Redirect URI, additional Redirect URIs, and SMART Launch URI Cerner has on file. Confirm they match what you registered, especially the Launch URI (it should end with /api/auth/smart/launch/<your-org-id>, not the callback path).
Cerner Central System Account
Each Cerner Code Console app has a paired System Account on Cerner Central where the client secret is managed and, for confidential apps, the JWKS URL is registered. Click the Cerner Central System Account Details link from the Application Details page above.
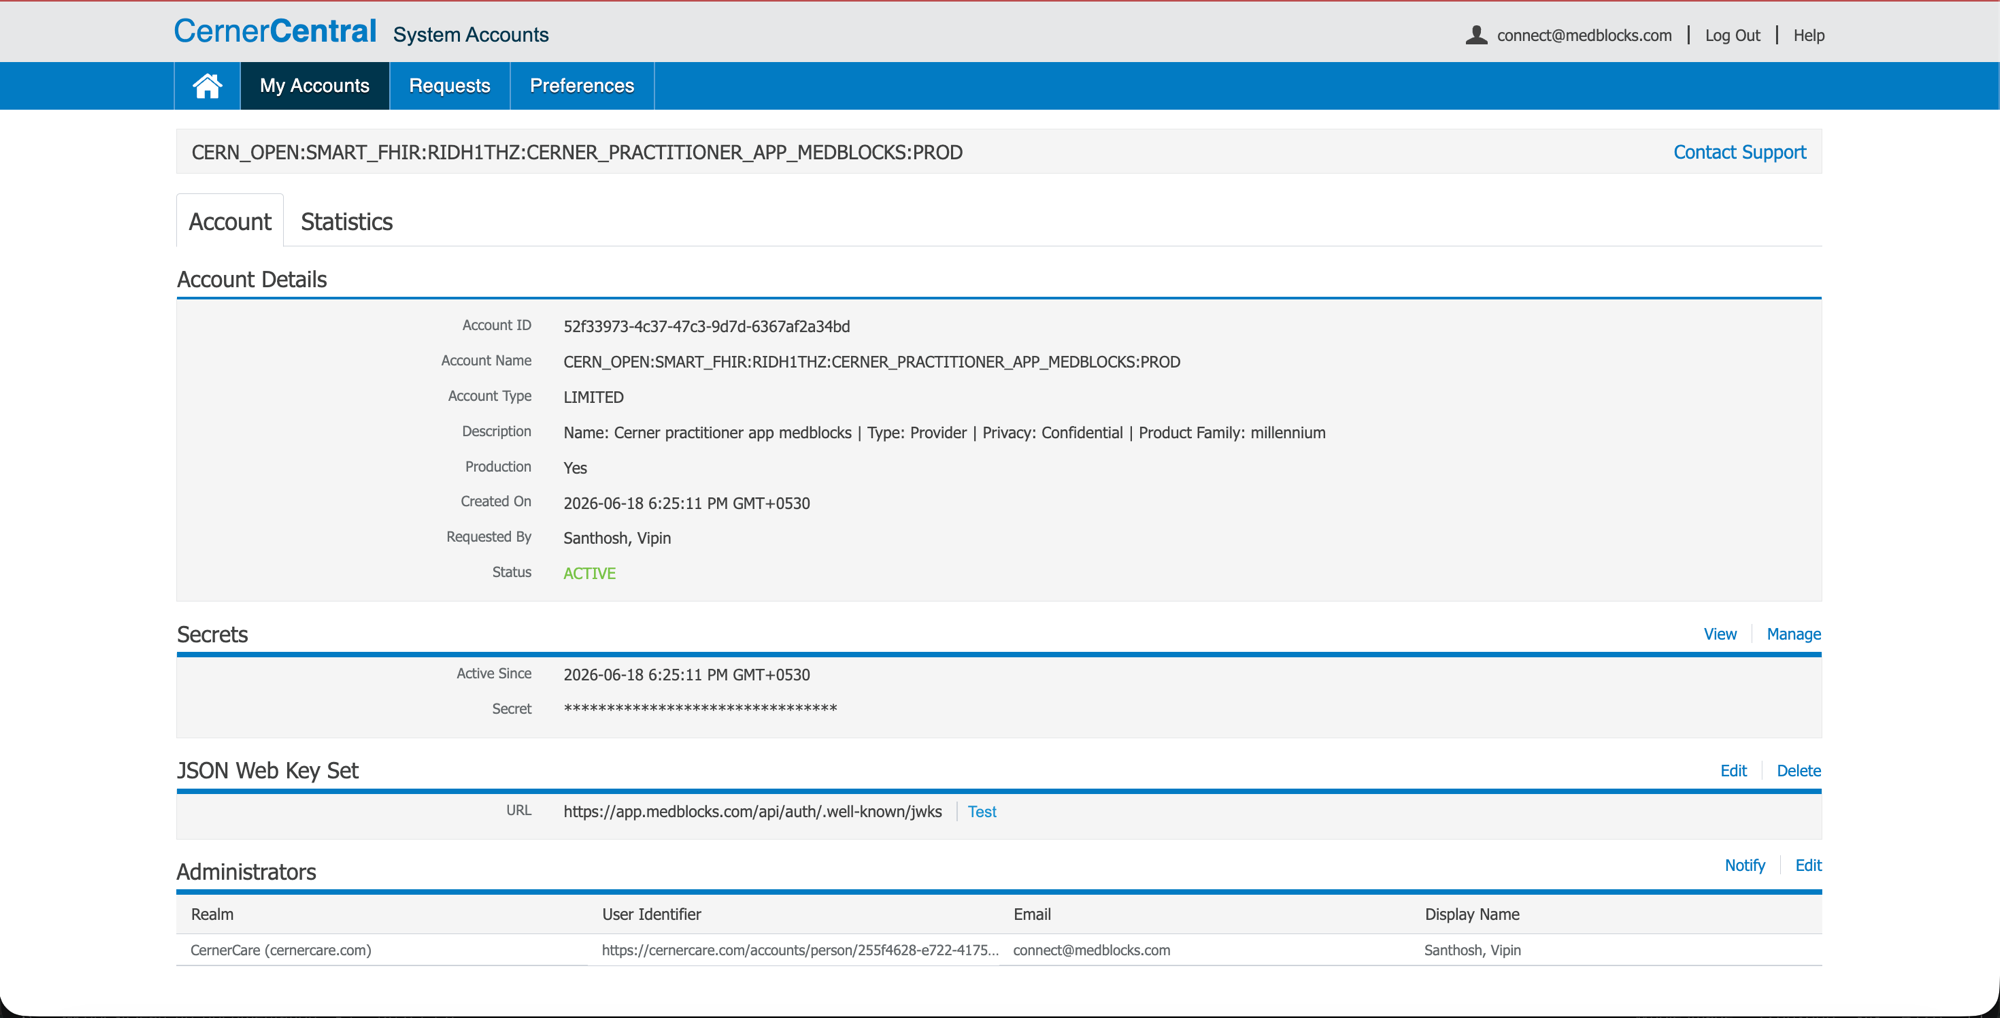
What to confirm here:
- Account ID matches the Client ID from the Code Console.
- Production: Yes.
- Status: ACTIVE.
- Secret: present (click Manage or View to copy the value for Medblocks).
- JSON Web Key Set URL:
https://app.medblocks.com/api/auth/.well-known/jwks. This is the public-key endpoint Cerner fetches to validate Medblocks’ JWT client assertions. The same JWKS serves all environments (prod, dev, local) because the keypair is shared, so this single URL is correct everywhere.
If the JWKS field is empty or pointing somewhere else, click Edit to the right of the JSON Web Key Set header.
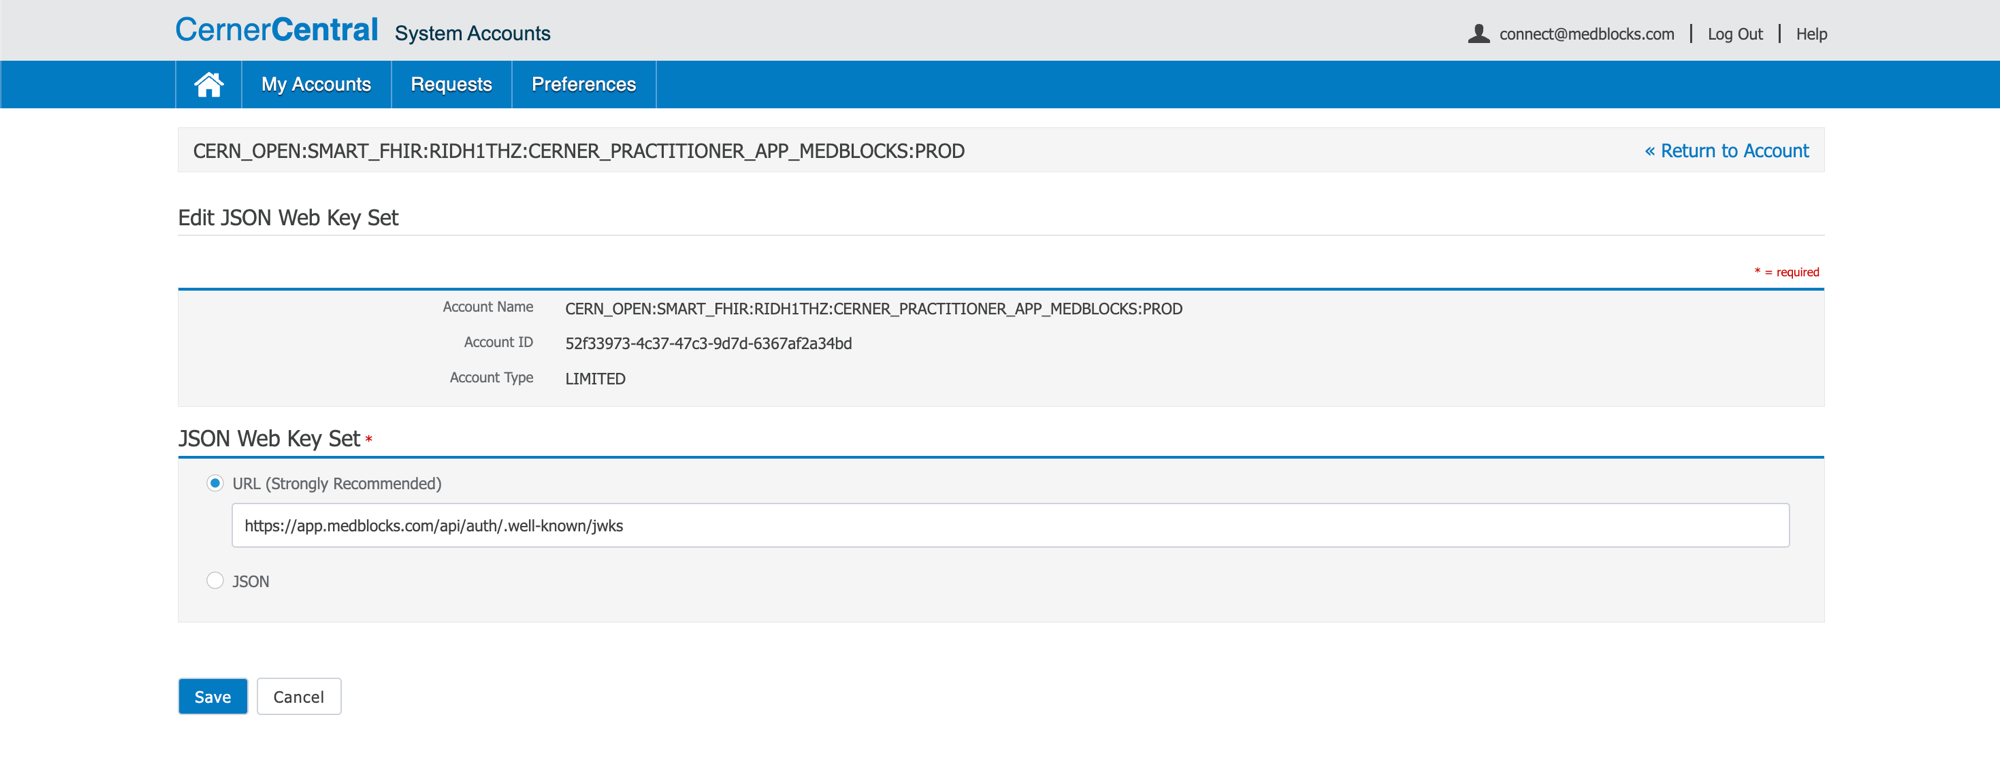
- Select the URL (Strongly Recommended) radio.
- Paste:
https://app.medblocks.com/api/auth/.well-known/jwks - Click Save.
Then back on the System Account page, click Test next to the JWKS URL to confirm Cerner can fetch it. A successful test means Cerner will accept JWT client assertions Medblocks signs.
Configure Medblocks
- Go to Settings.
- Select Connections.
- Find Cerner and open it.
The top of the page has the app-side settings — the App launch URL Medblocks redirects to after an EHR launch completes, and the CDS endpoint (if you’re serving CDS Hooks). CDS caching stays off unless you know you need it.
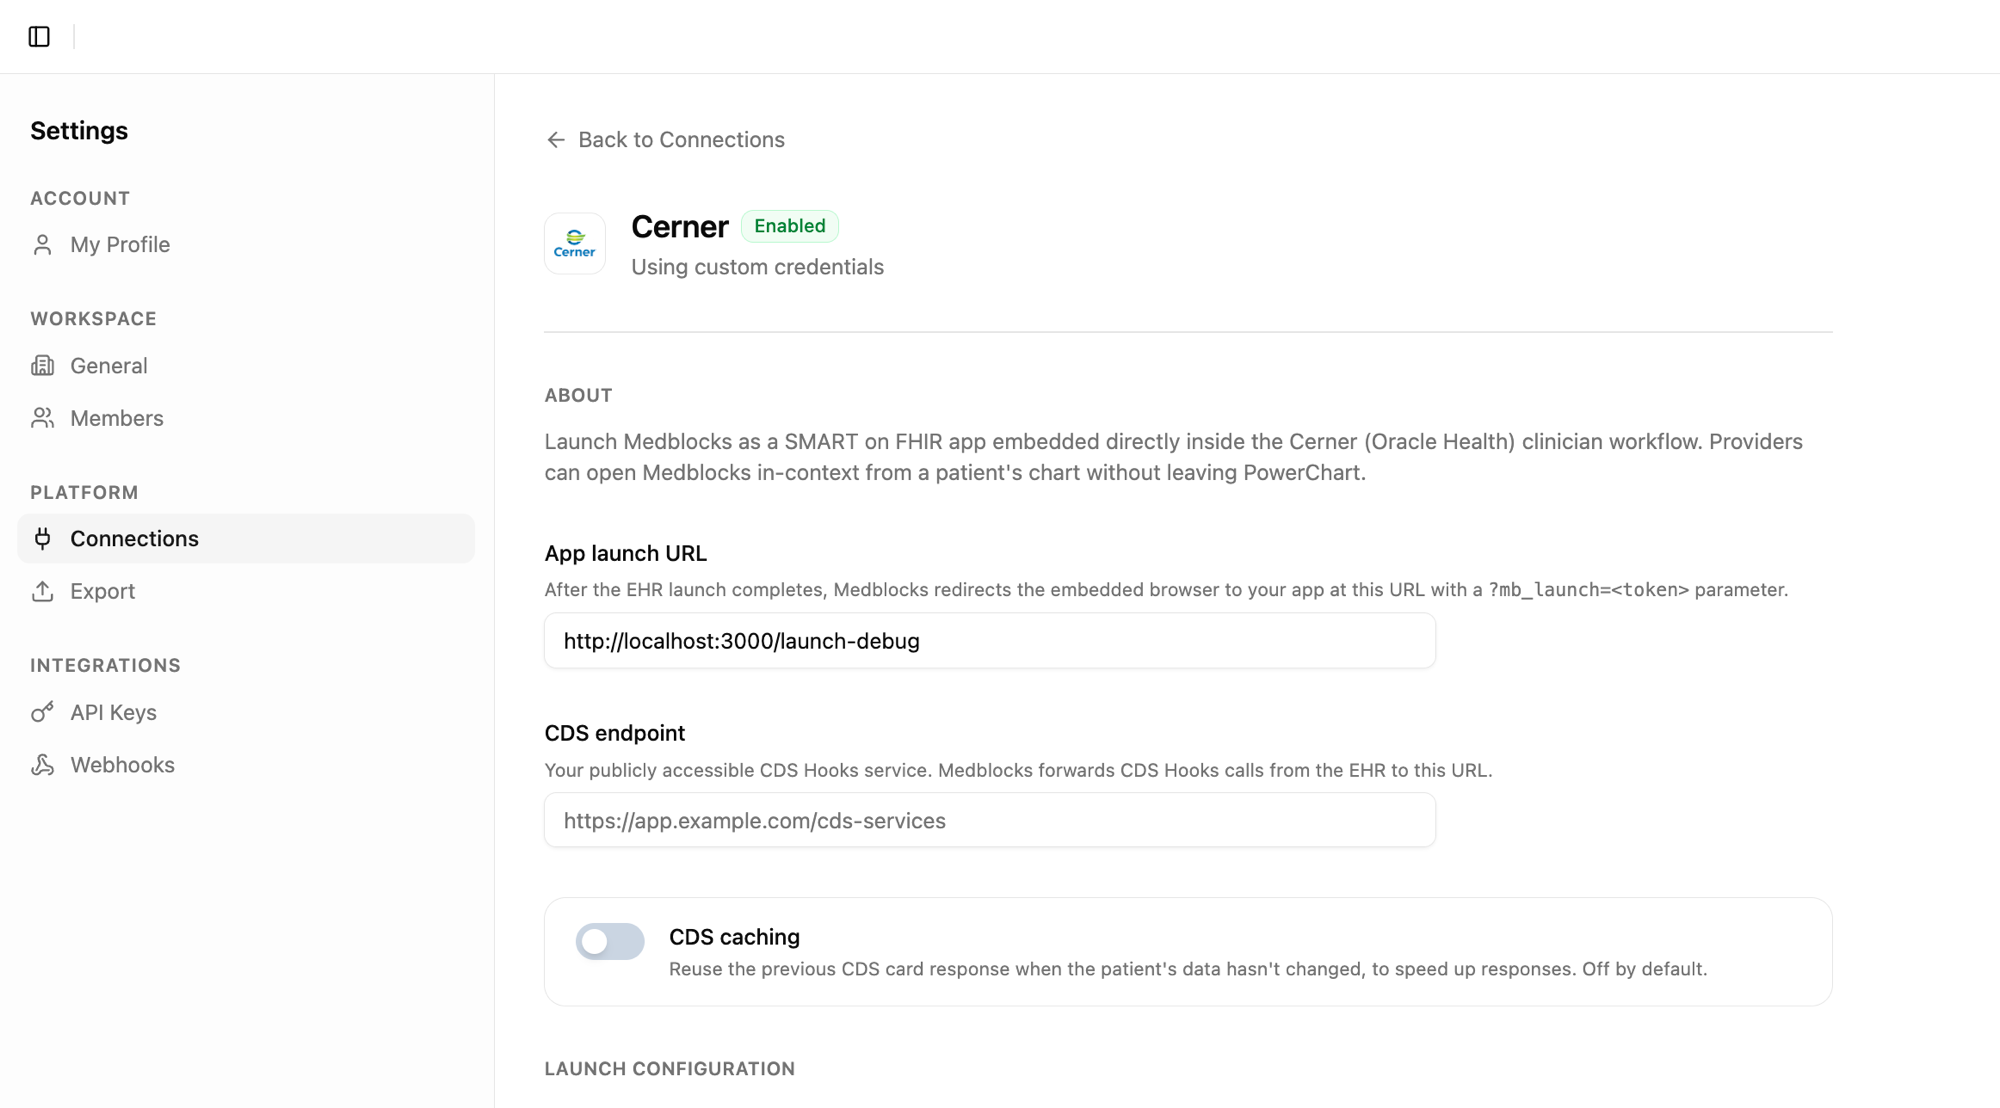
Scroll down for the org-scoped Launch URL + CDS Hooks URL that Cerner needs, and the credentials block:
- Toggle Use custom credentials.
- Paste the Client ID from Cerner Central.
- Copy the Redirect URI and JWKS URI shown here into the corresponding fields on the Cerner Code Console (if you haven’t already).
- Save.

The Scopes row shows what Medblocks will request on every launch — confirm it matches what you ticked on the Code Console API Access screen.
Test in the Cerner Code Sandbox
Cerner provides a public sandbox tenant ec2458f2-1e24-41c8-b71b-0e701af7583d with synthetic patients and a built-in launcher.
-
From the application detail page click Test Sandbox in the Testing panel.
-
Pick a synthetic patient. Cerner opens a Testing Details dialog with the sandbox tenant’s pre-populated patients. Each row describes the data shape (cancer staging observations, ICU vitals, pregnancy conditions, allergies, etc.) so you can pick whichever scenario fits what you want to test.
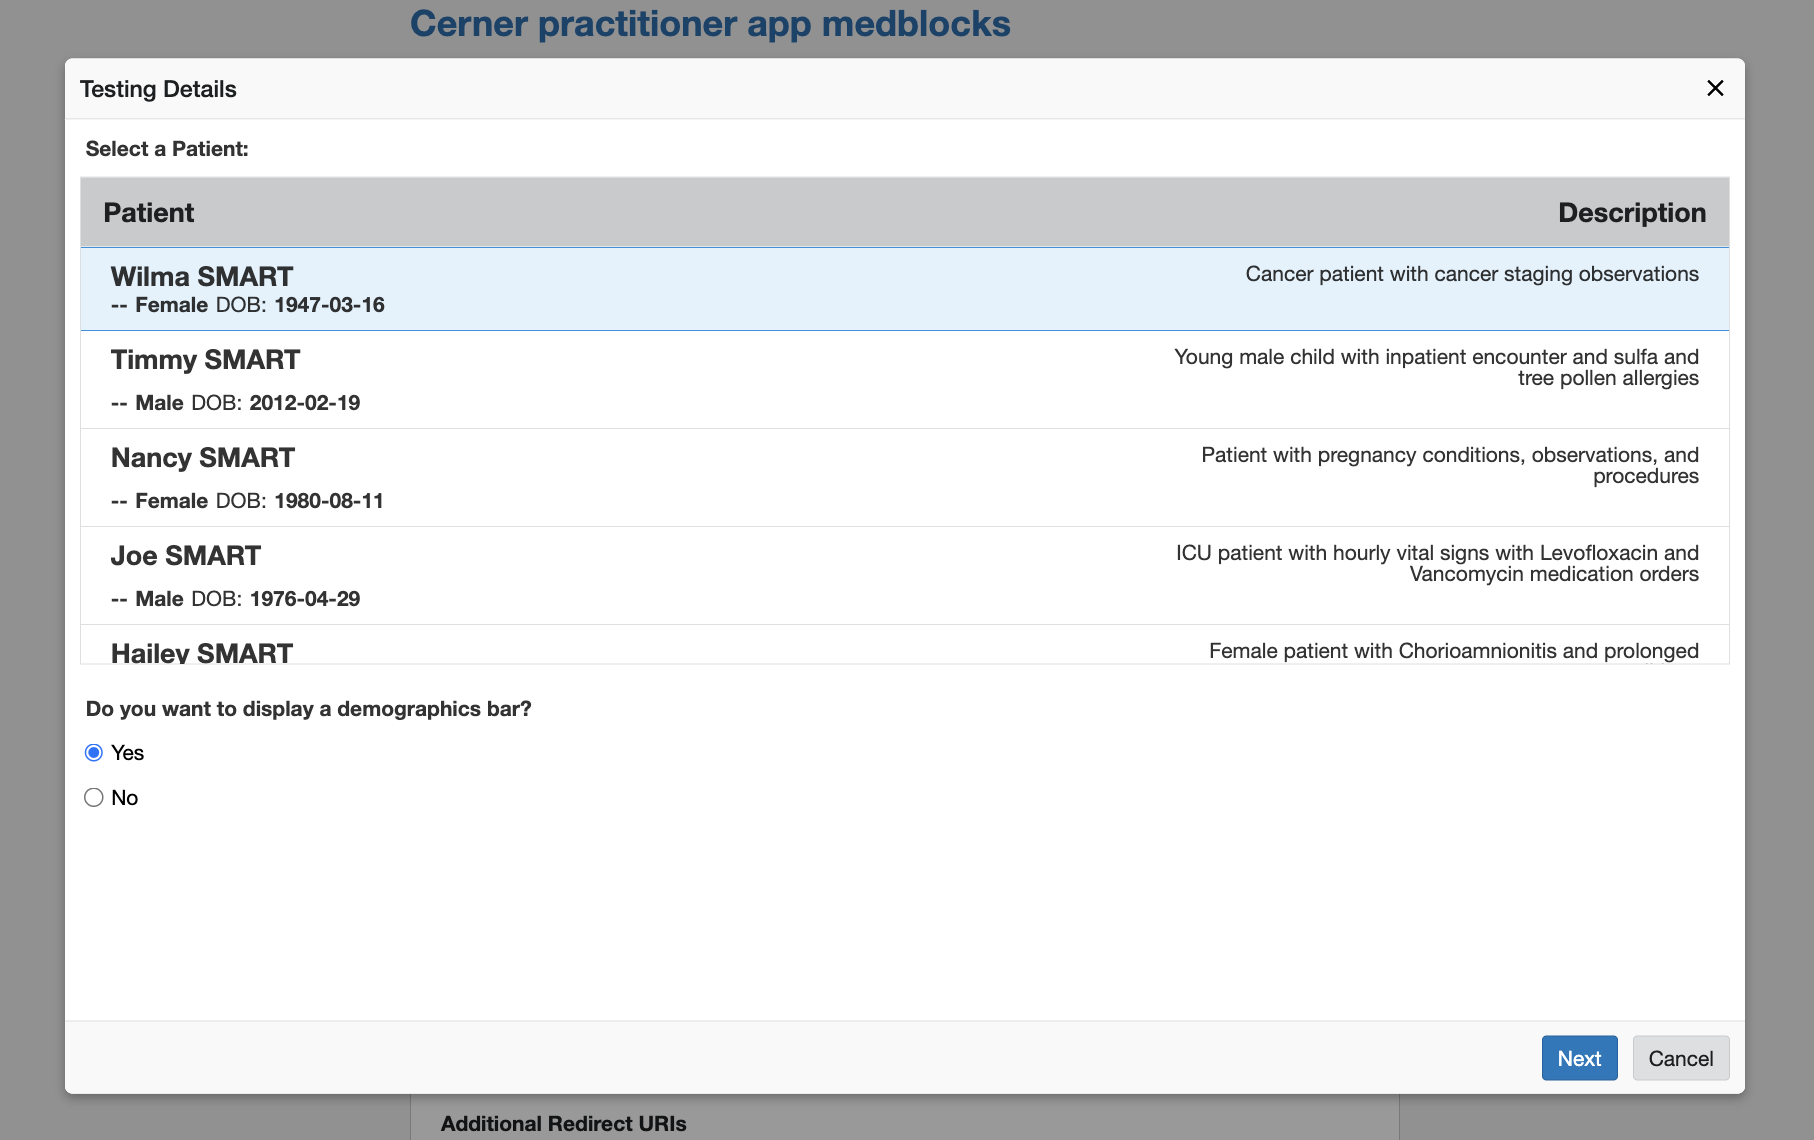
Leave Do you want to display a demographics bar on Yes unless you want to test what the banner-less behavior looks like. Click Next.
-
Launch the testing environment. Cerner shows the sandbox provider credentials you’ll use on the login screen.

Note the credentials (
portal/portalfor this sandbox), then click Launch. A new window opens. -
Sign in. A new window opens to the Oracle Health login. Use the credentials from the previous step (
portal/portal), leave the third field as it is, and click Log In.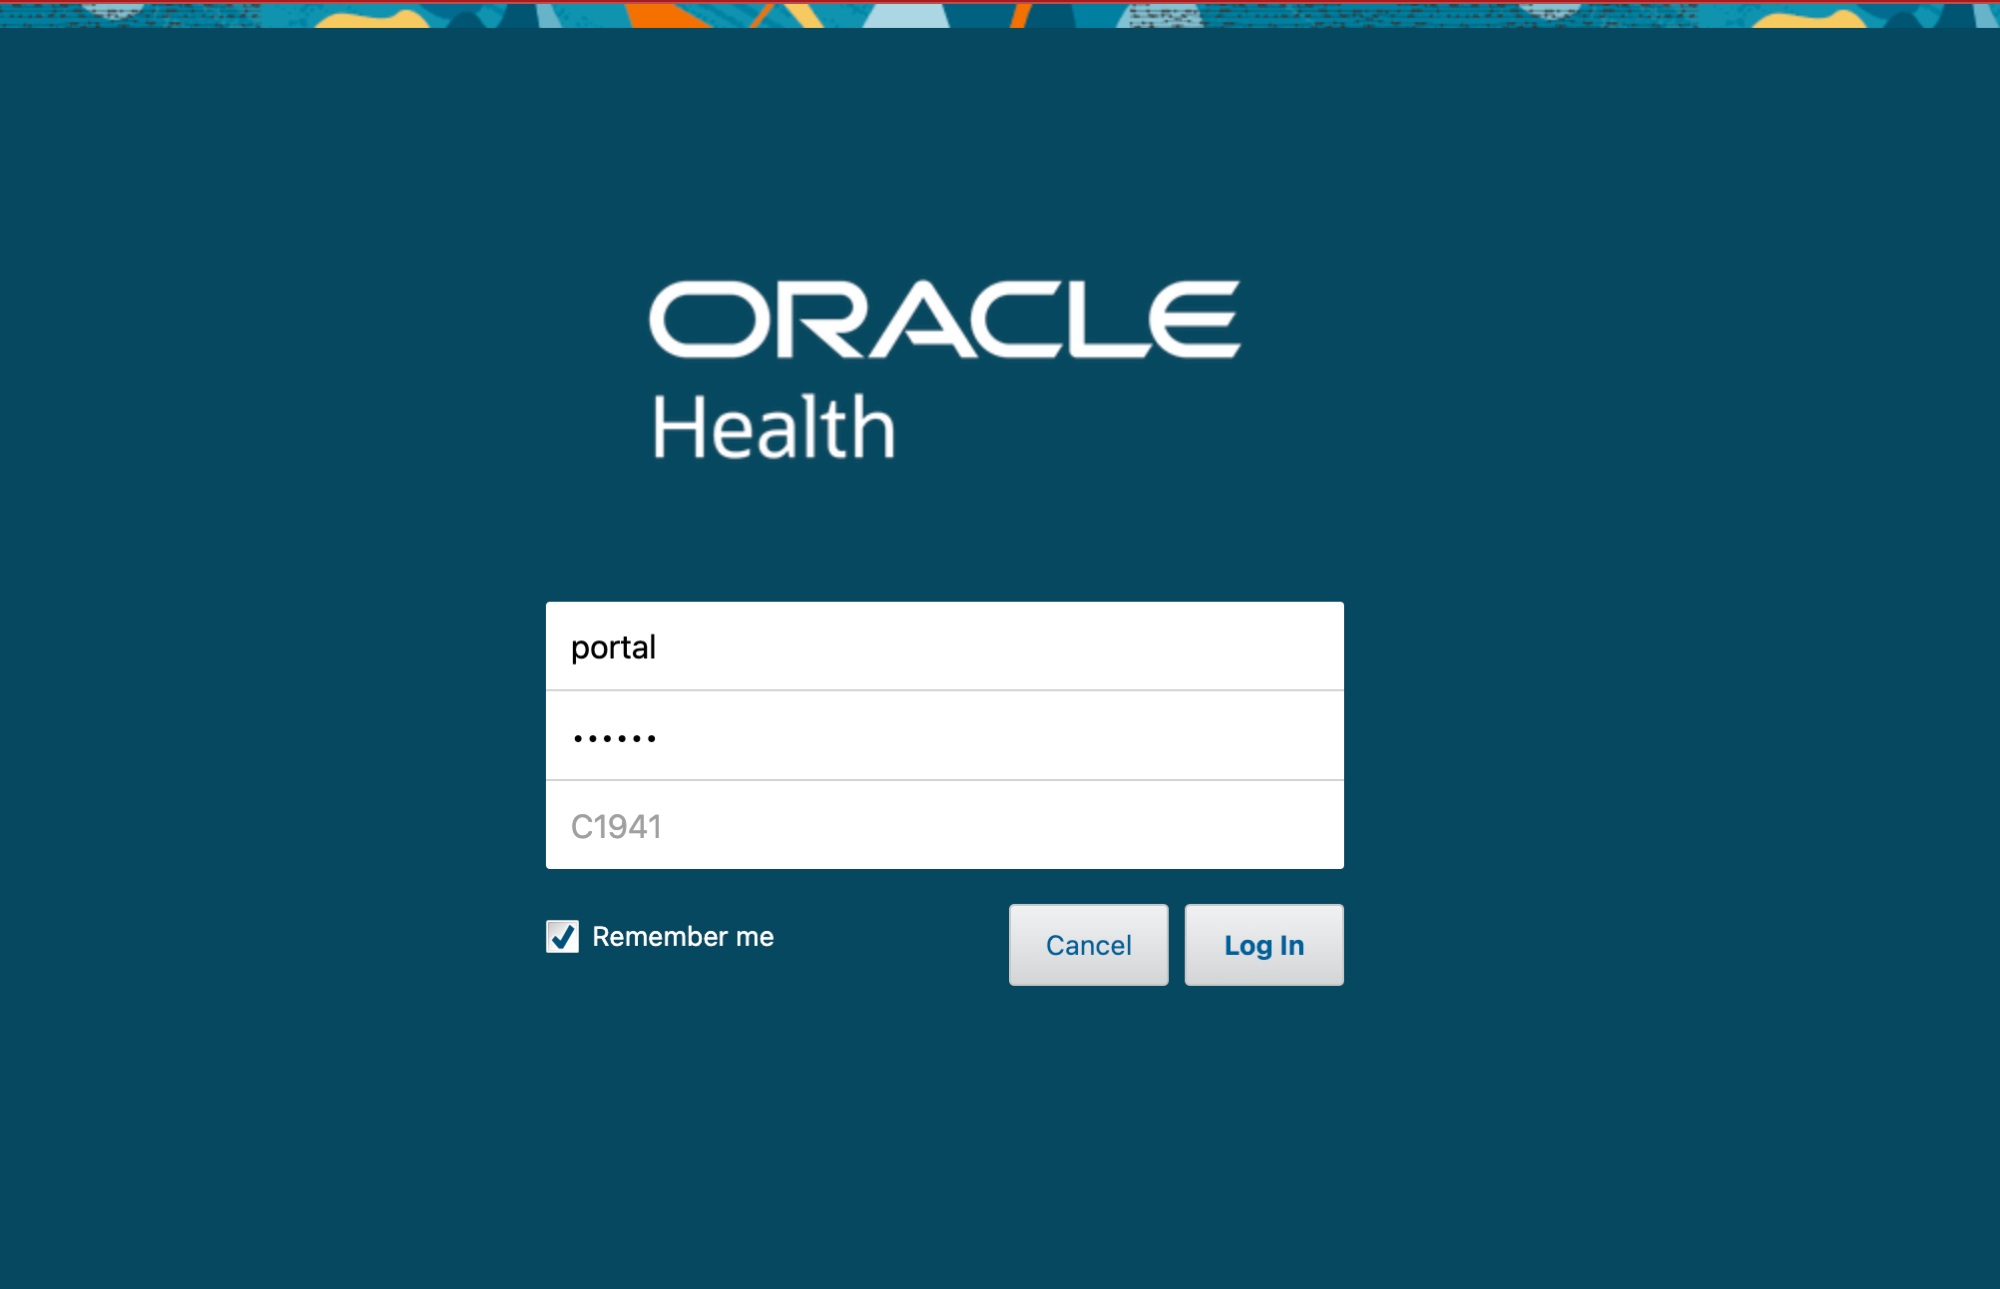
-
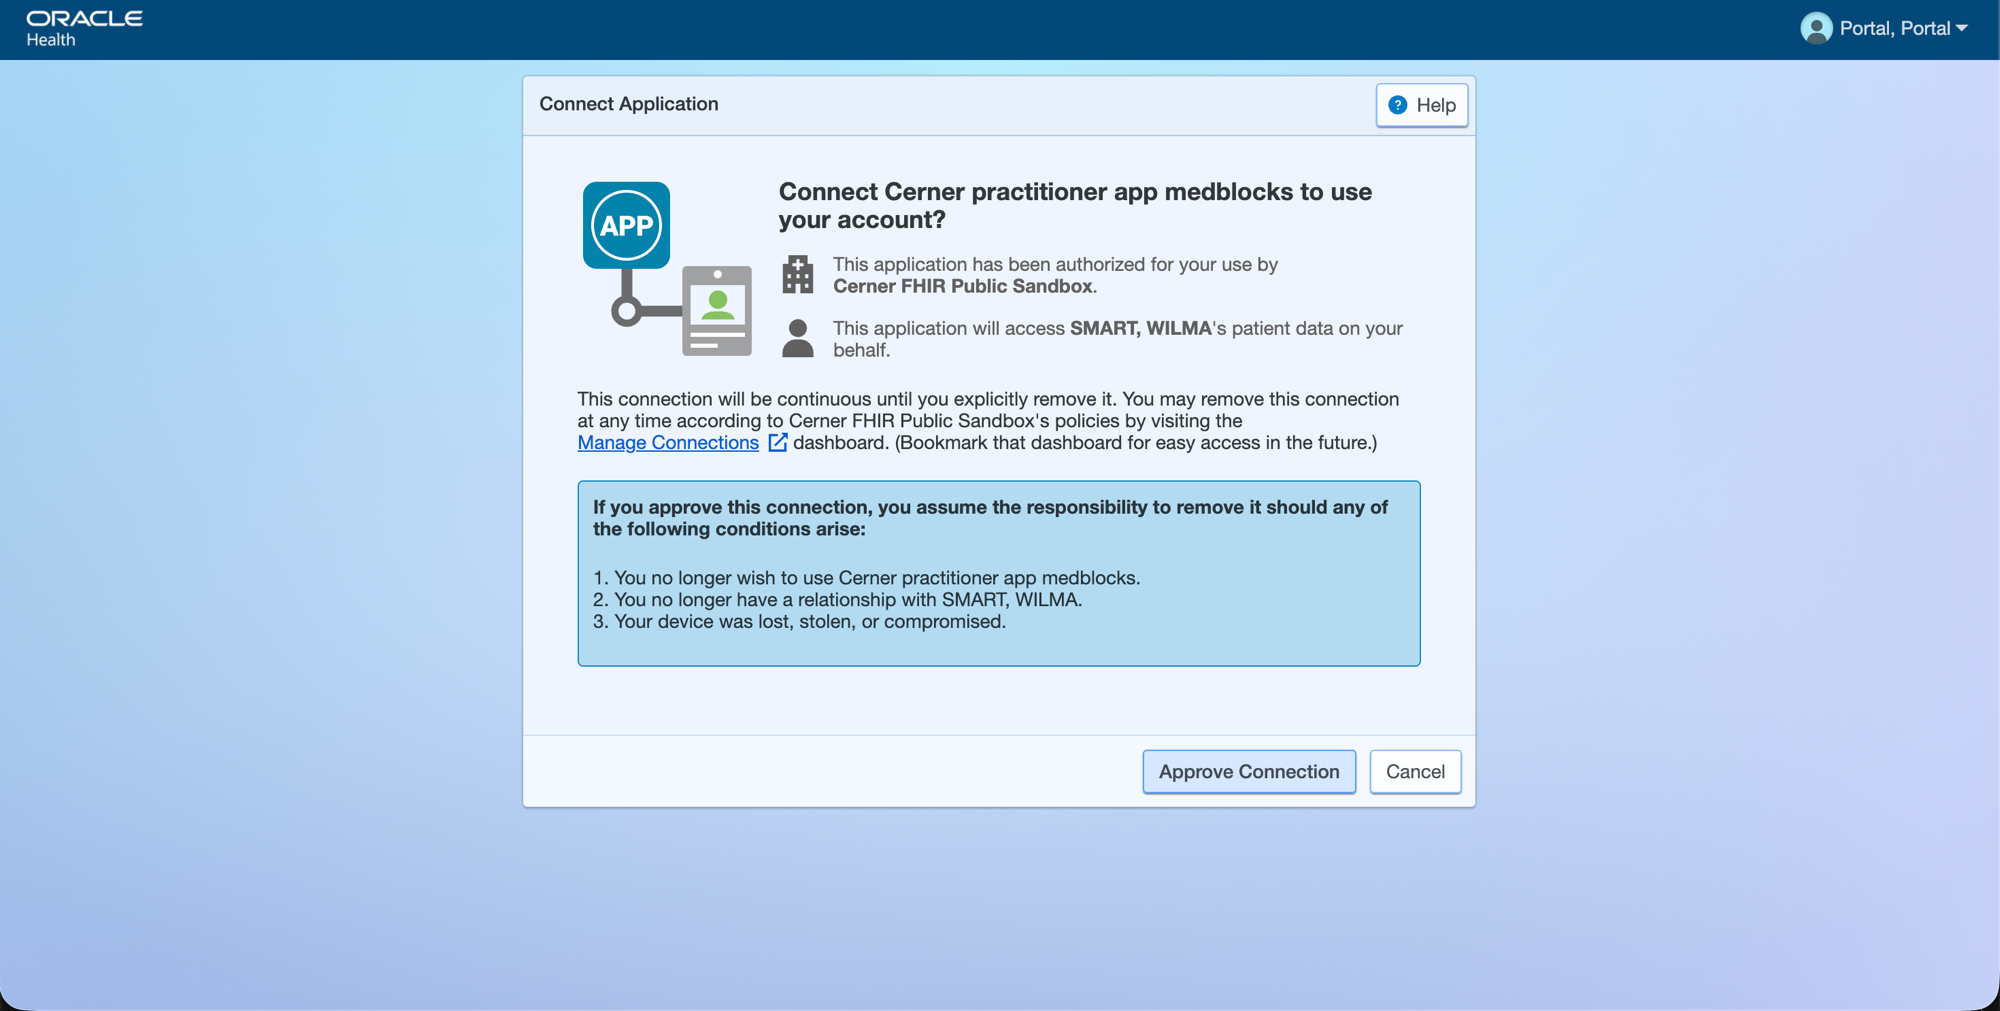
Approve the connection. Cerner shows the SMART consent prompt summarising what data the app will access on the patient’s behalf. Click Approve Connection.
-
Cerner redirects to your SMART Launch URI with
?iss=<fhir-base>&launch=<token>appended. Medblocks then hits Cerner’s authorize endpoint, the launched patient is persisted as a scoped account, and Medblocks bounces to your configured App Launch URL with?mb_launch=<token>appended. Your app exchanges that handle for the launch context (patient FHIR id, encounter id, fhirUser) via Medblocks’ API.
Seeing a “Not Found” page after approval? That’s expected if the App launch URL you configured under Settings, Connections, Cerner Clinical Workflow points at a placeholder like
http://localhost:3000/launch-debug(no route serves it). The launch itself succeeded, your app will be created at that URL in real deployments. To confirm the launch worked, check theehr_launchtable for a row withaccess_token,patient_fhir_id,encounter_fhir_id, andfhir_userpopulated.
If you hit FHIR source not found for iss, the sandbox tenant’s FHIR base URL is missing from fhir_source. Add the sandbox row with environment=sandbox and try again.
Going to Production
Cerner production tenants are per-customer. Each hospital’s IT team must explicitly authorize your Client ID for their tenant before launches will succeed against real PHI. The flow:
- Your customer’s Cerner administrator adds your Client ID to their tenant’s allowlist via Cerner Central.
- You add their tenant’s FHIR base URL as a
fhir_sourcerow withenvironment=production. - The customer’s Medblocks org points at that tenant.
- Edit the SMART Launch URI on the Code Console to point at the production host (
https://app.medblocks.com/api/auth/smart/launch/<customer-org-id>).
There is no “submit for production access” button on the Code Console itself, the app you registered above is already a production-capable Provider app, what gates production access is the per-tenant allowlist plus updating the Launch URI to a production org.