Epic FHIR Authentication: Getting an Access Token in Postman
In the last lesson we registered Care Summary and got a non-production client ID. In this lesson, we take that client ID into Postman and run the OAuth 2.0 flow against Epic’s sandbox.
By the end, you’ll have a live access token using which you can fetch patient details and their vitals and medications
Find Epic’s authorization and token endpoints
Start with the sandbox FHIR base URL:
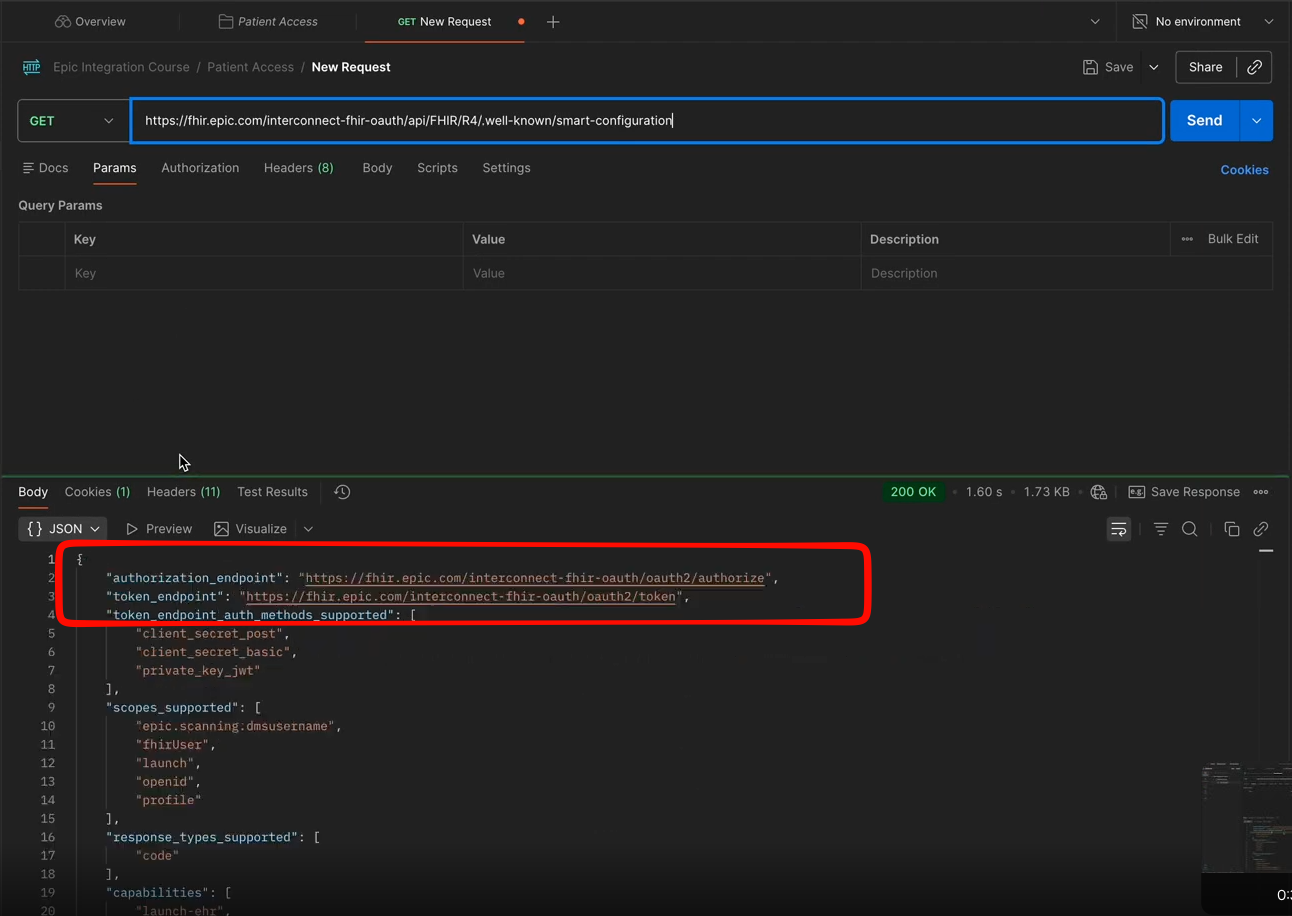
https://fhir.epic.com/interconnect-fhir-oauth/api/FHIR/R4Every SMART on FHIR server publishes its OAuth configuration at a well-known path. Add /.well-known/smart-configuration to the base URL:
GET https://fhir.epic.com/interconnect-fhir-oauth/api/FHIR/R4/.well-known/smart-configurationThe response has a lot of fields but the two fields you need right now are:
authorization_endpoint, where you send the patient to log in and consenttoken_endpoint, where you exchange the code for a token
You’ll use both in Postman, and your app will need them to run the same flow in code.
Set up OAuth 2.0 in Postman
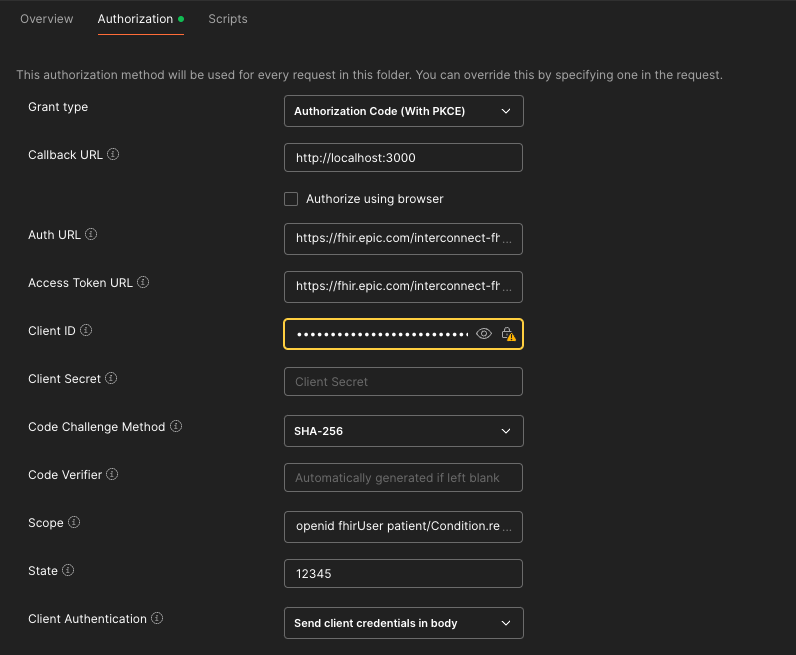
In Postman, open a new request, go to the Authorization tab, pick OAuth 2.0, and fill in the token settings:
| Field | Value |
|---|---|
| Grant type | Authorization Code (With PKCE) |
| Callback URL | http://localhost:3000 (the redirect URI you registered) |
| Auth URL | the authorization_endpoint from smart-configuration |
| Access Token URL | the token_endpoint from smart-configuration |
| Client ID | your non-production client ID |
| Client Secret | leave empty |
| Code Challenge Method | SHA-256 |
| Scope | openid fhirUser |
| Client Authentication | Send client credentials in body |
A few notes on these values.
Client secret stays empty because Care Summary is a public client. It proves its identity with PKCE instead.
The scope openid fhirUser gets you basic information about who logged in and a reference to their FHIR record. That’s enough to test the flow. You can also add patient scopes here, like patient/Observation.read, and you’ll get access to that data too.
The PKCE grant type means Postman does all the PKCE work from Lesson 1 for you. It generates the code verifier, hashes it into the code challenge, and sends each one at the right step.
Postman also swaps the code for a token automatically, so you don’t need to make the token request yourself.
Build your first real FHIR app in 15 days
500+ builders have done it. Live kick-off, structured modules, Demo Day. $27.
Join the challengeLog in as a sandbox patient
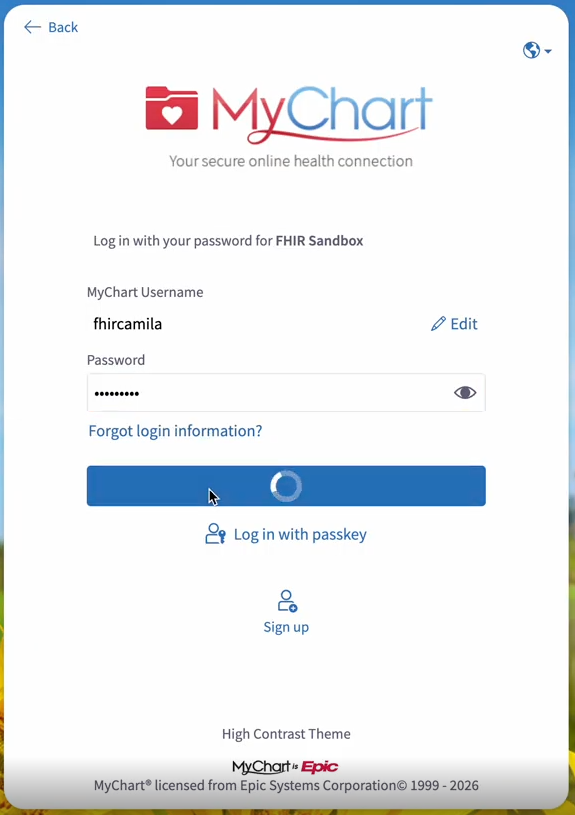
Click Get New Access Token. Postman opens Epic’s MyChart login page.
Epic’s sandbox comes with test patients, listed on the sandbox test data page on Epic. We’ll use Camila Lopez, the first patient on the list. Logging in as Camila is close to a tradition when testing Epic.
- Username:
fhircamila - Password:
epicepic1
The “not affiliated with your provider” warning
After logging in, you’ll see a warning that this app isn’t affiliated with your provider and isn’t covered by HIPAA.
In the sandbox, ignore it and continue. In production, Epic shows this warning until you’ve filled out its data use questionnaire for the app.
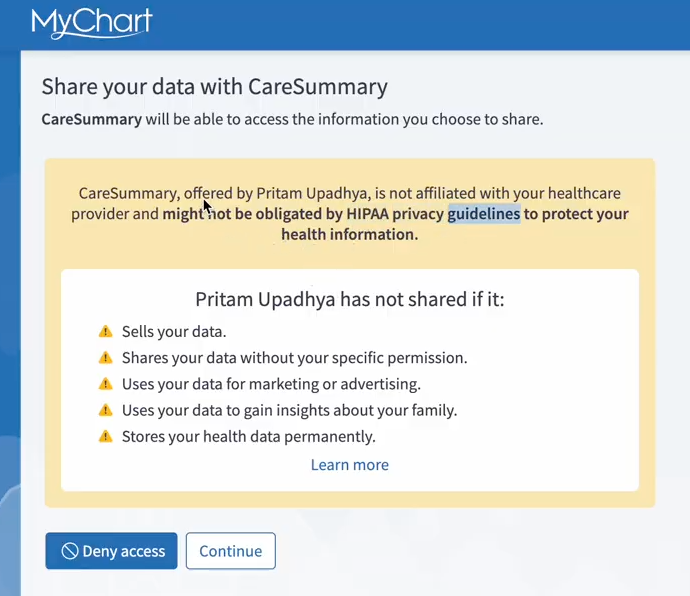
In the sandbox you can continue past this. In production, the data use questionnaire removes it.
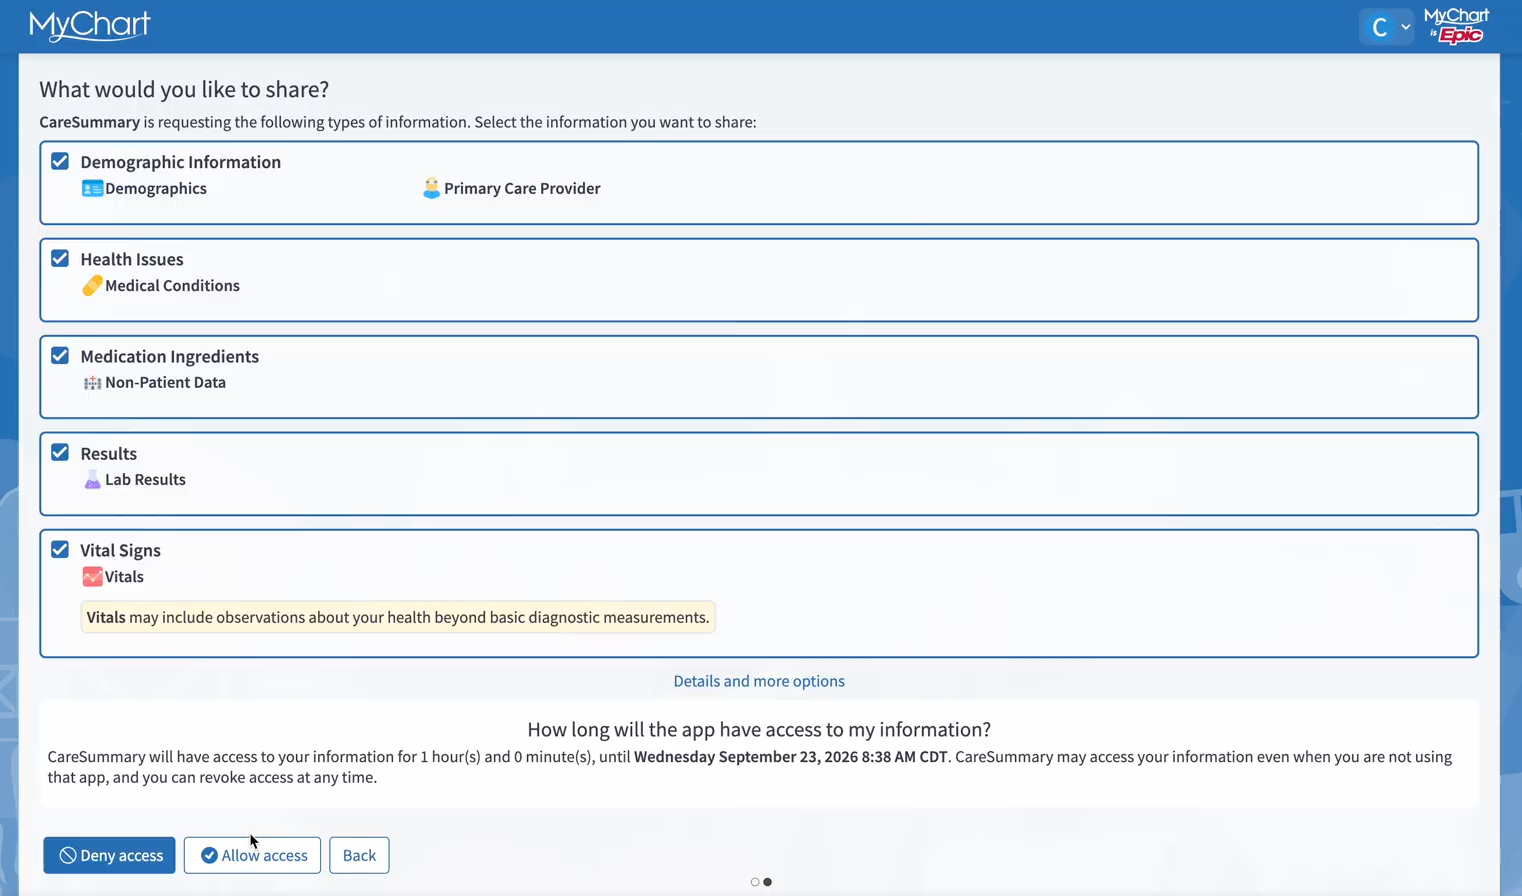
The MyChart Consent Screen
Now you’ll be taken to the Epic MyChart Consent Screen where all the scopes asked for in the request will be shown and you can select all or a subset of those scopes.
Click on Allow Access. MyChart redirects back to the callback URL, Postman captures the code, and exchanges it for a token in a POST request to the token endpoint, with the PKCE verifier included.
Read the token response
Here’s the token response Epic sends back, as JSON:
{
  "access_token": "eyJhbGciOi...",
  "token_type": "Bearer",
  "expires_in": 3600,
  "scope": "openid fhirUser ...",
  "id_token": "eyJ0eXAiOi...",
  "patient": "erXuFYUfucBZaryVksYEcMg3",
  "__epic.dstu2.patient": "T1wI5bk8n1YVgvWk9D05BmRV0Pi3ECImNSK8DKyKltsMB",
  "state": "..."
}
The fields that matter:
access_token is the bearer token you attach to every FHIR request from now on.
token_type is always Bearer. Every request carries the header Authorization: Bearer <access_token>.
expires_in is the number of seconds until the token expires. It varies by organization, so read it from the response instead of hardcoding it.
scope is what you were actually granted. The sandbox has a bug where you get every scope, even if you requested one or two. Production returns only what you asked for.
id_token is there because you requested openid. It’s a JWT, so you can paste it into jwt.io to decode it and see who logged in and their details.
patient is the patient’s FHIR ID. This is what you use in API calls, for example /Patient/{id} on the sandbox FHIR base URL.
What is __epic.dstu2.patient?
This is an Epic-specific field. It’s the same patient’s ID on Epic’s older DSTU2 FHIR server, and it’s usually different from the R4 ID in patient.
The reason the IDs differ is that Epic’s FHIR API is a facade over its own database, Chronicles. The IDs you see in FHIR aren’t necessarily the ones Chronicles uses internally.
You can ignore the DSTU2 ID for now. We use R4 throughout.
Make your first FHIR request
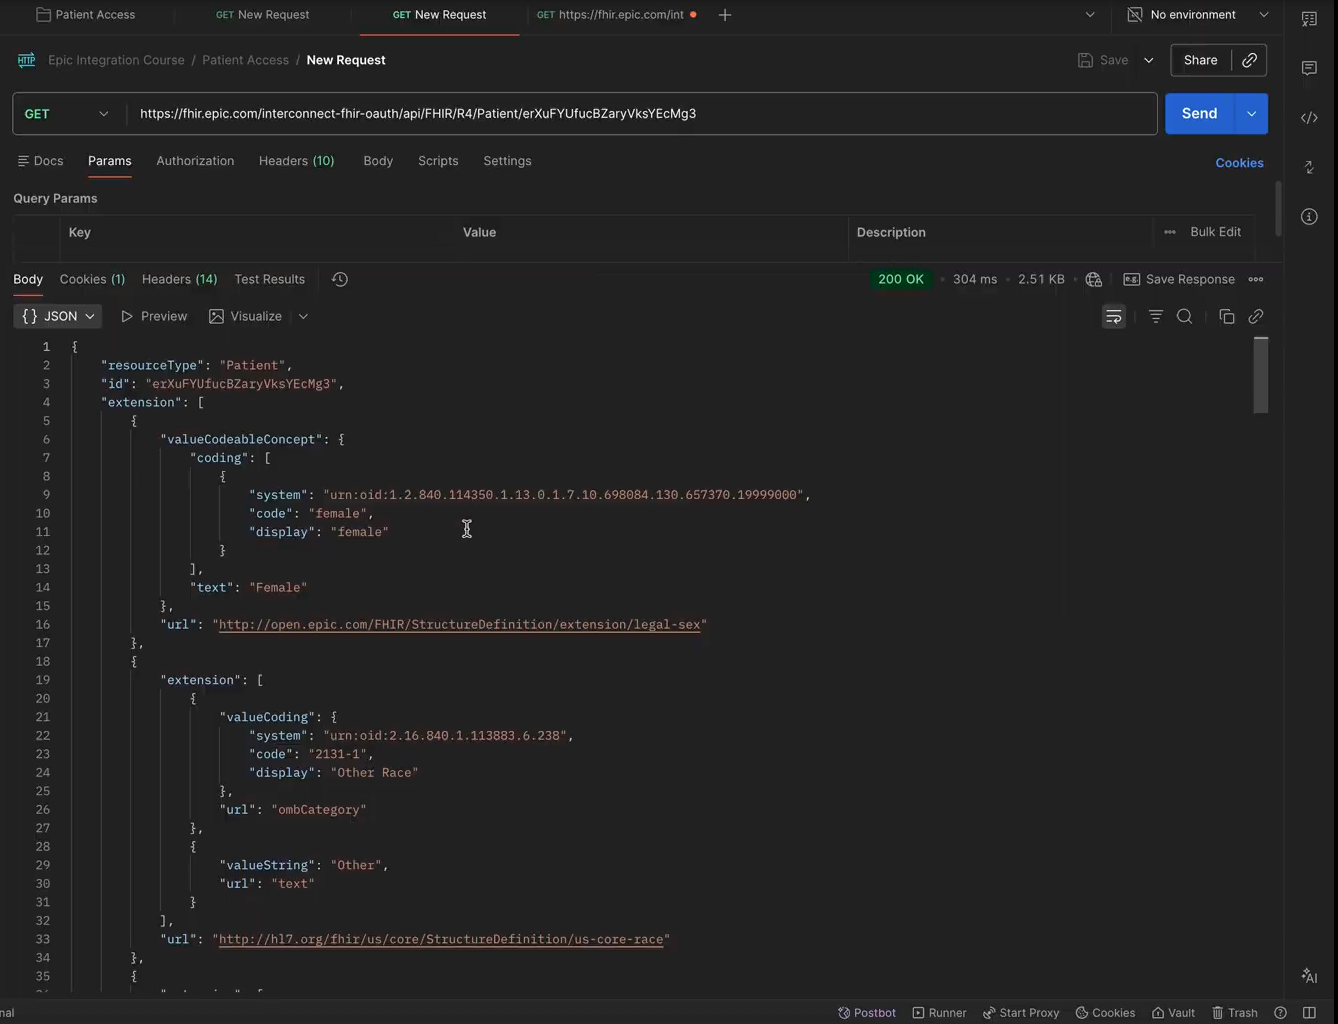
With the access token, you can now request FHIR resources. Take the sandbox base URL, add /Patient/ and the patient ID from the token response, and set the authorization to the bearer token you just got:
GET https://fhir.epic.com/interconnect-fhir-oauth/api/FHIR/R4/Patient/erXuFYUfucBZaryVksYEcMg3
Authorization: Bearer <access_token>
That returns Camila, a real sandbox patient from Epic.
You can query other resources the same way. To get all of the patient’s conditions, if your token has the scope for it:
GET https://fhir.epic.com/interconnect-fhir-oauth/api/FHIR/R4/Condition?patient=erXuFYUfucBZaryVksYEcMg3
Authorization: Bearer <access_token>
When the token expires
Access tokens are short-lived, and expires_in tells you how long you have. When one expires, you have two options:
- Send the patient back through the MyChart login.
- Use a refresh token to get a new access token without the patient.
To get a refresh token, add the offline_access scope to your request. The patient then sees an option on the consent page to let your app keep access for longer: 3 months, 6 months, 1 year, and sometimes indefinitely.
The catch: to use a refresh token, your app has to prove its identity with a confidential credential, a client secret or a private key. Epic requires a confidential client with a backend for the offline flow. A browser app using only PKCE can’t refresh.
So if your app needs long-lived access, the option is there, and you’ll need a backend to use it. Care Summary is a simple front-end app, so we’ll continue without refresh tokens and send the patient back through login when the token expires.
What’s next
You’ve now got an access token from Epic and pulled a patient and their conditions using Postman.
In the next lesson, we’ll call Epic’s FHIR API for Patient, Condition, MedicationRequest and Observation, look at the shape of the data that comes back, and load it into the Care Summary app. If Postman gives you an error at any step here, post it in the comments.