How Epic Patient Login Works: OAuth, Scopes and Consent
In the last module we looked at the different ways we can integrate with Epic : patient, practitioner and backend.
In this module, we’ll learn more about patient app integration with Epic, how to register a Patient App on Epic, and we’ll also build a real app which fetches patient data and displays it.
The app we’ll build in this module
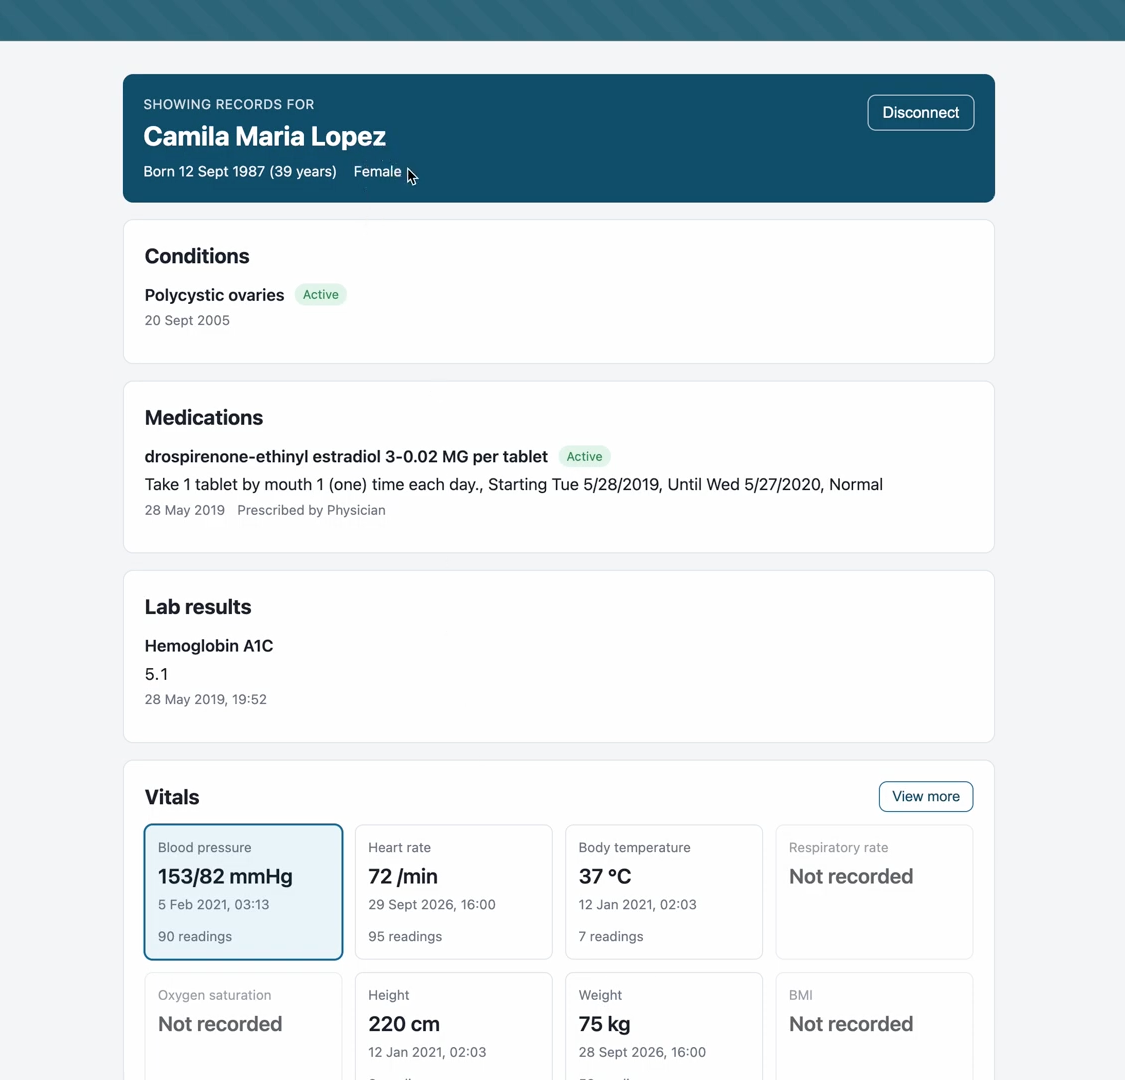
The app we’ll build is called Care Summary, and it builds a one-page health snapshot: who the patient is, their conditions, their medications and their key labs. Something a patient can hand to a new doctor, or pull up on their phone at a first visit. The code for this app, along with the AI Prompt is available here if you wish to follow this tutorial and reproduce a similar app.
We’ll run requests by hand in Postman against Epic’s sandbox, which has fake patient data. By the end of the module, you’ll have:
- registered a real app with Epic
- run the login flow yourself
- pulled a patient’s chart
- understood what the access token is doing on every request
What the patient sees
Here’s what the flow feels like from the patient’s side.
- The patient opens Care Summary and is asked to connect their health records.
- They search for the health system or hospital where they receive care.
- They click it and land on that hospital’s MyChart login page.
- They sign in.
- After signing in, they see a consent page listing every type of data the app is asking for.
- They approve, get sent back to Care Summary, and the health summary loads.
How it works
If you’ve ever clicked “Sign in with Google”, you’ve already been through this flow. You are trying to sign in to one platform, you get sent to Google, you log in and approve, and you come back to the same platform after finishing the authentication.
Connecting to Epic also follows the exact same process. The only difference is that you’re signing in with your hospital.
That process is OAuth 2.0. When you hear SMART on FHIR, the protocol all of this is based on, it’s three standard pieces put together:
- OAuth 2.0, the same thing behind the “Sign in with Google” button, for authorization
- OpenID Connect, a spec layered on OAuth that answers “who is this person?”
- FHIR, for the data itself
So a lot of what sounds like new healthcare login technology is just OAuth 2.0 with different vocabulary and a few concepts bundled together.
Build your first real FHIR app in 15 days
500+ builders have done it. Live kick-off, structured modules, Demo Day. $27.
Join the challengeThe four-step handshake
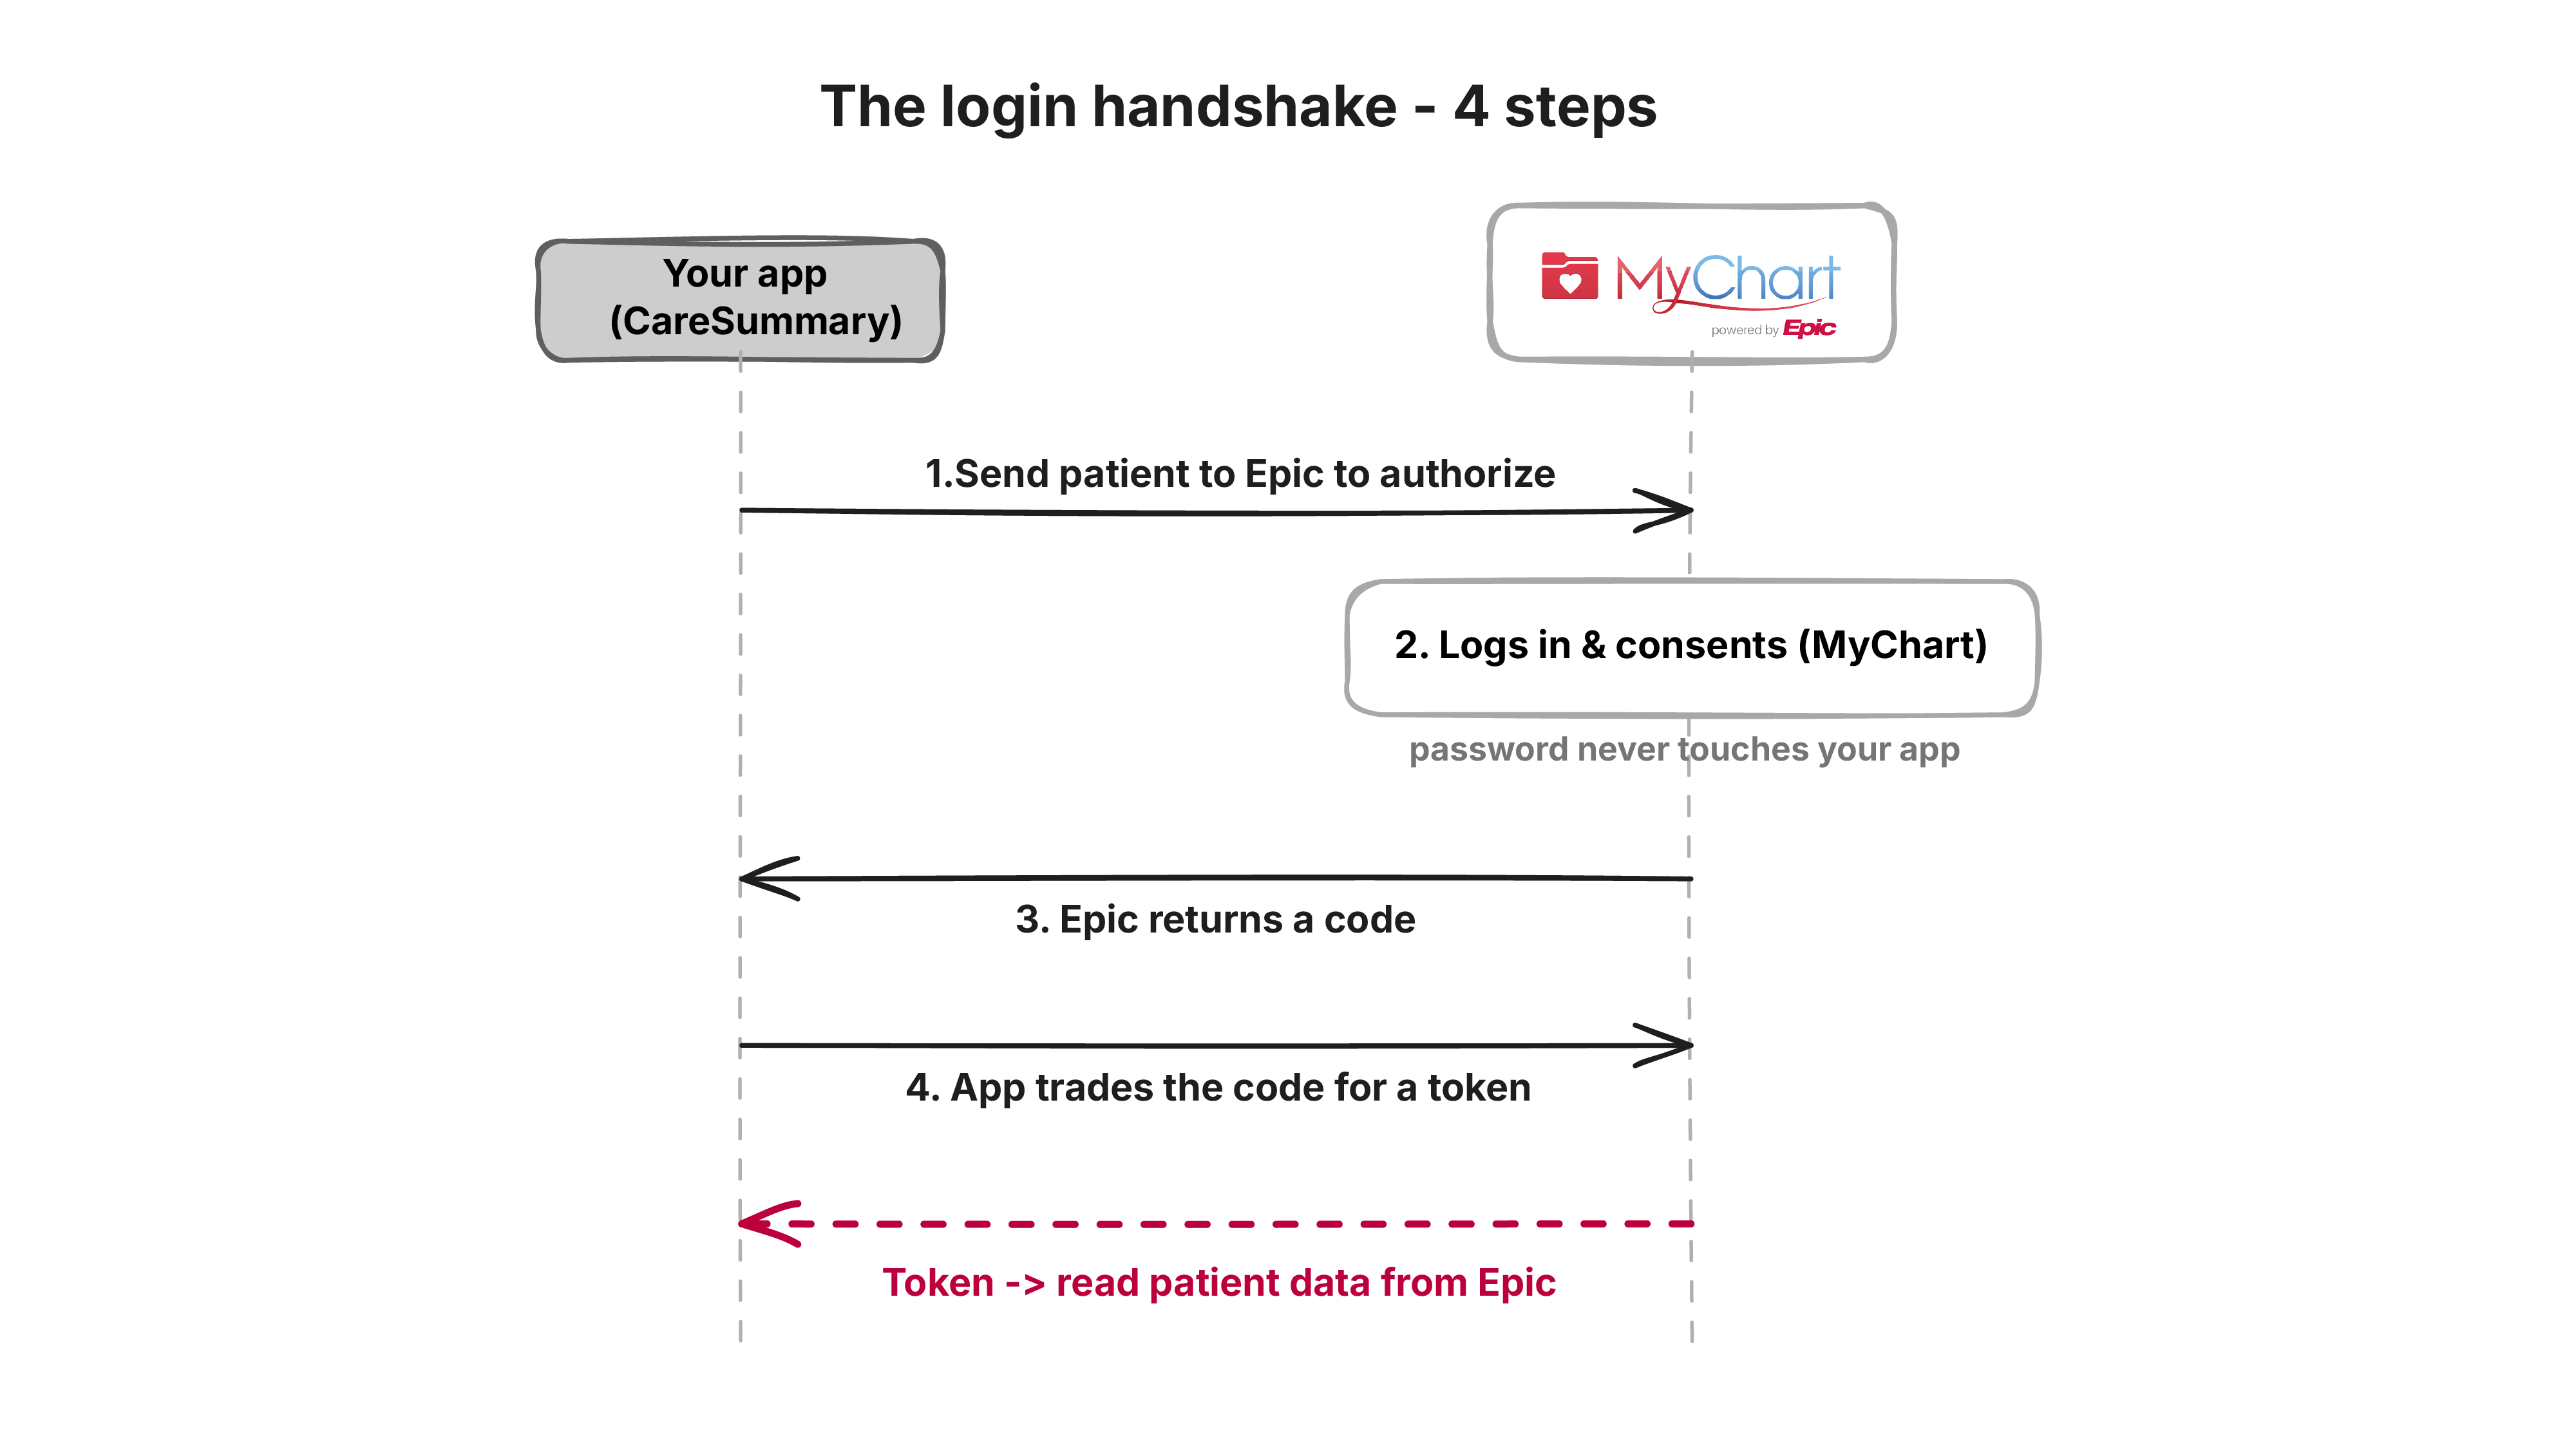
The login itself has four steps:
- Authorize. Your app sends the patient to Epic’s authorization endpoint.
- Log in and consent. The patient signs in to MyChart and approves the scopes your app asked for.
- Code. Epic redirects the patient back to your app with a short-lived authorization code.
- Token. Your app sends that code to Epic’s token endpoint and gets an access token back.
Once you have the access token, you can request the patient’s data from Epic’s FHIR server.
Step 1 is just a URL. Here’s roughly what Care Summary sends the patient to (line breaks added for readability):
https://fhir.epic.com/interconnect-fhir-oauth/oauth2/authorize
  ?response_type=code
  &client_id=YOUR_CLIENT_ID
  &redirect_uri=http://localhost:3000
  &scope=openid fhirUser patient/Patient.read patient/Condition.read
  &state=RANDOM_STRING
  &aud=https://fhir.epic.com/interconnect-fhir-oauth/api/FHIR/R4
  &code_challenge=HASHED_VALUE
  &code_challenge_method=S256
You’ll see each of these parameters again over the next few lessons. client_id and redirect_uri come from registering your app (Lesson 2). aud is the FHIR server you want access to. code_challenge is part of PKCE, which we cover at the end of this lesson.
MyChart handles login and consent
You’ve already seen MyChart in the flow. It’s both the login screen and the consent screen. Epic builds it, Epic runs it, and the patient’s password never touches your app.
For decision makers: if you use Epic as the identity provider, you don’t need to build login, store passwords, or implement a forgot-password flow for these users. Epic handles identity, authentication and consent.
That matters because identity in healthcare has a lot of edge cases. The person logging in isn’t always the patient:
- A parent can log in on behalf of their child. When the child turns 18, the parent loses that access, and the child decides whether to delegate access to anyone.
- An older patient can give one of their children access to their account.
Epic handles all of this on its side. When the patient comes back to your app from MyChart, you can trust that Epic has already checked who they are. You don’t need to ask them for a password again, and you can use the login as your identity check.
The patient has to pick their hospital first
You may have noticed the patient had to choose their hospital before they saw a login page. That’s because of the federated model from Module 1: every health system runs its own instance of Epic, with its own login page and its own rules for patient credentials.
There’s no single front door yet. Epic is working toward one entry point across all its hospitals, and there are other specs aimed at the same problem, but for now your app has to find out where the patient receives care before Epic can show them the right login.
How you do that is up to you. You can confirm it on a phone call and send the patient one specific link, or you can give them a search box and let them find their organization. We’ll cover the search approach, and where the hospital list comes from, in Lesson 5.
Scopes: one line of permission each
Instead of a vague “give this app access to all my medical records”, OAuth breaks permission into narrow pieces called scopes. Each scope is one line of permission: read the patient’s medications, read the patient’s conditions, and so on. The consent screen you saw earlier is the list of scopes, and the patient approves each line.
A scope string looks like this:
patient/Observation.readReading it left to right:
patientmeans you’re acting on behalf of the patient. You only get the patient’s own compartment, the data the patient could see themselves.Observationis the FHIR resource type.readis the permission.
So patient/Observation.read means “read the observations for this patient”, and patient/Condition.read means “read all the conditions for this patient”.
SMART also has user scopes and system scopes. user scopes are for apps acting as a logged-in clinician (Module 3), and system scopes are for backend services with no person involved (Module 4). For a patient-facing app, you only need patient scopes.
Care Summary asks for four, all read-only:
patient/Patient.read
patient/Condition.read
patient/MedicationRequest.read
patient/Observation.read
Sandbox quirk: Epic’s sandbox currently shows every scope on the consent page, even if you request only three. Production shows only what you asked for.
Ask for the least you can get away with
The rule of thumb is to request only the scopes your app actually uses. This is the principle of least privilege, and you’ll usually hear it in HIPAA settings.
This particular flow isn’t covered by HIPAA. The patient is choosing to share their own data with you, so it’s consumer data and you aren’t a covered entity. Least privilege still helps, for two reasons:
- Less data, less exposure. Data you store but never use is still data that can leak in a breach.
- Faster access to hospitals. If your app requests only a certain set of scopes, Epic distributes it to US hospitals automatically, without you signing contracts with each one. Request more and you lose that. We’ll go through exactly how this works in Lesson 5.
So don’t select everything because you can. Pick what your app needs.
What comes back: the token response
Once the patient consents and your app exchanges the code, Epic sends back a token response. Here’s the shape of the response (values shortened):
{
  "access_token": "eyJhbGciOi...",
  "token_type": "Bearer",
  "expires_in": 3600,
  "scope": "openid fhirUser patient/Patient.read patient/Condition.read ...",
  "id_token": "eyJ0eXAiOi...",
  "patient": "erXuFYUfucBZaryVksYEcMg3",
  "state": "RANDOM_STRING"
}
These fields that we need to understand are as follows:
access_tokenis what you use to get FHIR resources from Epic’s FHIR server.id_tokencarries details about who logged in. It’s there because the request included theopenidscope.patientis the patient’s FHIR ID, so you know immediately whose chart you’re looking at and can render the right details.encountersometimes appears, in specific settings. For a patient app you’ll mostly get the patient ID, the access token and the ID token.refresh_tokenappears if your app requested theoffline_accessscope and the patient allowed longer access on the consent page.
Refresh tokens
An access token is short-lived, and once it expires the patient has to go through the whole login process again. A refresh token lets you get a new access token without sending the patient through MyChart again. You have to use it before the refresh token itself expires, and Epic uses a rolling window here, so each refresh can extend your access. Keep refreshing and you can keep access to the patient’s record indefinitely.
Public and confidential clients
When your app swaps the code for a token, Epic’s authorization server needs to know the app is who it says it is. OAuth 2.0 sorts apps into two groups based on one question: can the app keep a secret?
A confidential client has a backend: a server you control that the user never sees. It can hold a secret key safely.
A public client runs in the browser, or ships as a mobile app. It can’t keep a secret. Anything in browser code is visible to the user, and even a compiled phone app can be decompiled to pull a key out. If the code runs on the user’s device, you’re handing the key to the user.
Care Summary runs in the browser, so it’s a public client.
Epic gives you three ways for an app to prove its identity at the token step:
| Method | How it works | Who can use it |
|---|---|---|
| Client secret | The app sends a shared secret along with the code. Epic sees the secret it issued and knows it’s the right app. | Confidential clients |
| Private key JWT | The app holds a private key and signs a short-lived JWT for each token request. Epic checks the signature against the app’s public key. The key itself never leaves your server. | Confidential clients |
| PKCE | The app makes up a one-time secret for each login and proves it at the token step. Nothing is stored in the app. | Public and confidential clients |
How PKCE works
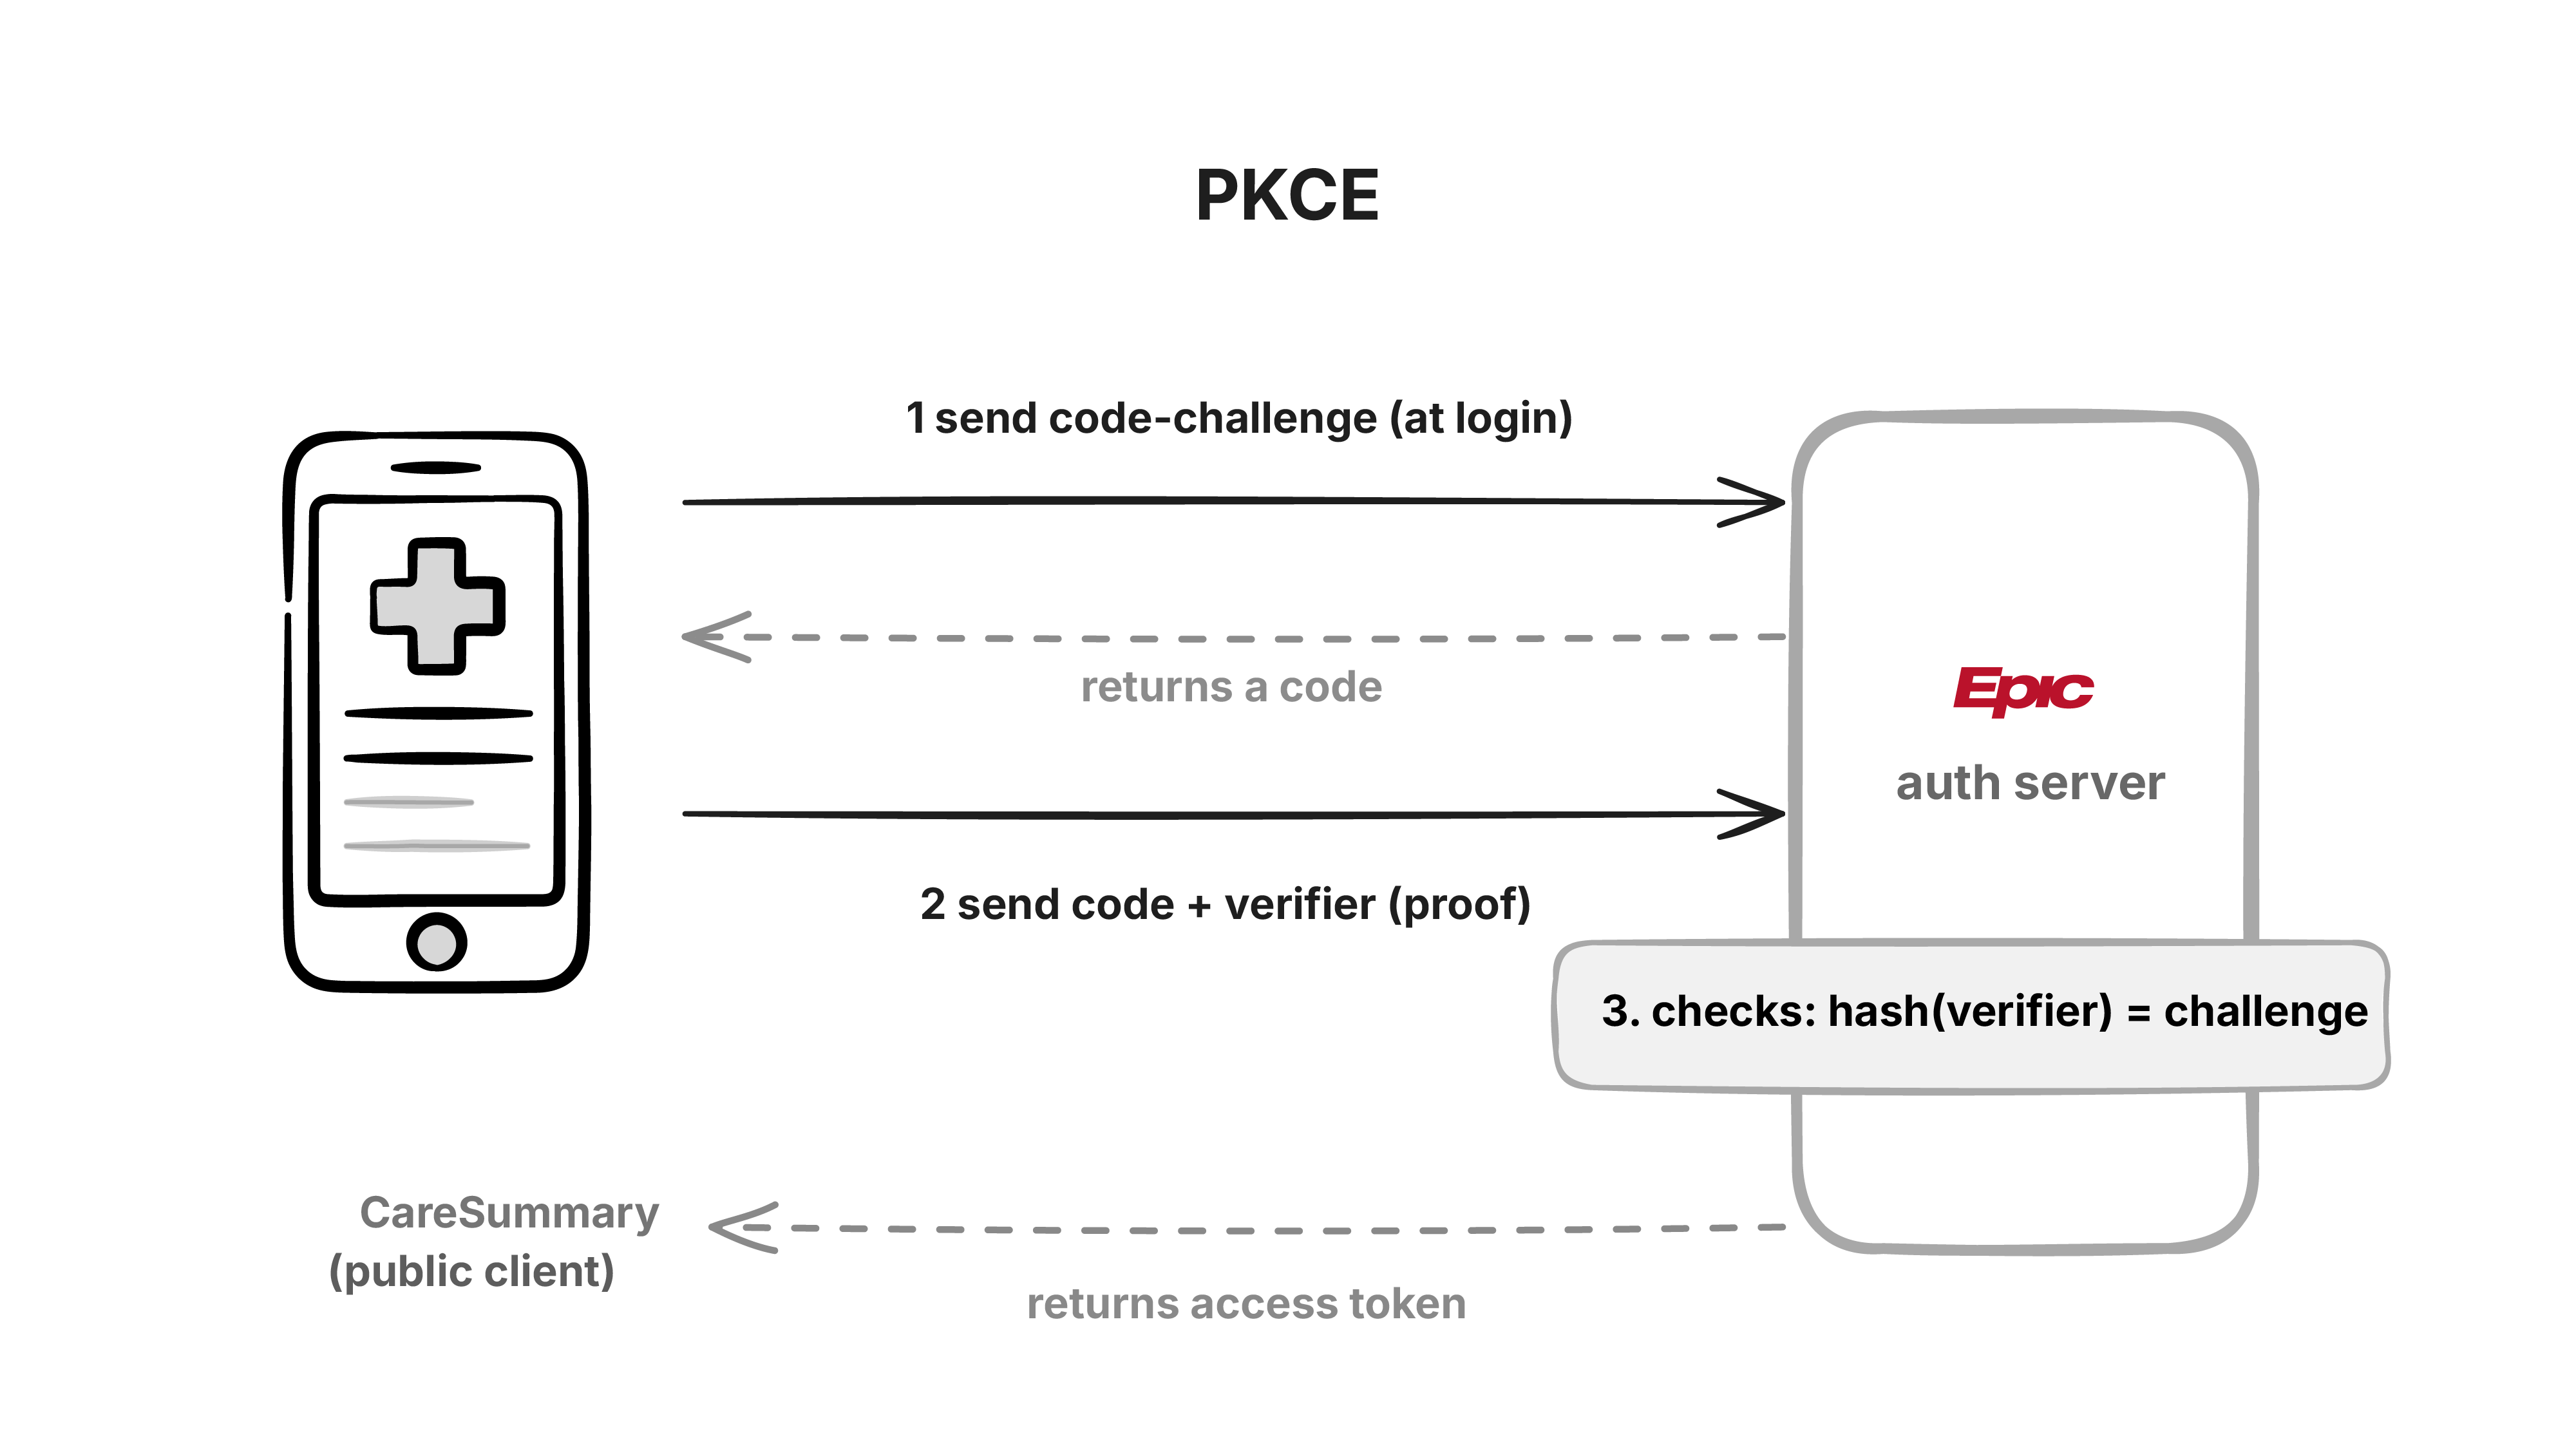
PKCE (Proof Key for Code Exchange, pronounced “pixie”) is how public clients prove who they are without storing a secret.
- Before sending the patient to Epic, the app generates a random string called the code verifier.
- It hashes the verifier with SHA-256 to get the code challenge, and sends the challenge in the authorize request. That’s the
code_challengeparameter in the URL earlier. - When the code comes back, the app sends the code plus the original verifier to the token endpoint.
- Epic hashes the verifier itself and checks it matches the challenge from step 2. If it does, the token request came from the same app that started the login.
Anyone who intercepts the code can’t use it, because they don’t have the verifier. And the verifier is created fresh for each login, so there’s nothing permanent in the app to steal.
If you’re building a browser app or a mobile app, PKCE is your only option. It sounds involved, but you won’t implement the cryptography yourself. OAuth libraries handle it, and in Lesson 3 Postman will do all of it for you.
Epic supports all three methods, and a confidential client can combine PKCE with a client secret or a private key JWT. A fully public client can use PKCE on its own and that works fine.
If you want to see these flows step by step before working with Epic, the OAuth 2.0 Playground walks through each request.
What’s next
So we’ve covered all the important concepts. The patient logs in on Epic’s screen, approves a list of scopes, and your app gets a token.
In the next lesson, we’ll register Care Summary on Epic’s developer portal and get a real client ID. If anything here didn’t make sense, let us know in the comments and we’ll explain it there as well.