Testing VitalCheck Inside Hyperdrive
Epic gives you a way to run your app inside a test Hyperspace client, so you can see exactly what a clinician sees when they open it. It’s also free to use.
It’s buried inside Epic’s documentation page which requires sign ups to access so this is not something you’ll find easily using AI agents as well.
Hyperspace and Hyperdrive
You’ll see both names in this lesson and they refer to the same thing from the clinician’s point of view.
Hyperspace is the older desktop client. Hyperdrive is the newer one, built on Chromium, and Epic is slowly moving customers over to it. When a practitioner opens the application, it’s still labelled Hyperspace. Epic didn’t change the name for end users.
For your app, the difference is in how it gets rendered, which we come back to at the end.
Build your first real FHIR app in 15 days
500+ builders have done it. Live kick-off, structured modules, Demo Day. $27.
Join the challengeHyperdrive test harness
On open.epic, there’s a page called Testing Integrations in Hyperdrive. It has a testing harness that lets you validate your integration works with Hyperdrive.
Click through and it asks for a login. This is a different login from the fhir.epic.com developer account, but you can use the same username and password, or sign in with Google. Once you’re in, you’ll see instructions for setting up a Hyperdrive test environment.
Install the Hyperdrive client
The harness runs on Windows or Mac. On Linux you may get it working through Wine, but it isn’t reliable. The easier path is a Windows virtual machine.
- Download the WebView2 Hyperdrive Client zip file.
- Unzip it. Inside you’ll find the executable and a file called Install Instructions.
- Follow the install instructions to set it up.
Once it’s installed, you have a real Hyperspace client on your machine. It opens to a login screen.
Request a Hyperdrive user account
The developer account won’t log you in here. You need a separate Hyperdrive user account, and you have to ask Epic for it by email. Tell them you’re testing Epic Hyperdrive for your SMART app. They may come back with a few questions, and then they’ll send you a username and password.
This can take a few days, so send the request as soon as you decide to test this way.
When you first log in, you’ll be asked to set up multi-factor authentication. Any authenticator app works. Google Authenticator or Bitwarden are fine. After that, you can sign in with your credentials and the MFA code.
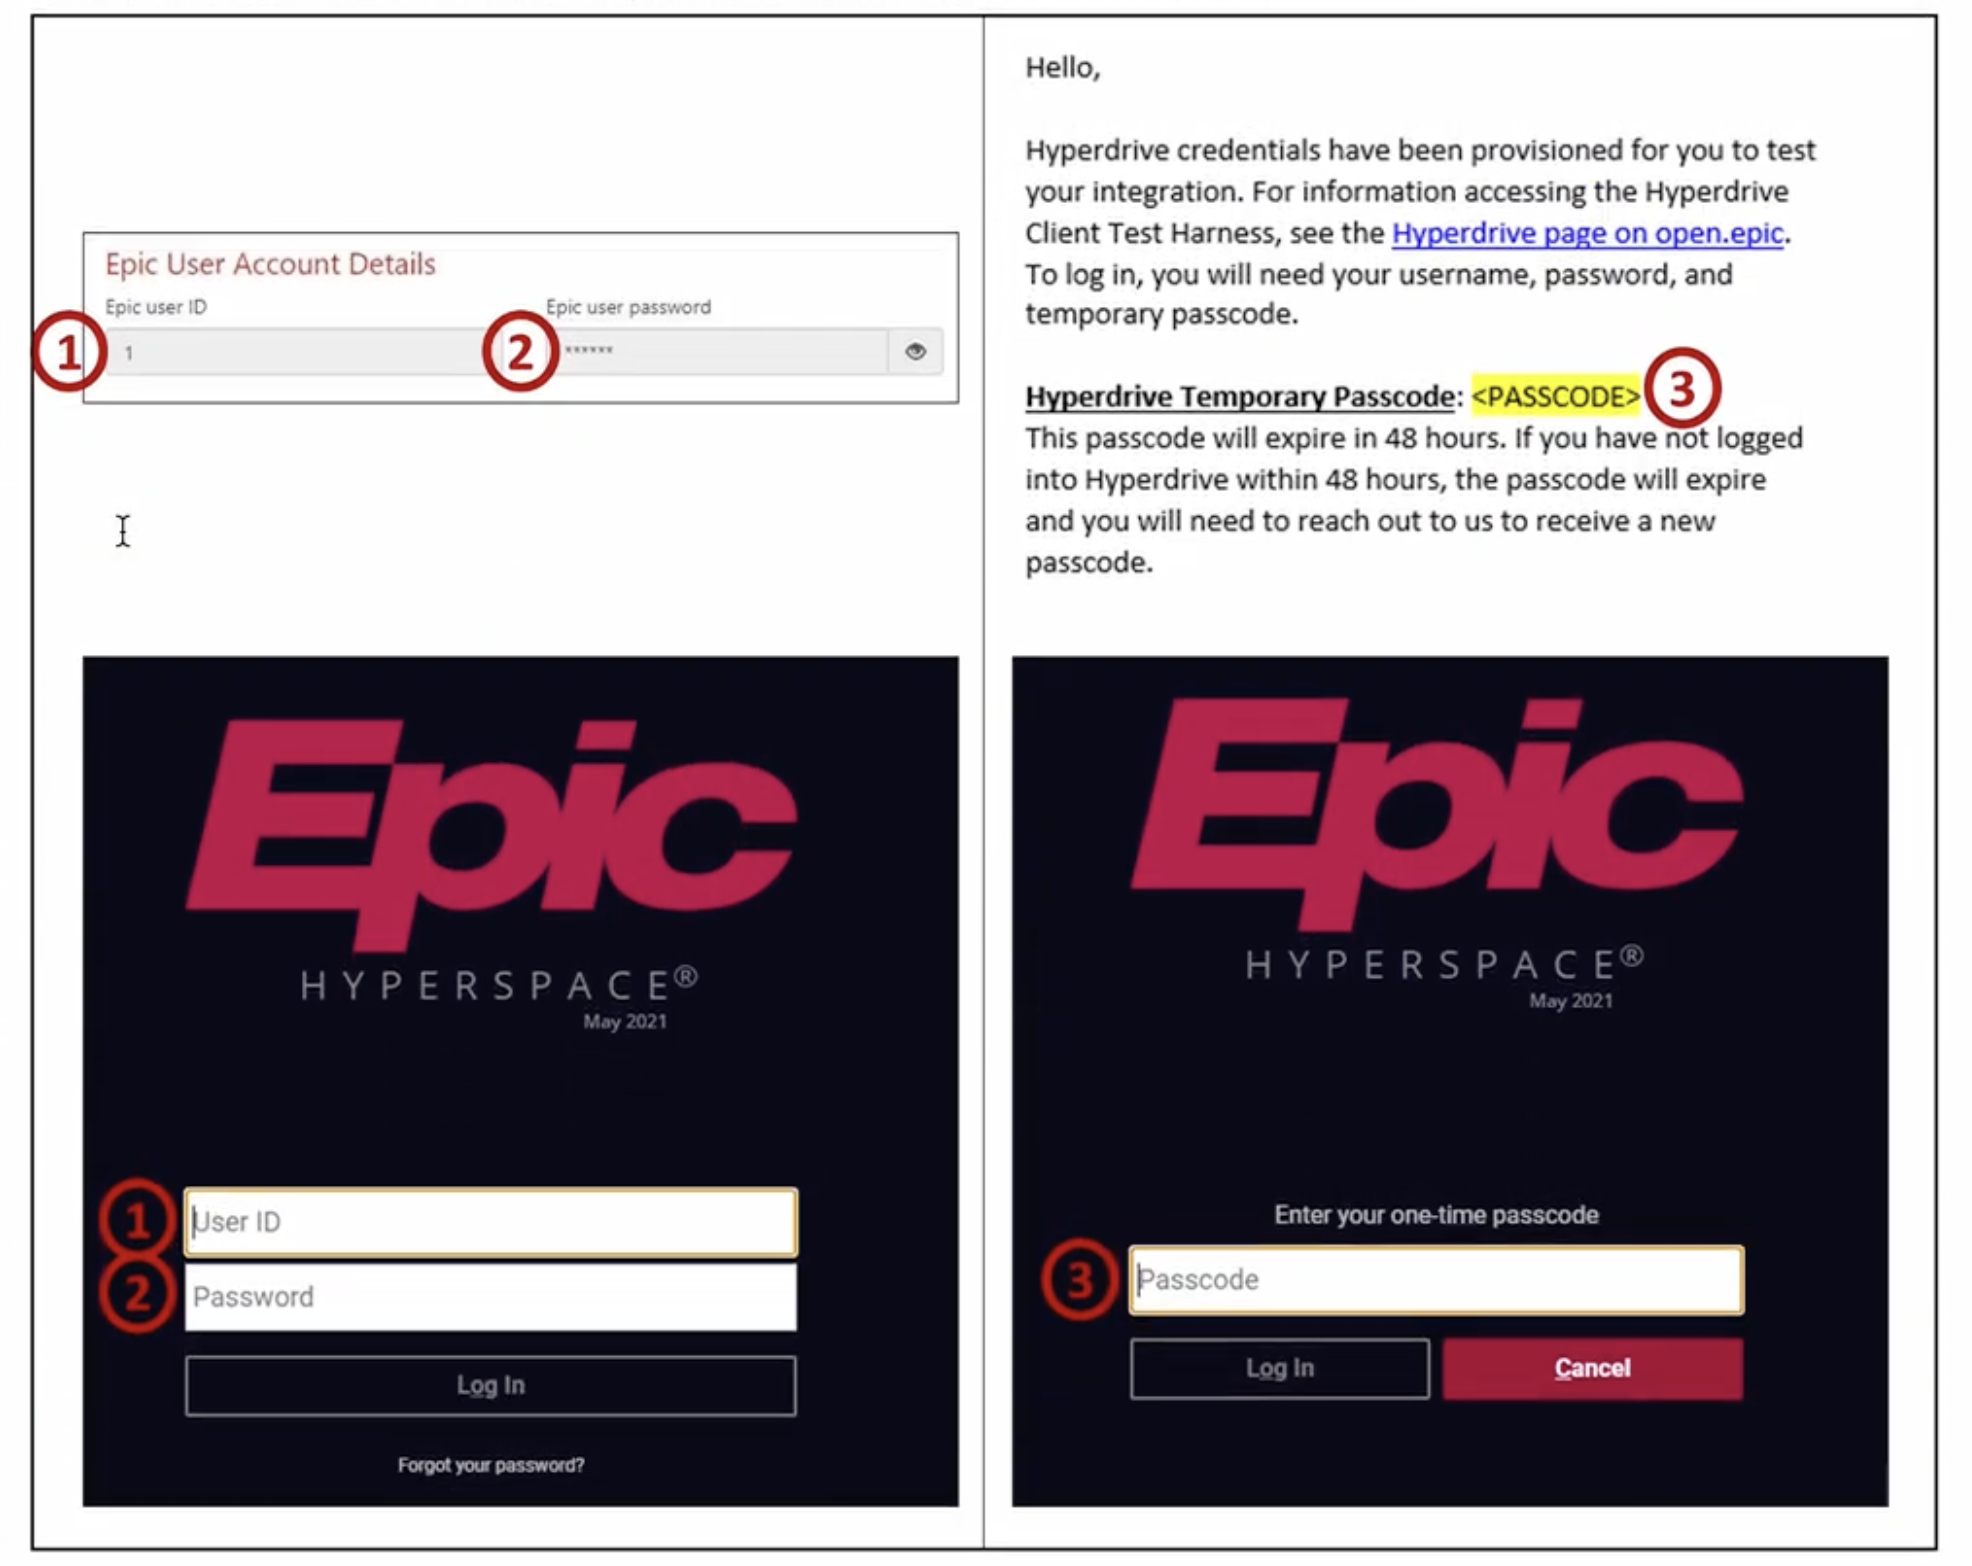
You may need to be in the US. The login didn’t work for us from outside the US. Everything in this lesson runs on a virtual machine located in the US. If you’re elsewhere, a proxy might work, but a US-based VM is the dependable option.
Launch VitalCheck inside Hyperspace
Once you’re in, open a patient chart. There’s a test integration configuration where you enter your app’s URL and client ID. This is the same configuration a hospital’s IT team will set up when they install your app, so it’s worth getting familiar with.
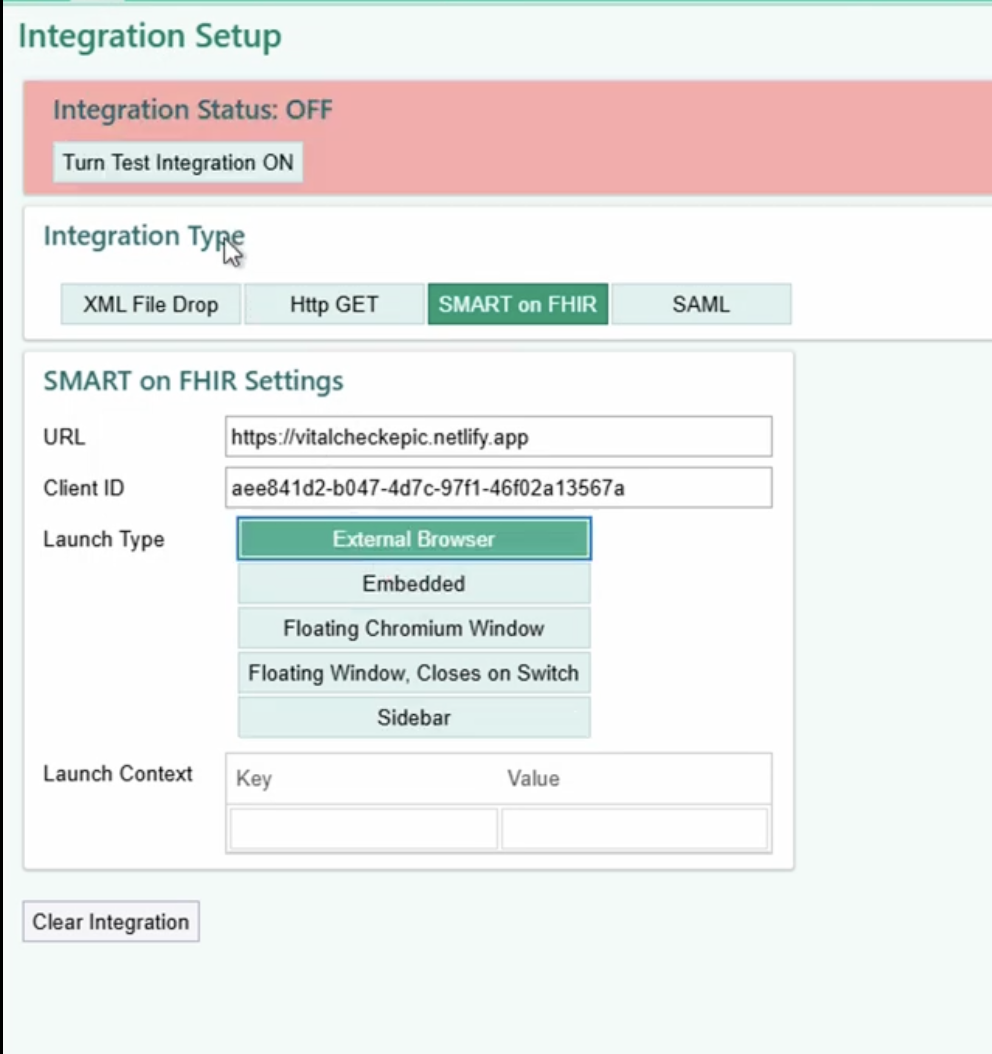
With that in place, VitalCheck opens as a sidebar app next to the patient chart.
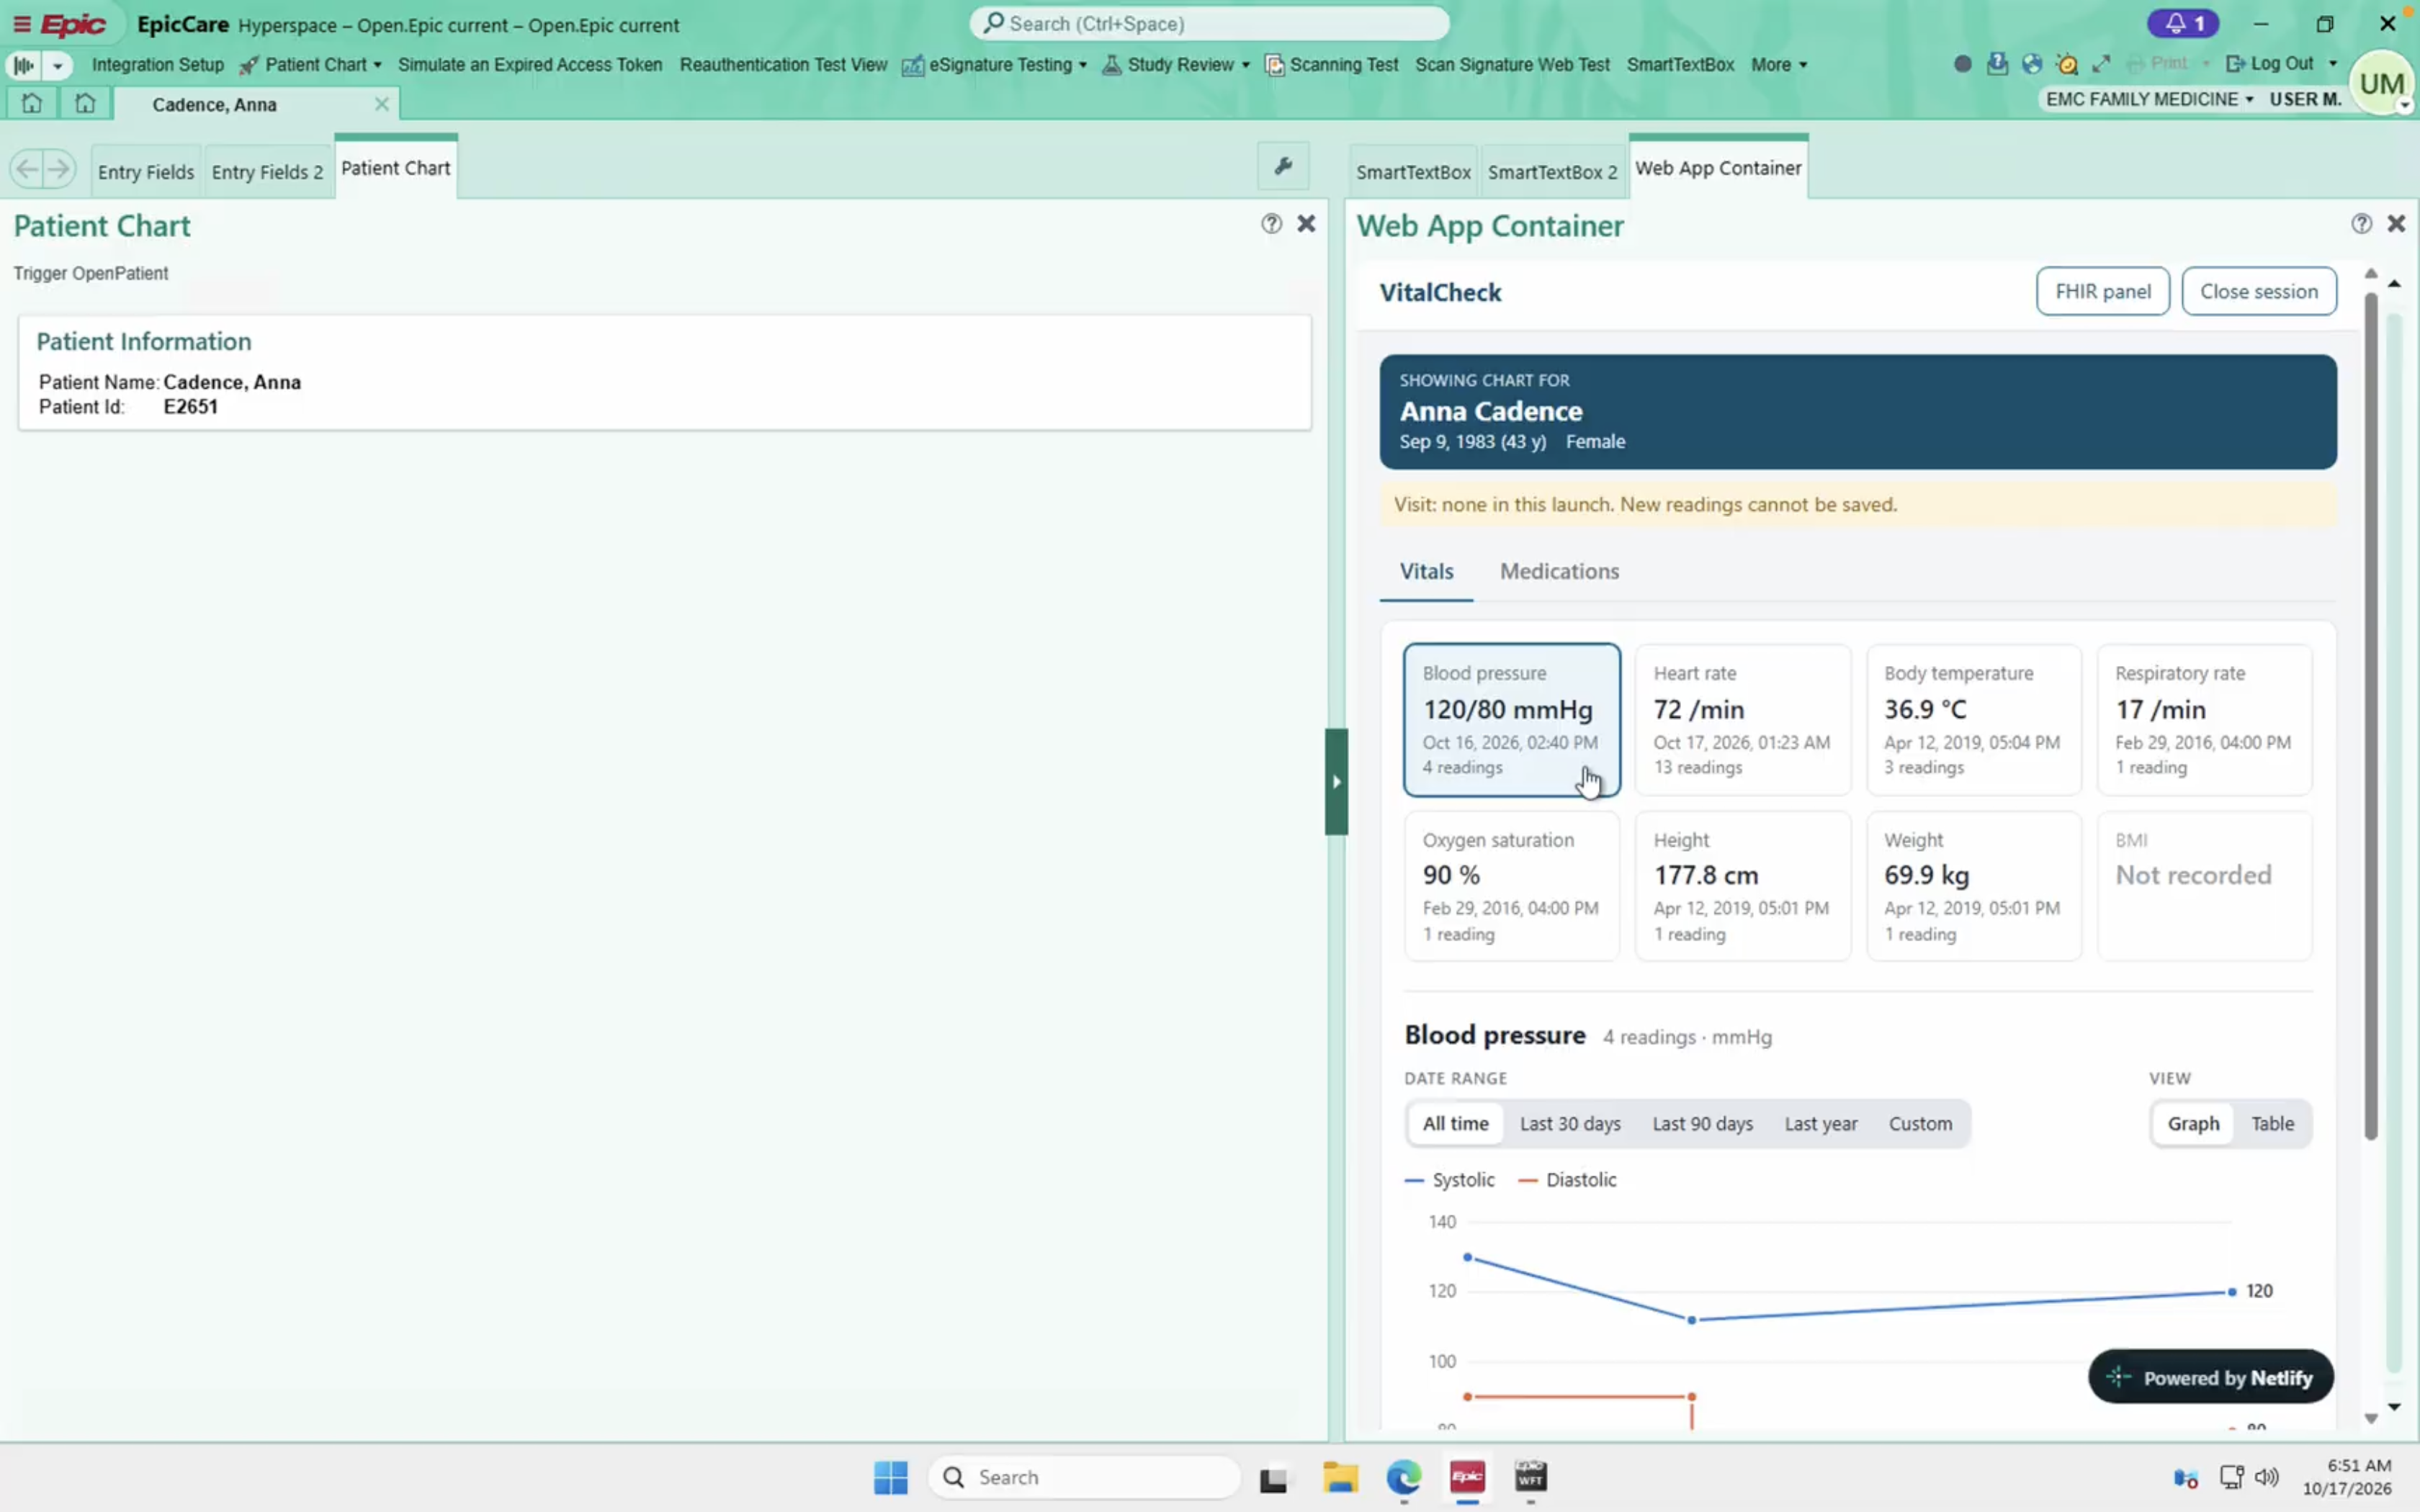
Try the other launch modes
Hyperspace can present your app in several ways, and you can switch between them in the configuration:
- Sidebar, docked next to the chart.
- External browser, which opens your app in the system browser. Select it, turn test integration mode back on, and from the patient chart header choose Open Patient. It takes a moment for the browser to load, and then your app opens on the patient.
- Embedded, inside Epic’s own screen.
- Floating window, a separate window on top of Hyperspace.
The same app in the external browser, embedded, and floating window modes.
Which mode a hospital uses is a configuration decision on their side. Your app should look right in all of them.
Launch tokens
The configuration also lets you add launch tokens. Epic has a page listing every token available. Each one adds a piece of context to the launch, for example which platform launched your app. Add the ones your app needs. This is also part of what you’ll give the hospital to configure.
Hyperspace is one launch point, not the only one. Your app can launch from Haiku, Rover and the other Epic clients we looked at in Module 1. The test harness lets you see the Hyperspace case, which is the most common.
Hyperspace for Mac
There’s also a Mac version. Download it from the App Store, sign in with the same Hyperdrive account, and when it asks for a URL, paste the one from the instructions page. It works the same way.
It isn’t a real browser
You can test as much as you want here, and it gives you a good picture of what the practitioner sees. There is one caveat that matters for how you build your app.
When Hyperspace launches your app, it’s simulating a browser. Certain things aren’t permitted, and some things behave differently from Chrome or Safari. Cookies don’t work the same way. Session storage doesn’t work the same way. Local storage is shared across everything.
The failure this causes is a stale patient. A clinician opens your app on one patient. Then they open it again, in another window, on a second patient. Your app loads, finds the first patient’s data in storage, and shows that instead. The clinician is now looking at the wrong patient’s vitals.
So don’t rely on browser storage to hold patient context. Take the patient and encounter from each launch and use those, every time.
What’s next
You’ve seen VitalCheck running inside a real Hyperspace client, in each of the launch modes a hospital might use.
In the next lesson we go through how a provider app actually goes live: getting a hospital to install it, what they sign, what you send them, and what it costs. If the harness won’t install or the login won’t work for you, post in the comments.