Epic FHIR Authentication: EHR Launch and Access Token
In the last lesson we registered VitalCheck on fhir.epic.com and got a non-production client ID. In this lesson we use that client ID in Postman to run the EHR launch against Epic’s sandbox and exchange it for an access token.
By the end you’ll have a token that already knows which patient the clinician launched from, and you’ll use it to read that patient’s record.
Launch the app from Epic’s test launcher
On fhir.epic.com, open the Documentation menu and go to the page called Launching your app from Epic. On the right side of that page there’s a Try It button. This is Epic’s test launcher, and it simulates a clinician opening your app from inside a patient’s chart.
Click it and fill in the dialog:
- App: select VitalCheck.
- Patient: pick any of the test patients.
- Launch URL: the endpoint URI you registered in the last lesson. This is where Epic sends the clinician.
- Tokens: optional extra details about the launch, like the IP address of the machine or the patient’s date of birth. Ignore these for now.
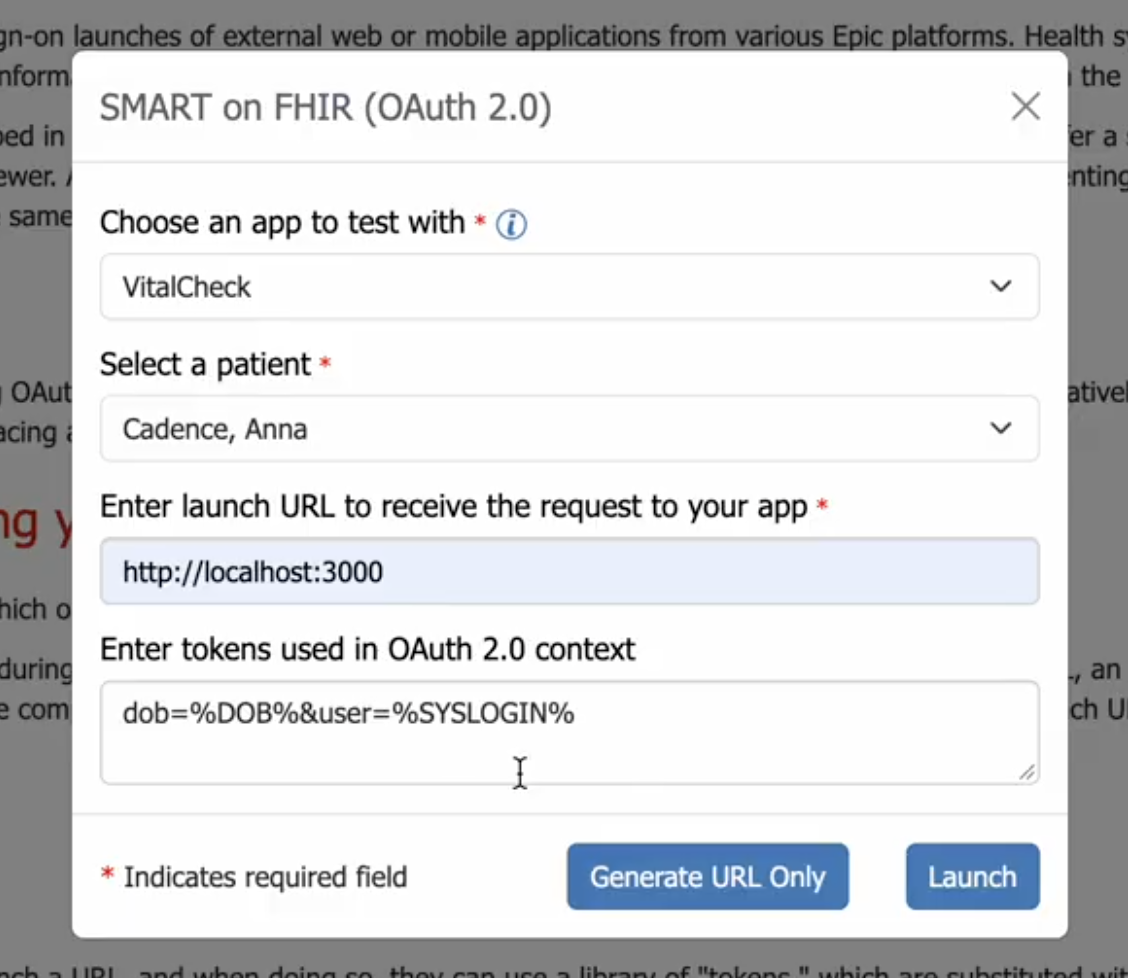
If you click Launch, Epic sends you to your endpoint URL with a few parameters attached. This is exactly what happens when a practitioner opens your app from inside Epic.
Click Generate URL only instead, so you can see what that URL looks like before anything happens. Pasting it into a browser does the same thing as clicking Launch.
Build your first real FHIR app in 15 days
500+ builders have done it. Live kick-off, structured modules, Demo Day. $27.
Join the challengeWhat the launch URL carries
The generated URL is your endpoint URL plus two parameters:
http://localhost:3000
  ?iss=https%3A%2F%2Ffhir.epic.com%2Finterconnect-fhir-oauth%2Fapi%2FFHIR%2FR4
  &launch=eyJhbGciOi...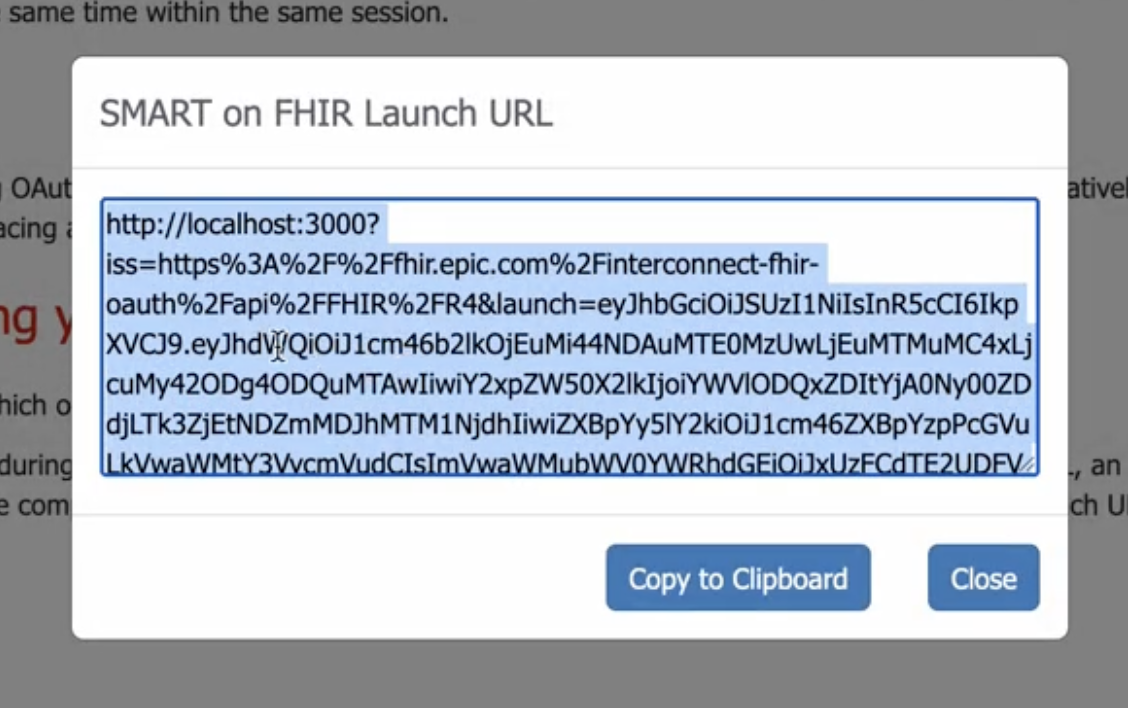
iss is the issuer. In OAuth 2.0, the issuer is whoever issues the tokens. Here it’s the FHIR server of the practice your app was launched from. That makes it the base URL for every request you make after this. If your app is installed at several hospitals, iss is also how you tell which one just launched your app.
launch is the launch token. It encodes the context of the launch: which patient is open, which encounter, and other details Epic needs.
Why the launch token skips the login screen
In the patient flow, the authorization step sent the user to a MyChart login page and then a consent page. In the EHR launch, you pass the launch token along with the same authorization request, and Epic skips both. The clinician is already logged in to Epic and already on the patient, so there’s nothing to ask. The flow goes to the authorization endpoint and straight back to your redirect.
It’s still the same OAuth flow underneath.
Find the authorization and token endpoints
Copy the iss value. It’s URL-encoded, so run it through a URL decoder first to get the FHIR base URL:
https://fhir.epic.com/interconnect-fhir-oauth/api/FHIR/R4Append /.well-known/smart-configuration and send a GET request:
GET https://fhir.epic.com/interconnect-fhir-oauth/api/FHIR/R4/.well-known/smart-configurationThe response includes a lot of things, but the two you need are:
authorization_endpointtoken_endpoint
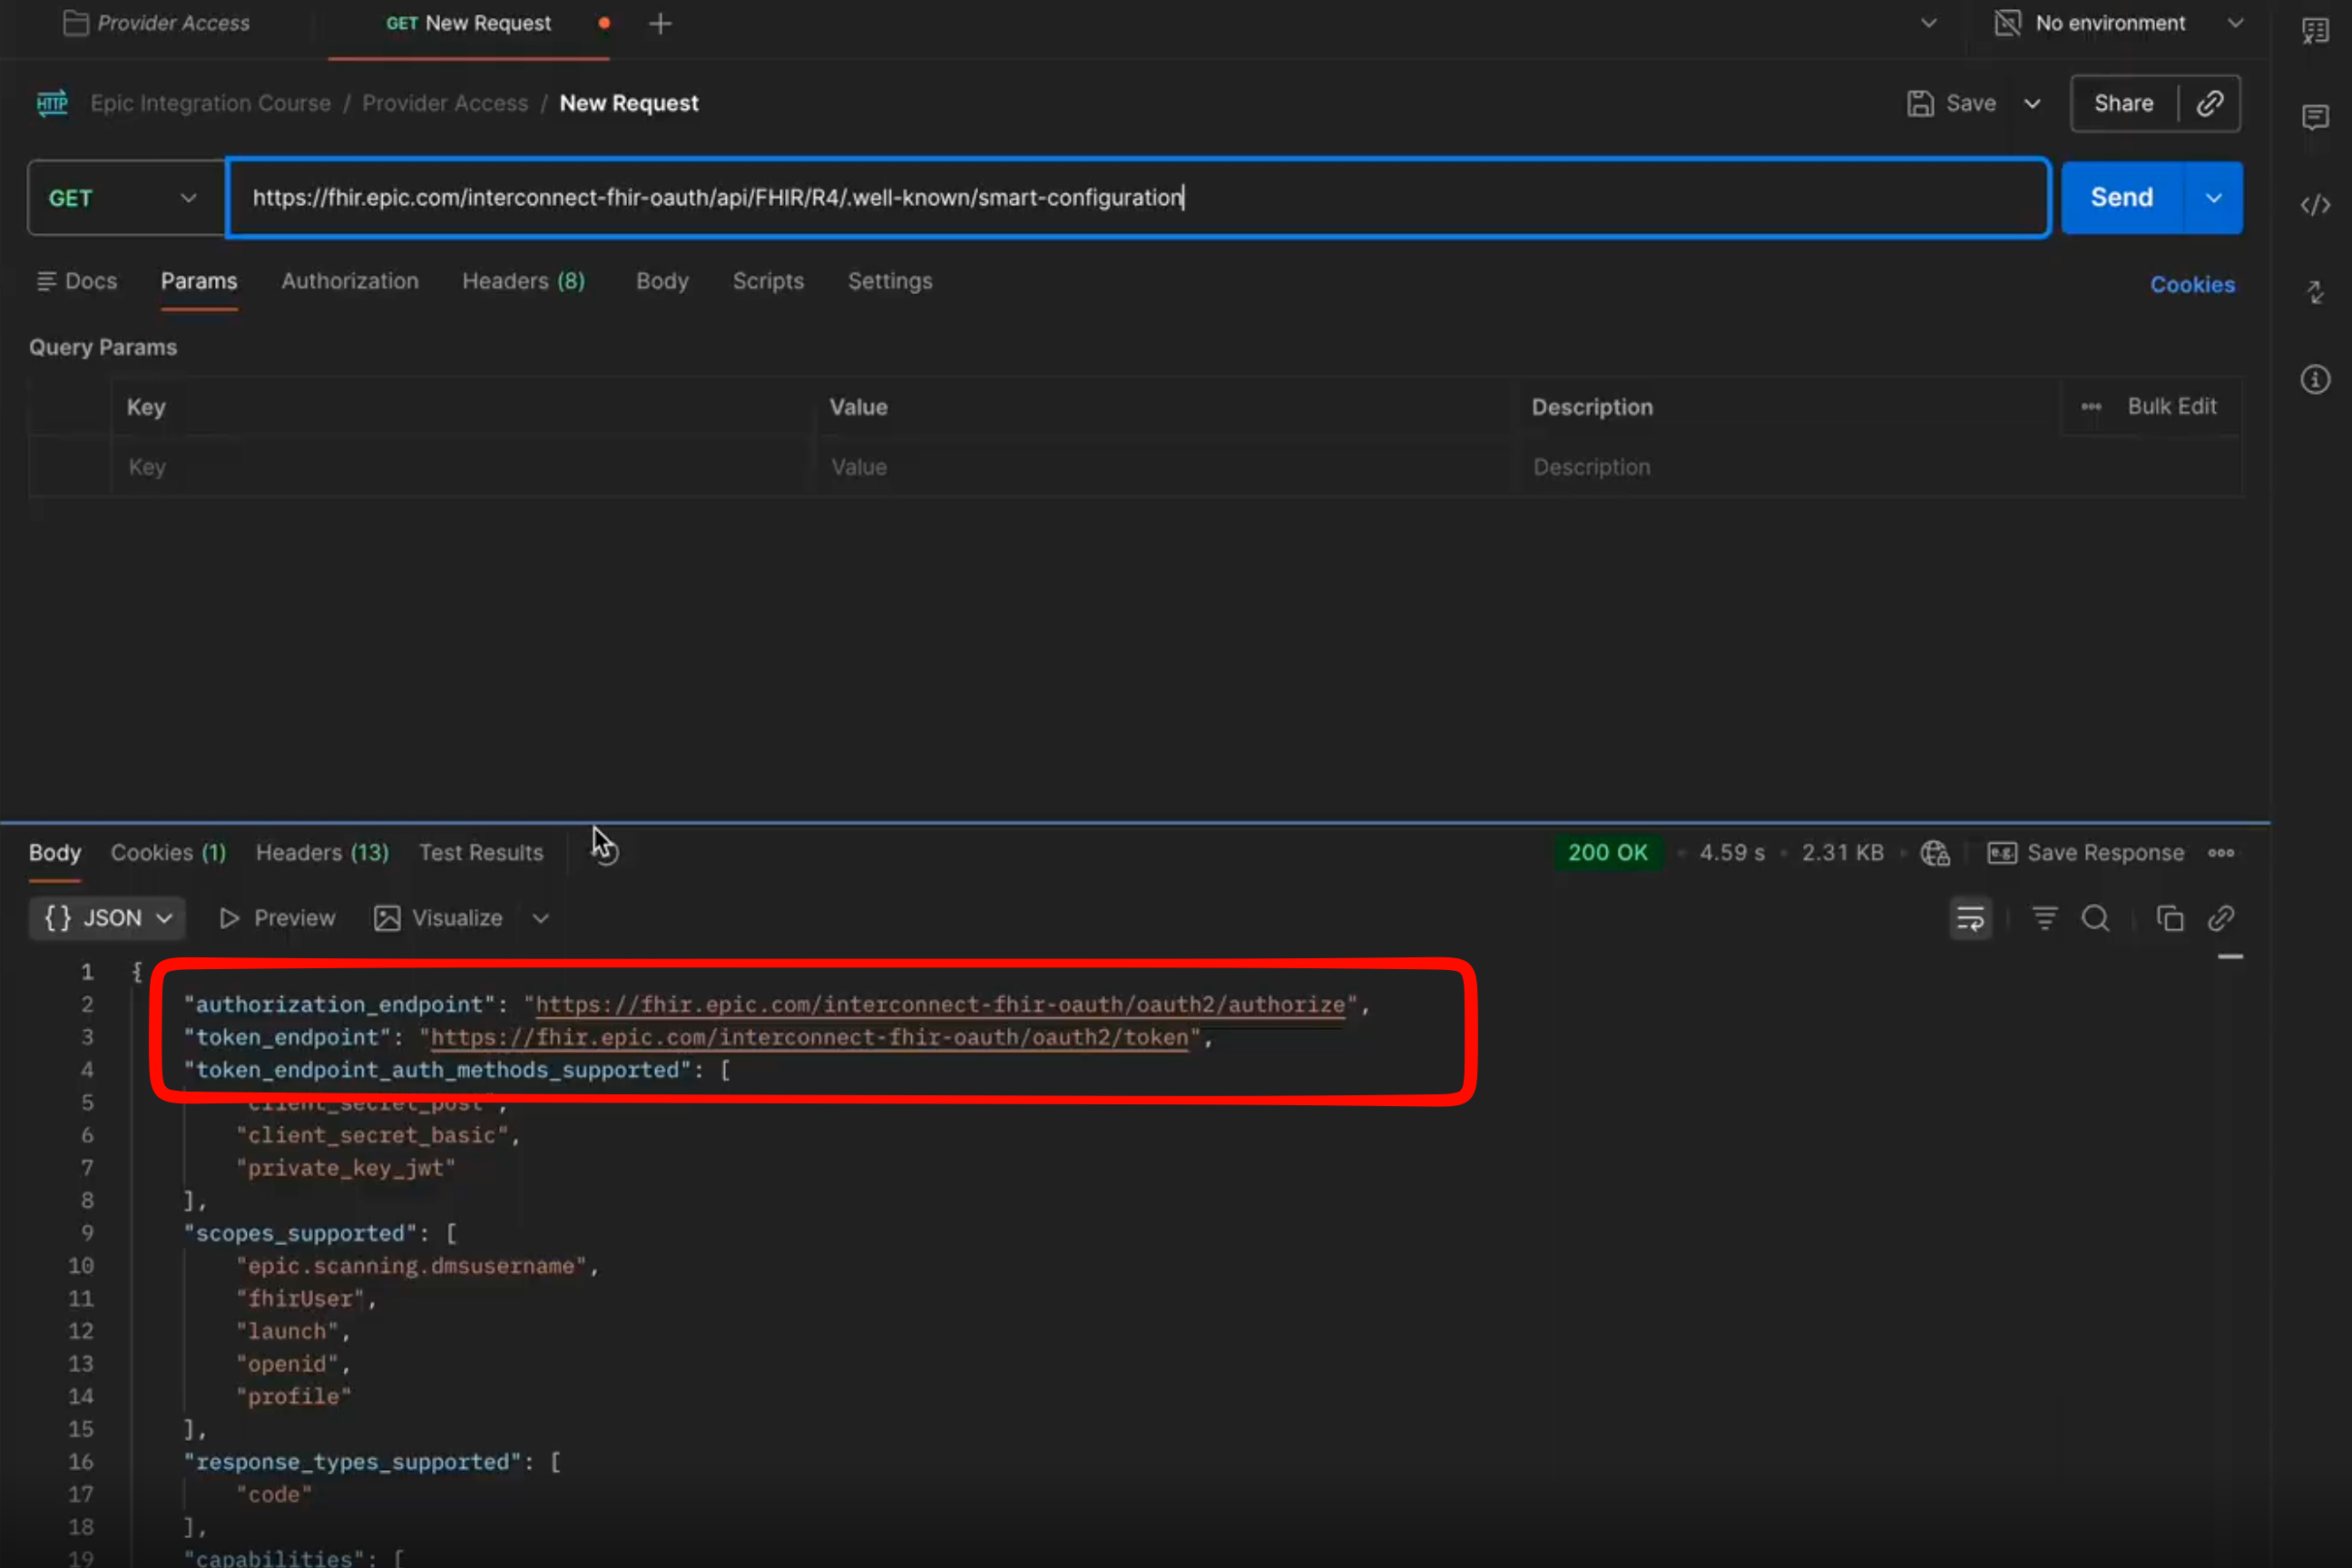
In production you’d do this against whatever iss the hospital’s Epic instance sends you, because the endpoints differ from site to site.
Set up OAuth 2.0 in Postman
In your Postman collection, open the folder for VitalCheck. Under Authorization, change the type from No Auth to OAuth 2.0 and fill in the fields.
| Field | Value |
|---|---|
| Grant type | Authorization Code (With PKCE) |
| Callback URL | Your endpoint URI (http://localhost:3000) |
| Auth URL | The authorization_endpoint from the discovery response |
| Access Token URL | The token_endpoint from the discovery response |
| Client ID | Your non-production client ID |
| Client Secret | Leave empty |
| Scope | launch openid fhirUser user/Patient.read user/Observation.read user/Observation.write |
| State | Any random value, about 8 characters (12345678 works) |
| Client Authentication | Send client credentials in body |
A few notes on the fields.
The callback URL is the endpoint URI you registered. It can be the same URL as your app’s base URL, if your app is a single-page app that handles the redirect itself, or a dedicated callback route. In Postman it doesn’t matter, because Postman intercepts the redirect.
The scope must include launch. Without it, Epic won’t accept the launch parameter and you won’t get the patient context back in the token. The rest of the scopes depend on what your app needs. Try different ones and see what Epic returns.
Client authentication has to be set to send credentials in the body.
Add two extra parameters
Scroll down to Advanced and add two parameters to the authorization request.
| Parameter | Value |
|---|---|
launch | The launch token from the generated URL |
aud | The FHIR base URL (the decoded iss value) |
The launch parameter is the one that carries the patient context. The aud parameter (audience) tells Epic which FHIR server you’re asking for access to. Some Epic instances reject the request without it, so add it every time, even though the sandbox may let it through.
Get the token
Click Get New Access Token. Postman redirects to Epic’s authorization page and comes straight back. No login, no consent. Postman takes the authorization code and exchanges it for a token.
If you leave out the launch token, Epic will instead show a provider login page and ask the clinician to sign in. That’s a standalone provider launch. It works, but your app won’t open from inside the EHR and it won’t know which patient is open. You’d be asking the clinician to log in to Epic again from your app.
Read the token response
Click Proceed and scroll down.
{
  "access_token": "eyJhbGciOi...",
  "token_type": "Bearer",
  "expires_in": 3600,
  "scope": "launch openid fhirUser user/Patient.read user/Observation.read ...",
  "state": "12345678",
  "patient": "erXuFYUfucBZaryVksYEcMg3",
  "encounter": "eBnj6YvXfJ8vN1NzO8Zj2Kw3"
}
Most of this is the same as Module 2. The access token, the token type, the expiry and the scopes you were granted.
The new fields are the launch context:
patient is the FHIR ID of the patient the clinician launched from. This is the only way your app can know which patient is open.
encounter is the ID of the current visit. It appears when the launch happens inside an encounter. You’ll need it in the next lesson, because Epic won’t accept a vitals write without one.
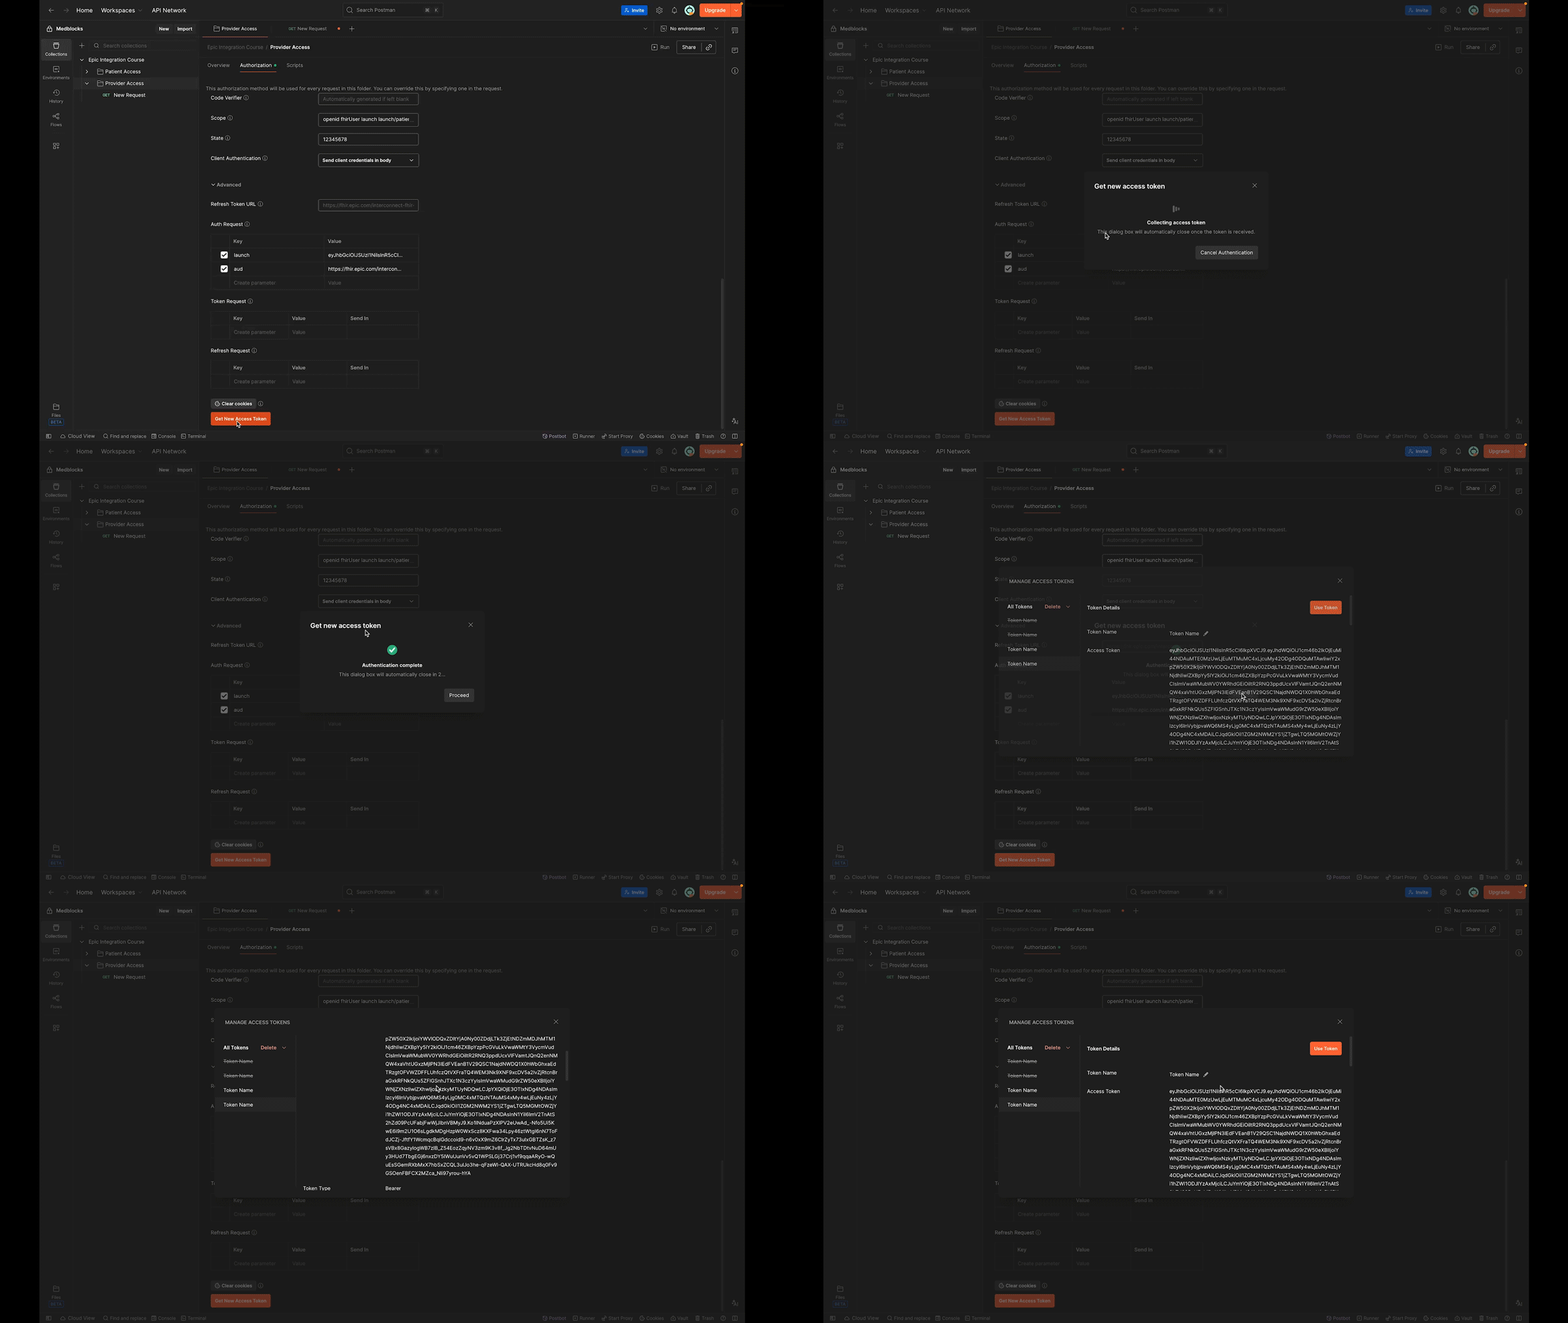
This is what makes a provider app different. The clinician is already on a patient in Epic. If your app opens and shows them a patient list to pick from, you’ve broken the workflow. Use the patient ID from the token and show only that patient.
Make your first FHIR request
Click Use Token. Then save the folder with Ctrl+S or Cmd+S.
Postman doesn’t save the authorization change automatically. If you skip the save, the requests inside the folder keep using the old settings and you’ll get an authentication error that looks like a problem with Epic.
Create a GET request in the folder, name it Get Patient, and use the FHIR base URL plus the patient ID from the token:
GET https://fhir.epic.com/interconnect-fhir-oauth/api/FHIR/R4/Patient/erXuFYUfucBZaryVksYEcMg3Epic sometimes returns XML by default, so set the Accept header to application/json.
Send it. The response is the Patient resource for the patient you selected in the launcher.
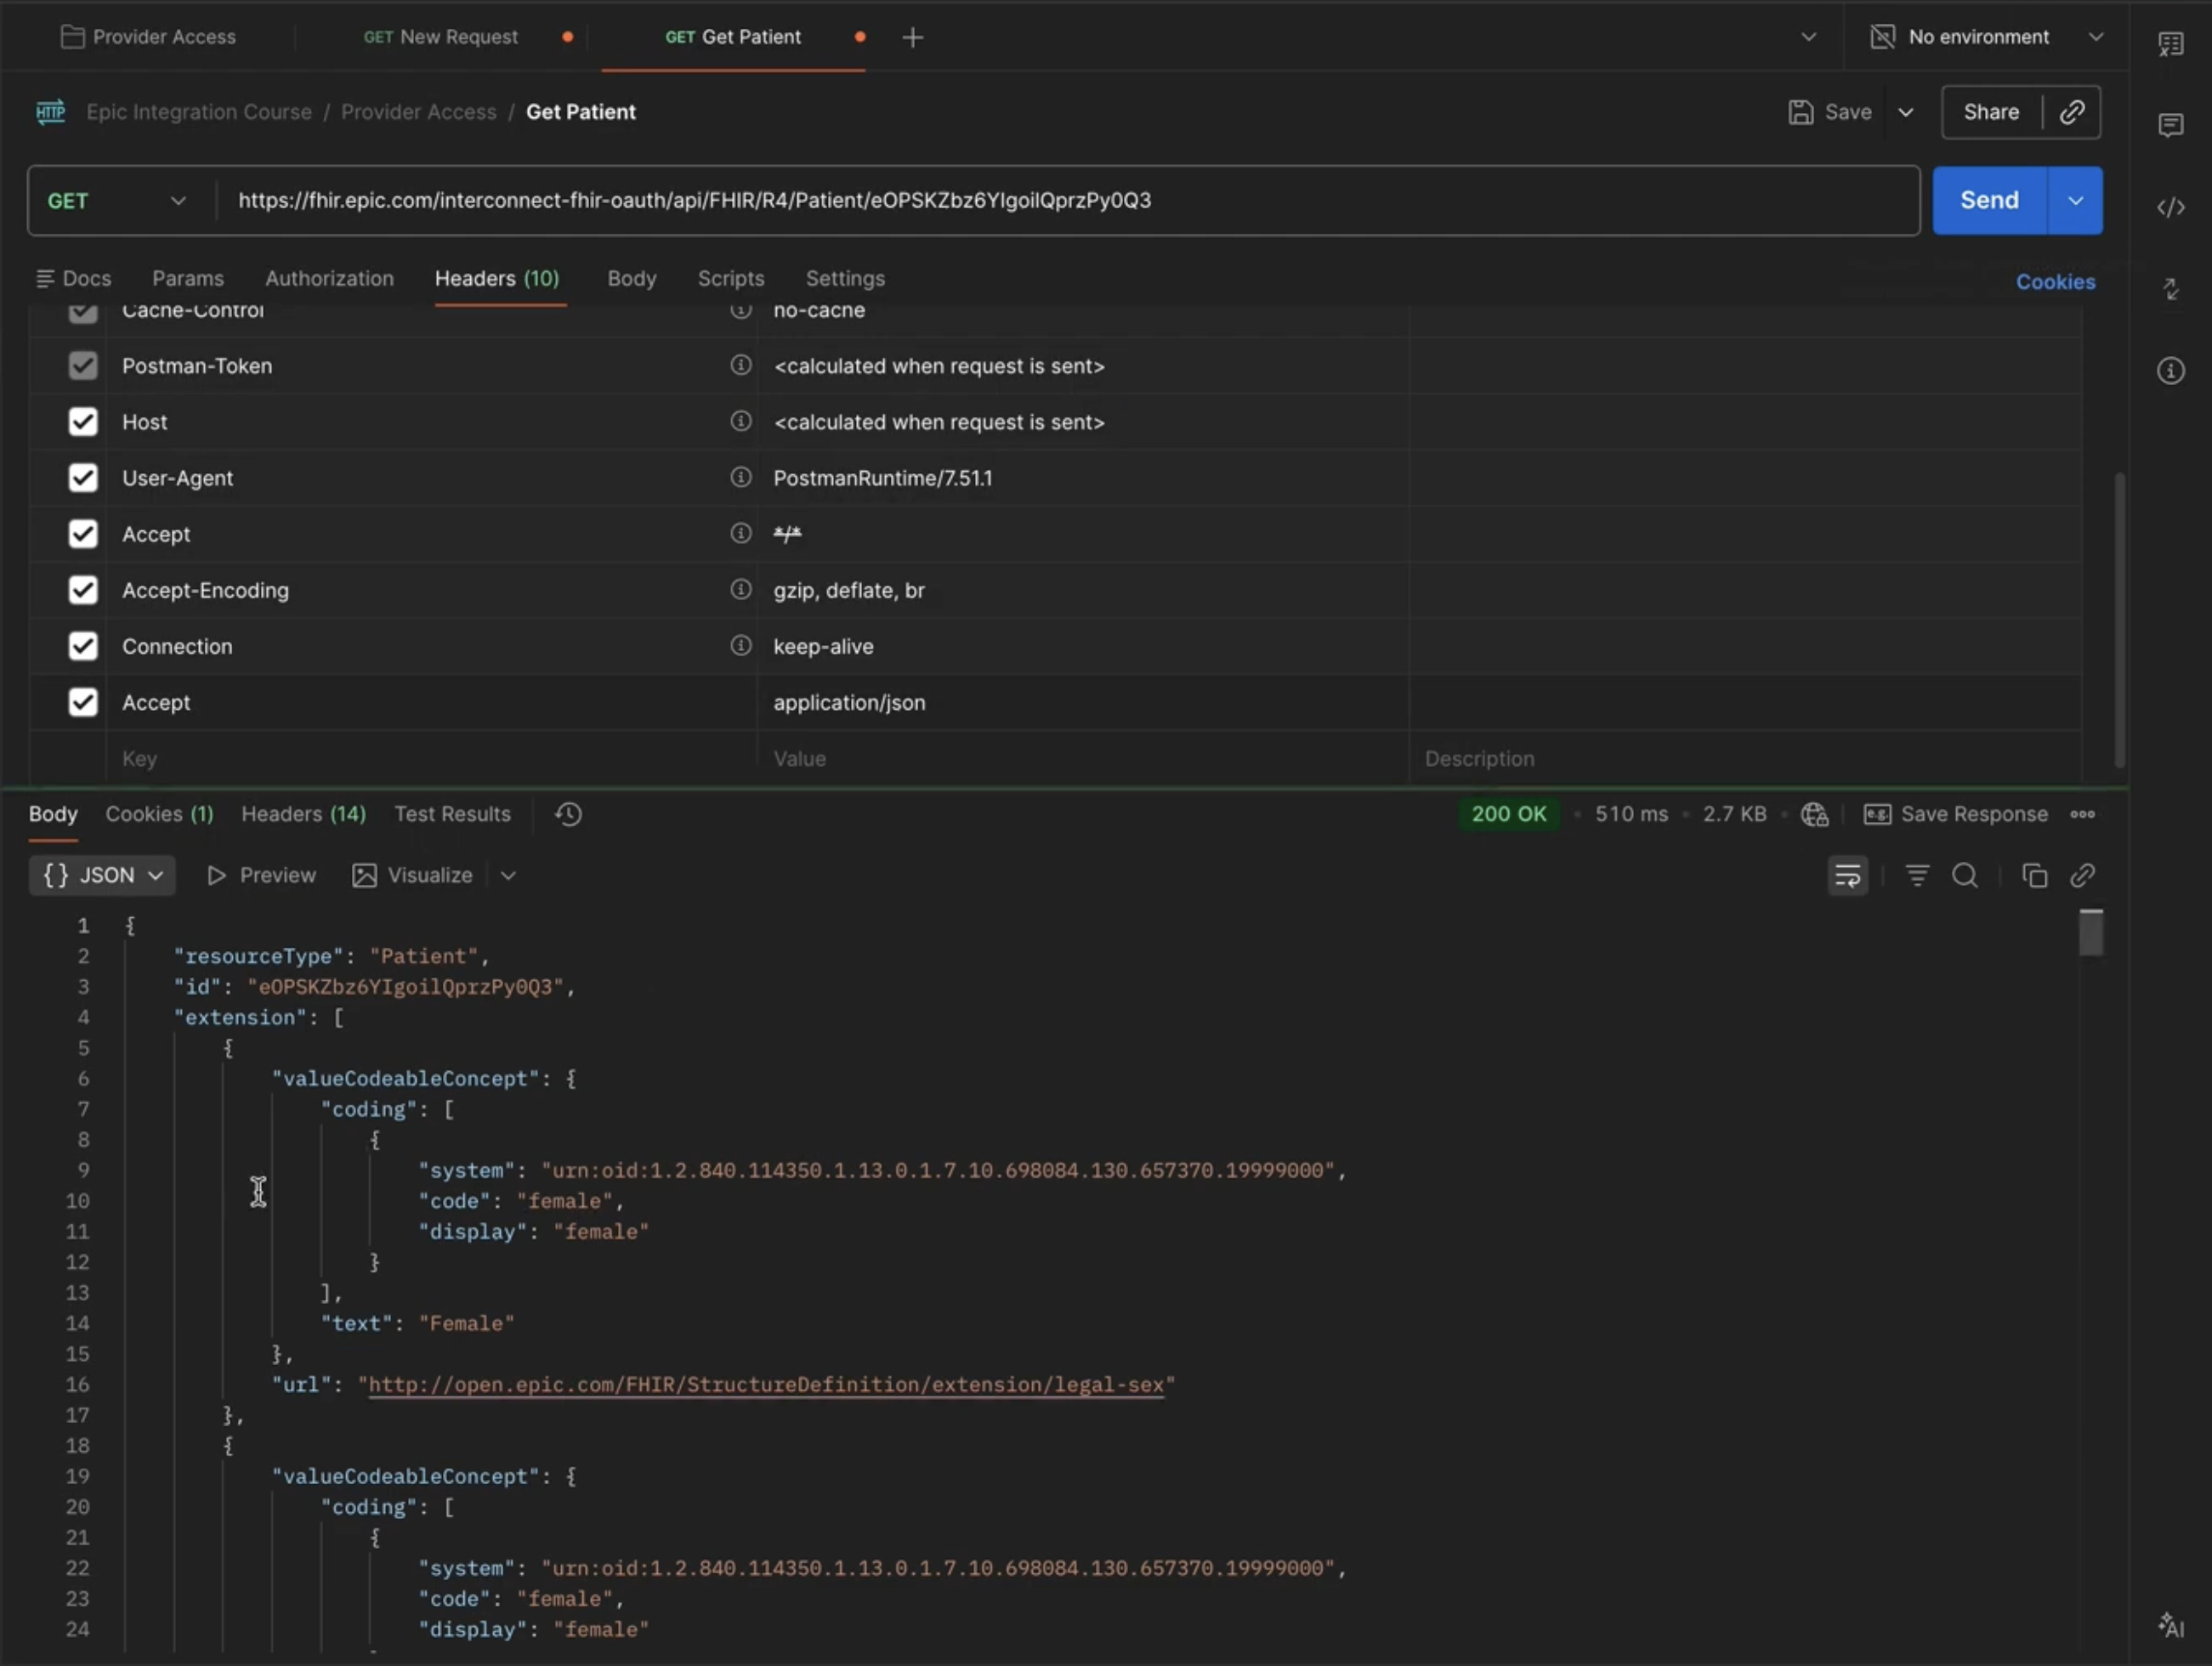
Every other resource works the same way. You can fetch the patient’s vitals with an Observation search right here in Postman, but we’ll do that in the working app in the next lesson so you can see the request and the response together.
Should your app show the patient’s details?
If your app is embedded inside Epic, the patient’s name and details are already on screen in Epic’s own header. So you don’t strictly need to repeat them.
But it’s a good practice to show them anyway. Put the patient’s name and date of birth somewhere small, off to the side, so the clinician can always confirm your app is on the same patient they are. It’s a safety check, and it costs nothing.
What’s next
You’ve run the EHR launch, exchanged the launch token for an access token, and read the patient data.
In the next lesson we build VitalCheck, read the patient’s vitals through the Observation API, and write a new reading back into Epic. If Postman is giving you an error at any step, post it in the comments.