
MCP server
Give AI assistants access to your Medblocks Platform workspace.
The Medblocks Platform MCP server lets an AI assistant such as Claude or ChatGPT work with your workspace on your behalf. Once you connect it, the AI assistant can see who is set up in your workspace, search for hospitals and clinics, start a secure connection to your patient portals, and read the health records that come back.
MCP, the Model Context Protocol, is an open standard that lets an AI assistant call tools on an outside service. Medblocks exposes your workspace as one of those services. The server is named medblocks-platform, and it lives at https://app.medblocks.com/mcp.
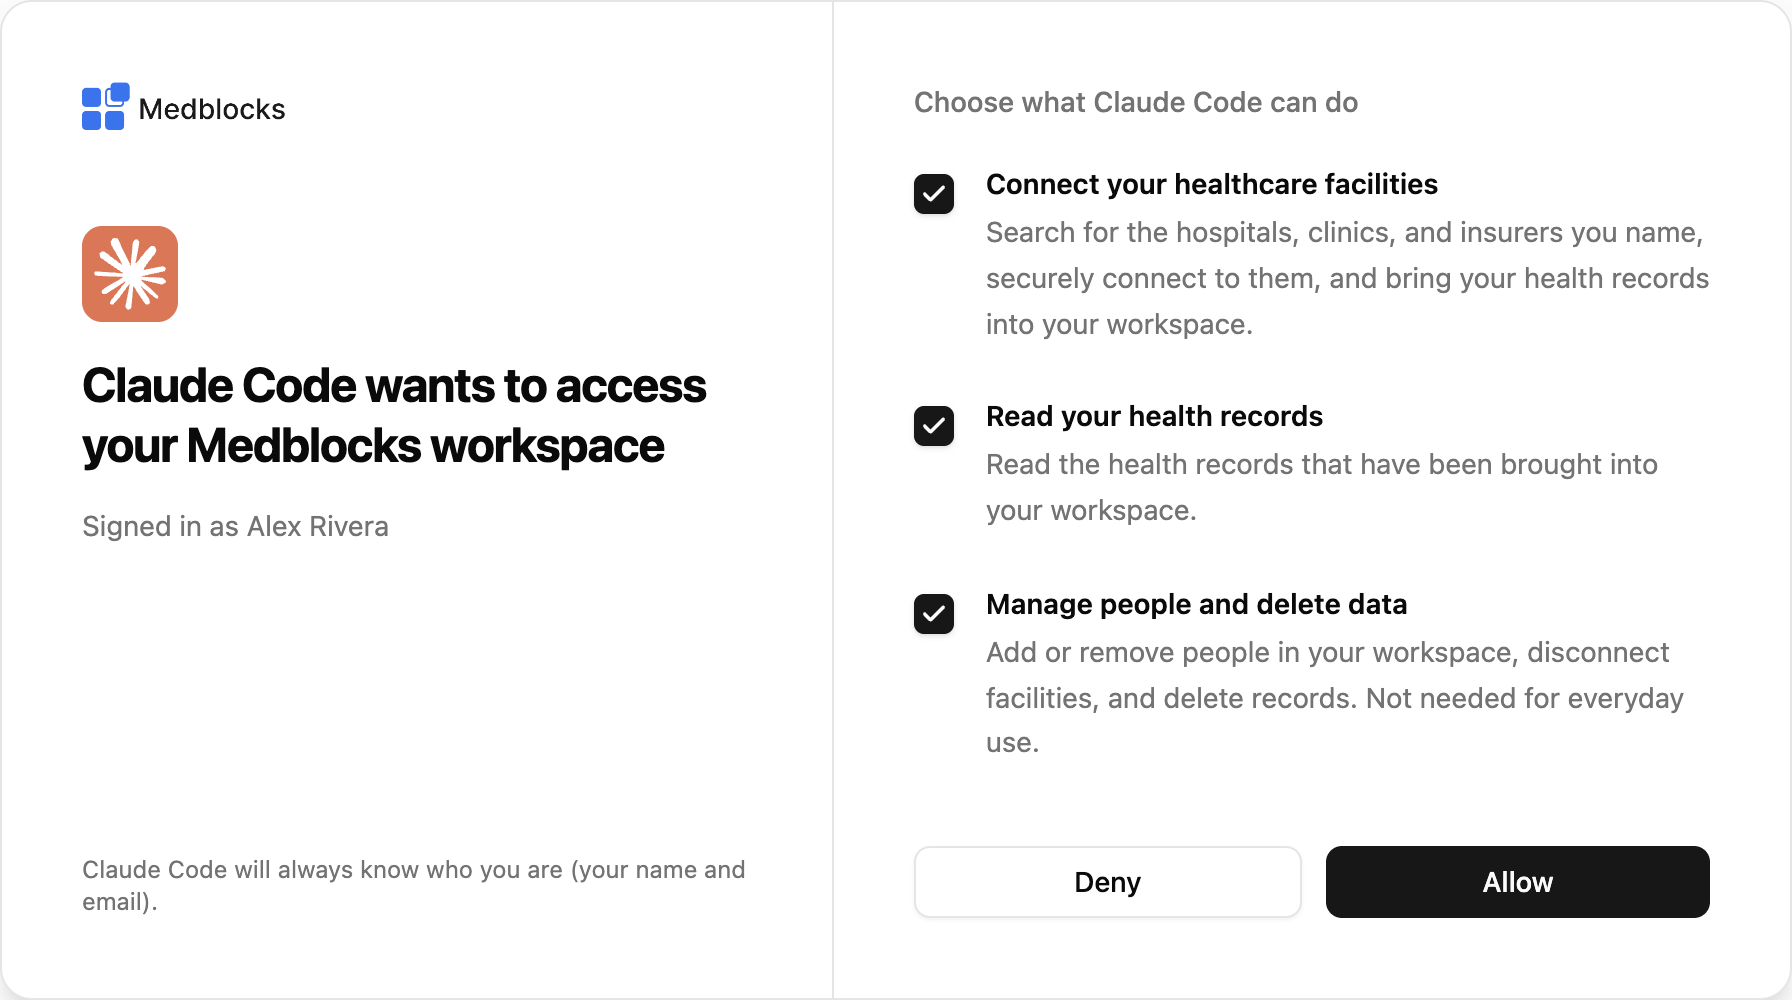
When you connect, Medblocks shows a consent screen where you choose what the AI assistant can do before you approve.
Connect Claude Code
Connect the Claude Code CLI to your workspace.
Add the server
claude mcp add --transport http medblocks https://app.medblocks.com/mcpSign in
Start Claude Code, run /mcp, choose medblocks, then choose Authenticate. Your browser opens a Medblocks page. Sign in with the same account you use for the dashboard. If you are new, Medblocks creates a workspace for you automatically.
Choose what it can access
Review the consent screen, tick the capabilities you want to grant, and click Allow. Claude Code picks up the token and the tools become available.
To connect a scripted workspace without the browser sign in, pass an API key header instead.
claude mcp add --transport http medblocks https://app.medblocks.com/mcp \
  --header "Authorization: Bearer mb_sk_..."
Connect Codex
Connect the Codex CLI to your workspace.
Add the server
codex mcp add medblocks --url https://app.medblocks.com/mcp \
  --oauth-resource https://app.medblocks.com/mcp
The --oauth-resource flag matters. The server issues a signed token only when the client asks for this resource, so without the flag the connection is rejected.
Sign in
codex mcp login medblocksYour browser opens a Medblocks page. Sign in with your dashboard account. If you are new, Medblocks creates a workspace for you automatically.
Choose what it can access
Review the consent screen, tick the capabilities you want to grant, and click Allow. Confirm the connection with codex mcp list.
Codex stores the connection in ~/.codex/config.toml. To connect a scripted workspace without the browser sign in, add the server with an API key header instead.
codex mcp add medblocks --url https://app.medblocks.com/mcp \
  --header "Authorization: Bearer mb_sk_..."
Connect ChatGPT and Claude
The ChatGPT and claude.ai web apps both connect with the same server URL and handle sign in and consent in the browser.
https://app.medblocks.com/mcpClaude (claude.ai and Cowork)
The same connector works for Claude on the web and for Cowork.
Add a custom connector
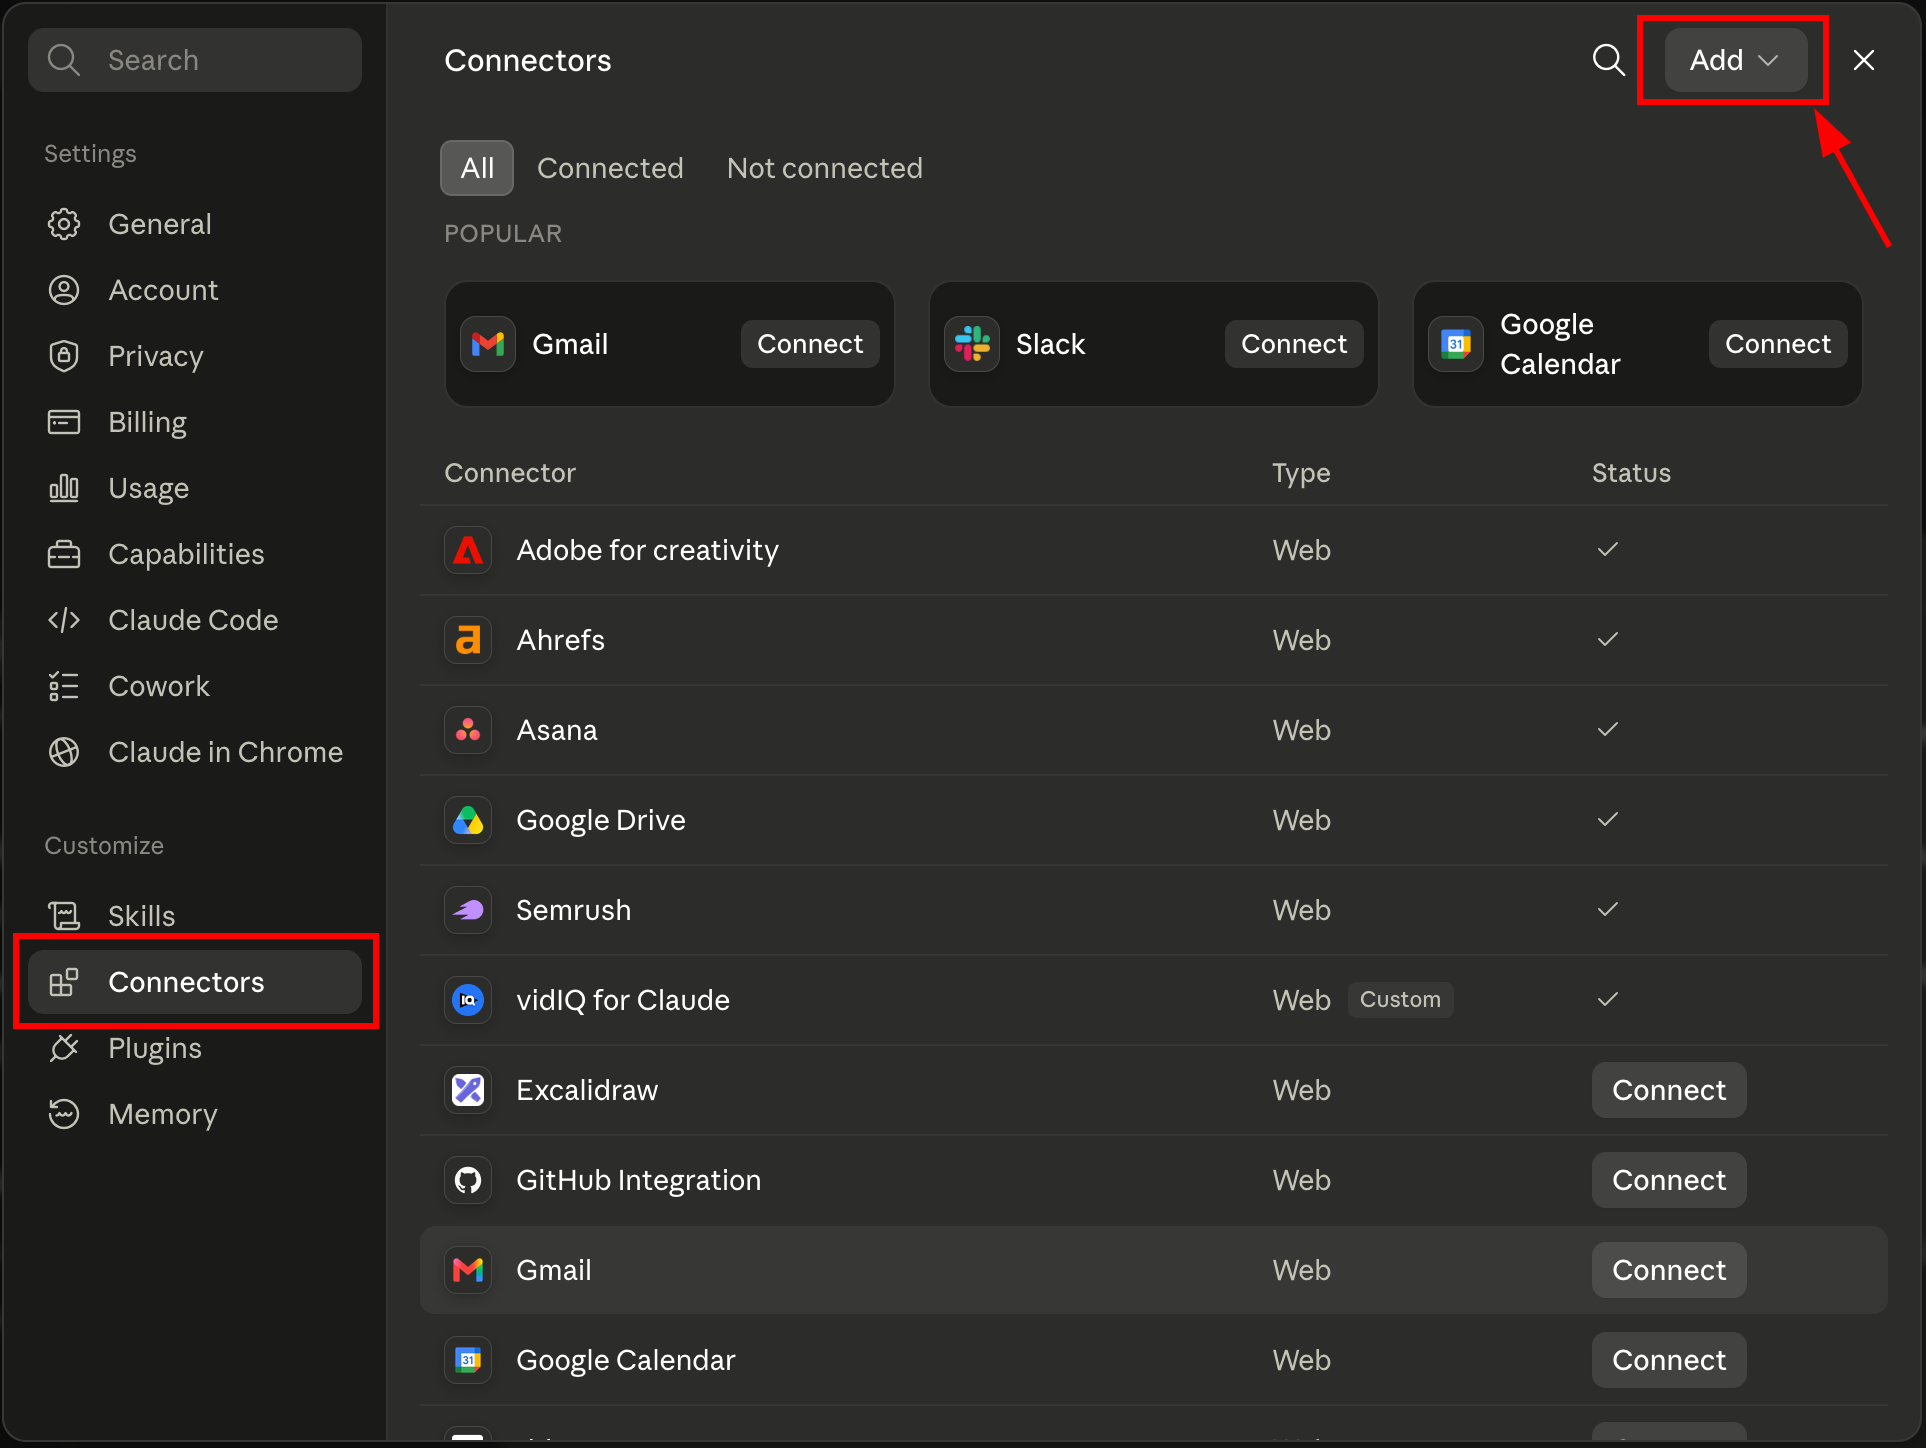
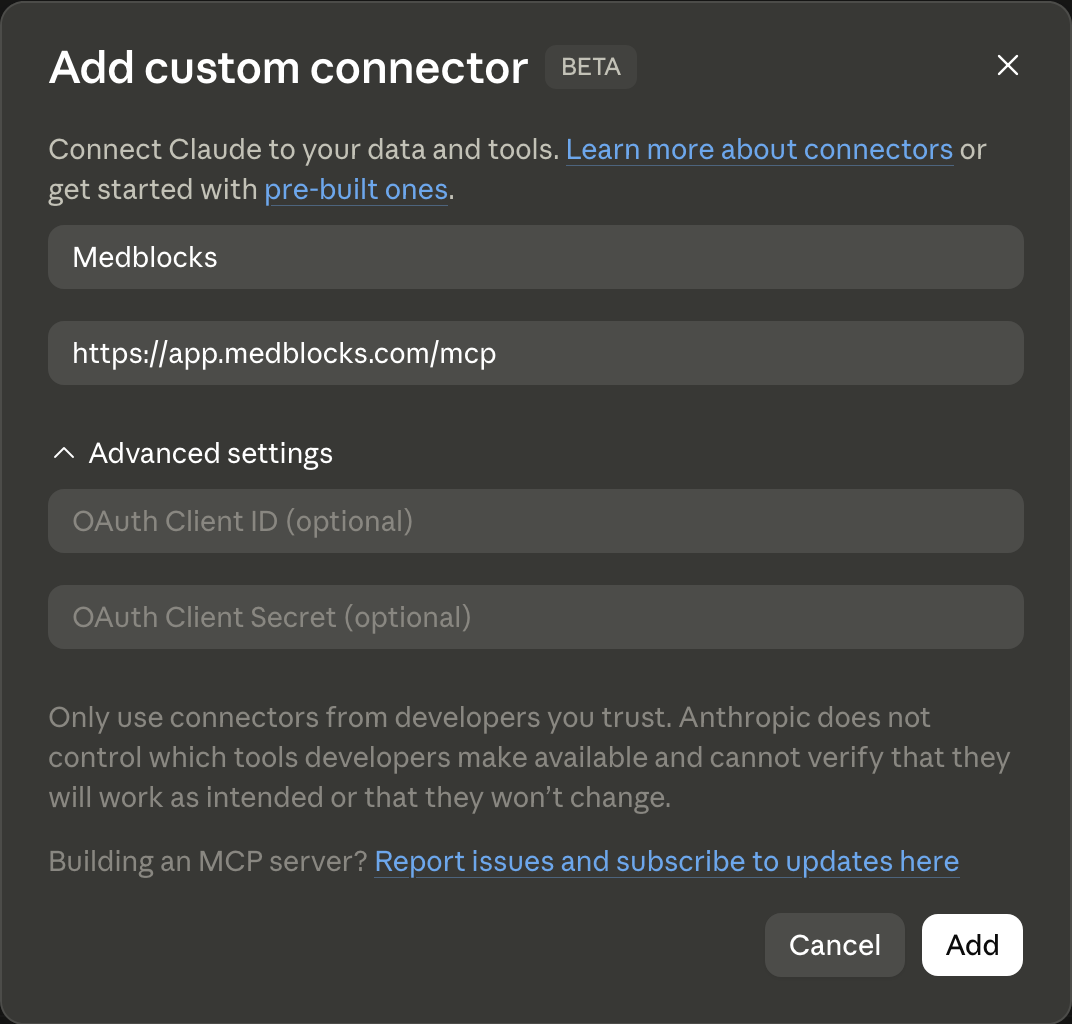
Choose Add custom connector. Name it Medblocks, paste https://app.medblocks.com/mcp, and click Add. Leave the optional OAuth fields blank.
Sign in and choose what it can access
Claude opens a Medblocks page. Sign in, review the consent screen, tick the capabilities you want to grant, and click Allow.
ChatGPT
Turn on developer mode
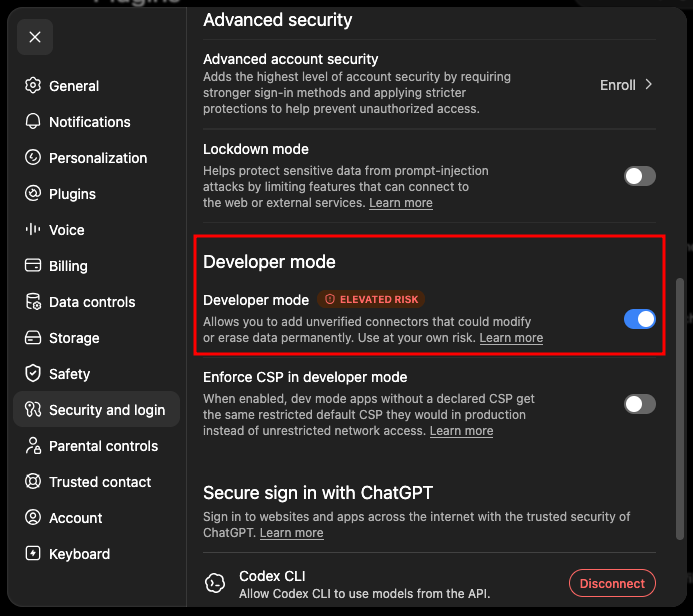
Go to Settings > Security and login > Advanced security and turn on Developer mode. This is available on paid plans. You can leave “Enforce CSP in developer mode” on. The Medblocks in-chat panel declares everything it loads and works under the stricter policy.
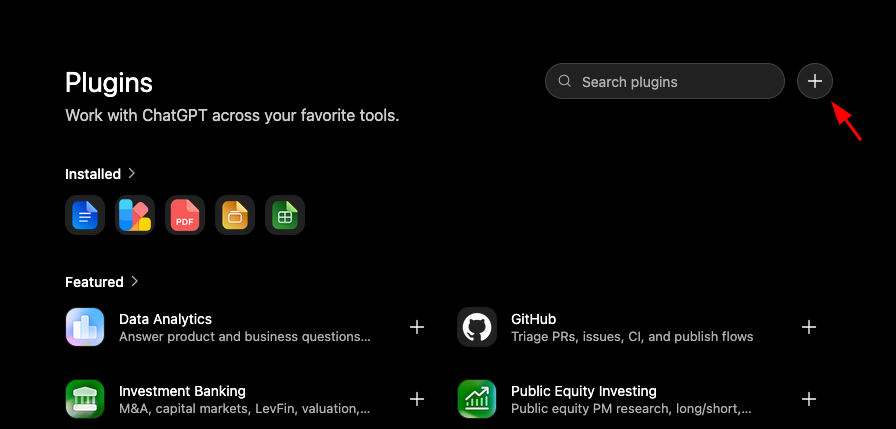
Enter the server URL
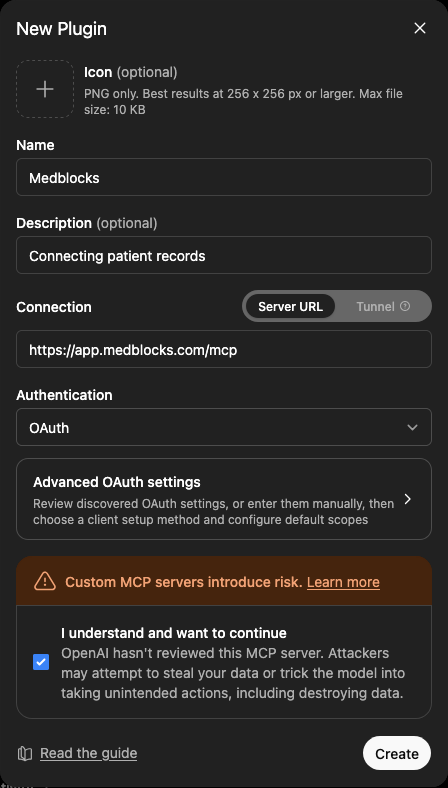
In the New Plugin dialog, set Connection to Server URL and paste https://app.medblocks.com/mcp. Leave Authentication on OAuth, tick “I understand and want to continue”, and click Create.
Sign in and choose what it can access
ChatGPT opens a Medblocks page. Sign in, review the consent screen, tick the capabilities you want to grant, and click Allow.
When the AI assistant starts a connection in ChatGPT or in Claude on the web, a Medblocks panel inside the chat lists the matching health systems ready to connect. Name several facilities at once and the panel lists matches for each. Remove any that do not belong, search and add any that are missing, then click connect. The secure Medblocks page opens where you sign in to each facility. Return to the panel and check the status once after you finish. Connections that can no longer retrieve records are clearly marked as needing reconnection.
Claude Code and Codex run in the terminal and do not display panels. There the assistant presents the matches in the conversation and asks you to choose before it creates a plain link.
Before it asks where you receive care, the assistant checks for health systems you previously connected in your production workspace. If it finds an active connection, it names the health system and asks whether you want to use those records or connect more facilities. If a connection needs attention, it offers to reconnect it. Sandbox workspaces and their connections stay out of the conversation unless you explicitly ask for sandbox or testing.
When you connect another facility, the assistant identifies whose records you are connecting. It uses your signed-in name when the records are yours, or asks for the other person’s name. A matching name reuses the person already in your workspace. A new person always needs a real name.
What each permission allows
When you connect, Medblocks shows a consent screen with one tick box per capability, all ticked by default. Untick any you would rather not grant. The last one covers destructive actions, so you may want to leave it off unless you need it. The AI assistant always knows who you are (your name and email) and can see your workspace, so those are granted without a prompt.
| Permission | What it allows | Default |
|---|---|---|
| Connect your healthcare facilities | Lets the AI assistant search the hospitals, clinics, and insurers you name, securely connect to them, and bring your health records into your workspace. | On |
| Read your health records | Lets the AI assistant read the health records that have been brought into your workspace. | On |
| Manage people and delete data | Lets the AI assistant add or remove people in your workspace, disconnect facilities, and delete records. Not needed for everyday use. | On |
You can grant fewer permissions than the AI assistant requests. Anything you leave off is simply unavailable to it, and you can reconnect later with a different choice.
Tools
The server exposes ten tools. The AI assistant decides which ones to call based on what you ask, and the permissions above gate what it is allowed to reach.
| Tool | What it does |
|---|---|
get_workspace_overview | Reports who you are, summarizes the selected workspace, and lists health systems previously connected there. |
list_workspaces | Lists every workspace you can use, labeled production or sandbox. |
list_people | Lists everyone set up in your workspace. |
search_health_systems | Searches hospitals, clinics, and insurers by name. |
choose_health_systems | Opens the in-chat panel with every matching facility so you can make the selection. |
connect_health_system | Creates a private connection session and secure link after you select one or more facilities. It reuses an existing person with the same name or creates a new person from the real name you provide. |
check_connection_status | Checks how a connection is going, for a single session or for a whole person. |
get_health_records | Reads a person’s medical records from their connected health systems. |
disconnect_health_system | Stops retrieving records from one connected health system and revokes access. |
delete_person | Permanently removes a person and all their retrieved records from the workspace. |
Every tool call writes a private audit entry in your workspace. This is why even lookup tools declare that they change state in their MCP metadata. connect_health_system can create a person and connection session. The last two tools are destructive, so a well-behaved AI assistant confirms with you before it runs them.
Work in a sandbox workspace
Developers who keep a sandbox workspace for testing can point the AI assistant at it. Say something like “pull my records from the Cerner sandbox” and the assistant looks up your workspaces, switches to your sandbox, and works there for the rest of the task. Medblocks verifies your Better Auth workspace membership before every switch. If you have several sandbox workspaces it asks which one you mean.
The assistant never creates a sandbox workspace for you. Create one from the dashboard first, then ask again. API key connections stay bound to the workspace that minted the key and cannot switch.
Use the server as a developer
If you are driving the server from your own code, you can skip OAuth. Send a Medblocks API key as a bearer token on every request, and the server acts as that workspace.
curl https://app.medblocks.com/mcp \
  -H "Authorization: Bearer mb_sk_..."
Mint the key from the dashboard under Settings > API Keys. An API key is a server-side secret, so keep it out of browser code and client bundles, the same as any other Medblocks API key. See Set up your workspace for how to create and rotate keys.
A key uses the permissions stamped on it rather than the consent scopes above. Reach for OAuth when a person is connecting their own AI assistant, and reach for a key when a backend service needs the tools.
Import the Medblocks skill
The server publishes the Medblocks agent skill through the draft Skills over MCP extension. ChatGPT reads this catalog when a plugin publisher runs Scan Tools and stores a static snapshot in the plugin draft. Run the scan again after changing the skill files so a new plugin version receives the update.
Skill discovery does not change ordinary MCP tool calls. Clients that do not support the extension continue to use the same tools and resources.
Revoke access later
You stay in control after you connect. In the dashboard, go to Settings > MCP server. Revoke the AI assistant there and it can no longer refresh its access, and any access already issued expires within an hour. Removing the connector inside the AI assistant stops that client from calling the server as well.
Troubleshooting
Unexpected content type text/html, or “No authorization support detected.” Your client reached a web page instead of the MCP server. Check that the URL is exactly https://app.medblocks.com/mcp with no trailing path, and that you did not point the client at a plain website address. A correct URL answers an unauthenticated request with a 401 and a WWW-Authenticate header, which is what starts the sign in.
Codex rejects the connection before sign in. Include the resource flag so Codex requests a signed token, otherwise the server declines. Add the server with --oauth-resource https://app.medblocks.com/mcp as shown above.
See also
Need help?
Running into an issue? Get support from our team and we will get back to you.
How is this guide?