
Test with sandboxes
Integrate with Synthetic Hospital and public EHR sandboxes.
Use the Synthetic Hospital to test your integration with synthetic patient data. It gives you a safe, production-like environment to build and validate your integration before connecting to real systems.
If you want to test EHR-specific workflows, you can connect to public sandboxes such as Epic, Cerner, or Athena.
Create a Sandbox workspace
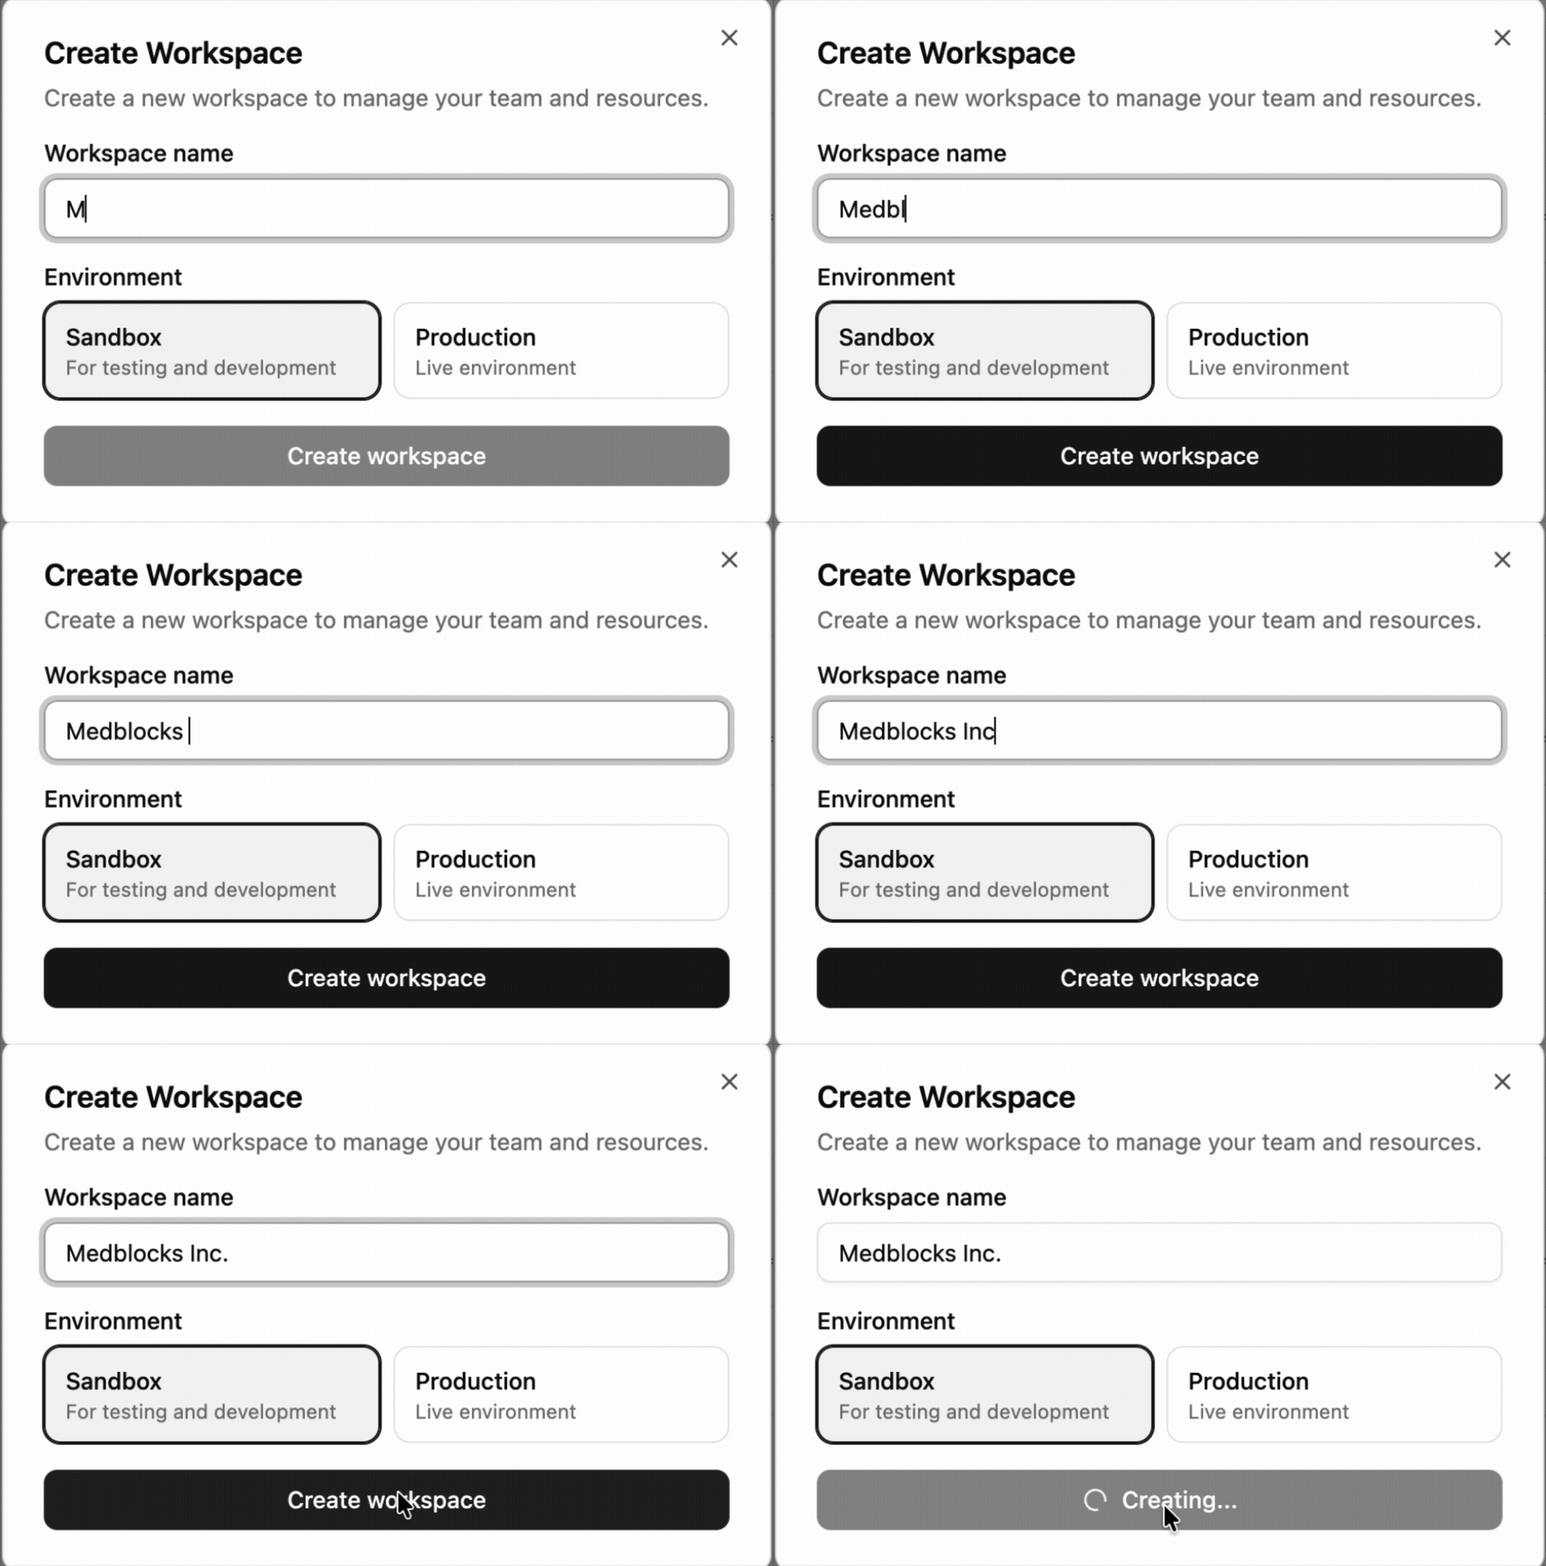
Follow Set up your workspace to sign in and reach the Create your workspace dialog shown below. Choose Sandbox as the environment. A Sandbox workspace can only see the sources scoped to it. Use a separate Production workspace when you are ready for live credentials, live patients, and production export destinations.
Synthetic Hospital
The Synthetic Hospital is a test facility inside the Medblocks patient portal. It has pre-seeded sample patients. It also allows you to upload your own FHIR R4 bundle.
Add a sample patient
Click on the + button next to Patients to open the “Add New Patient” dialog box. In the “Add New Patient” dialog box, enter a patient name and an email, and then click on the Add Patient button.
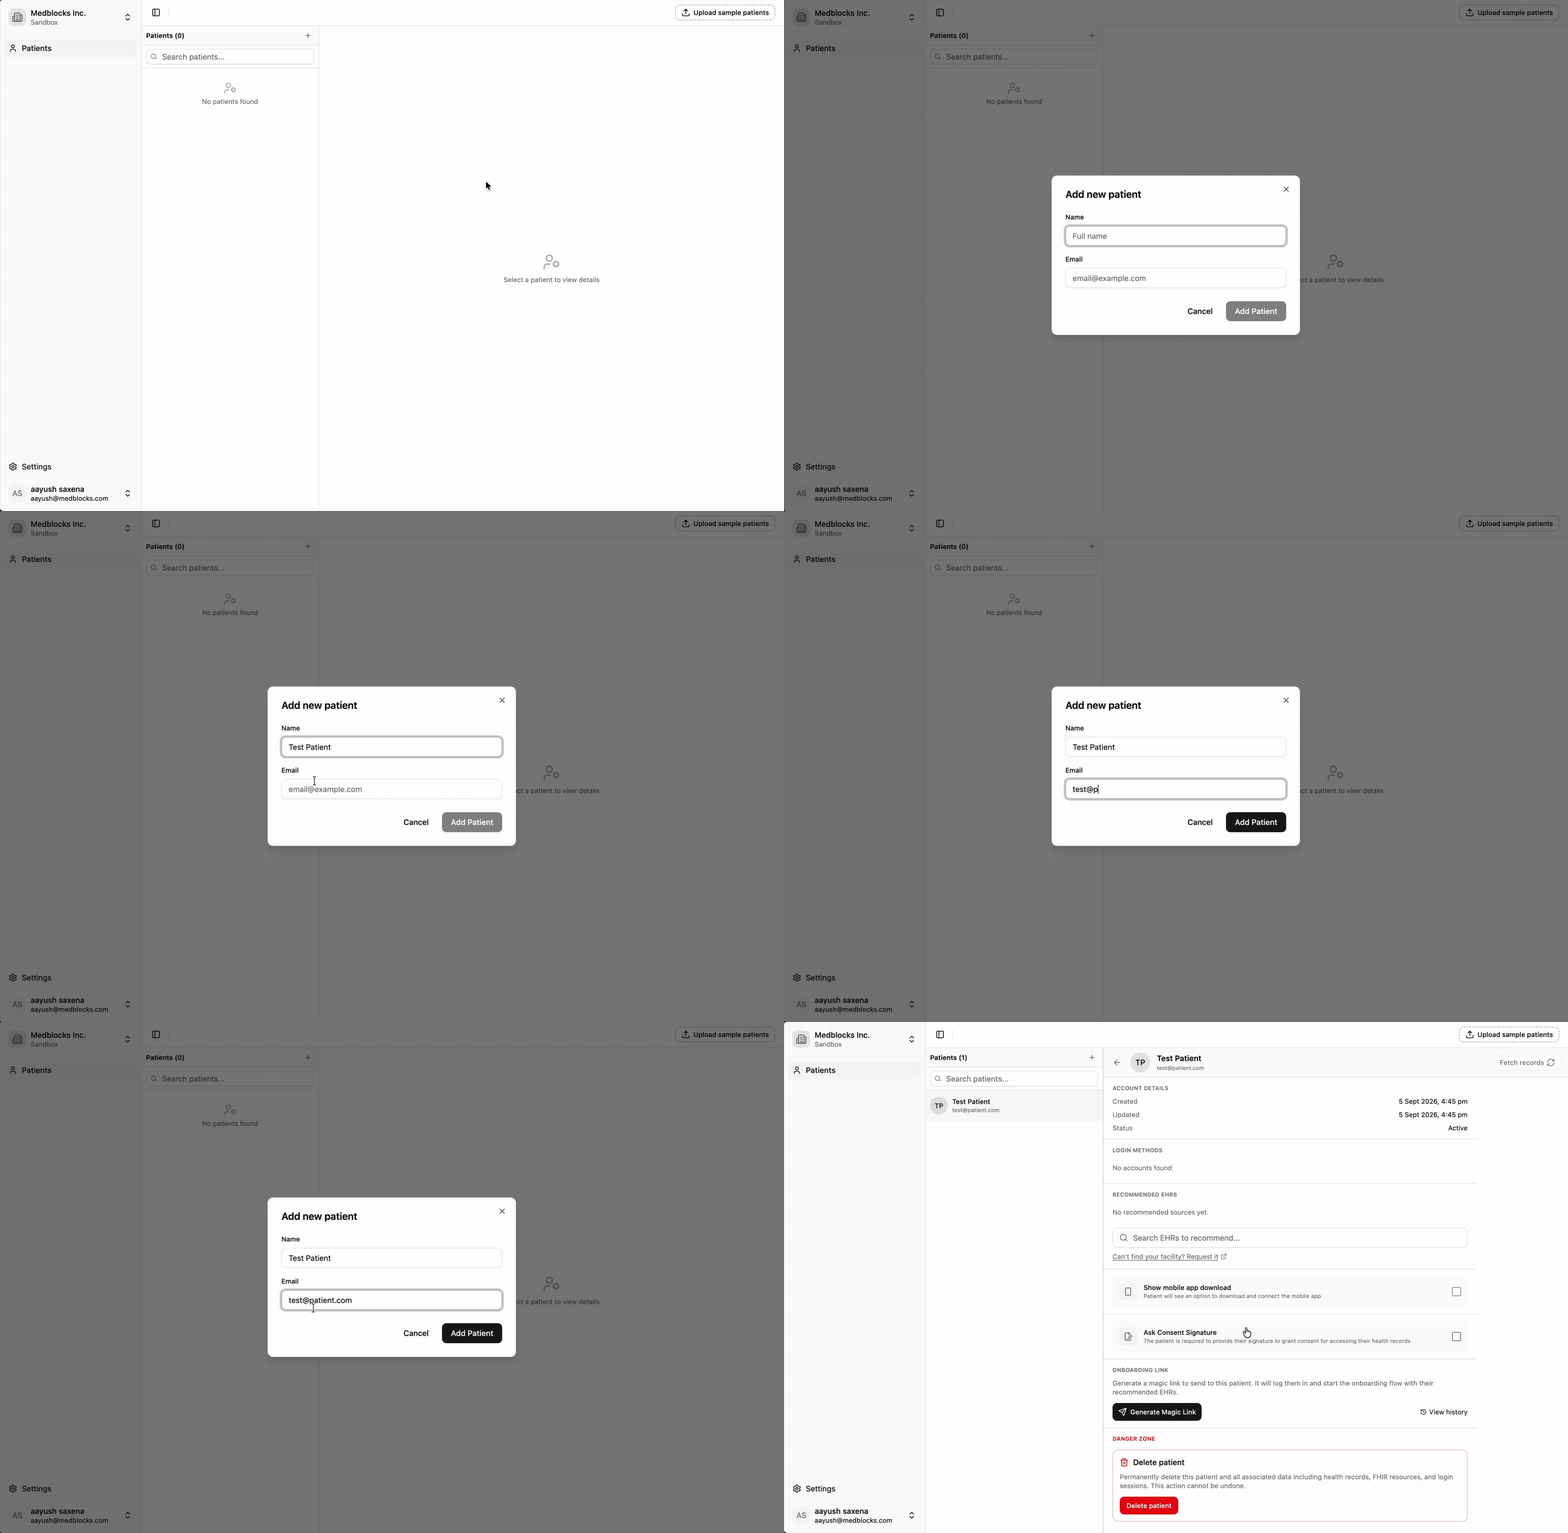
You can now see the newly added sample patient in the Patients list.
Generate a magic link
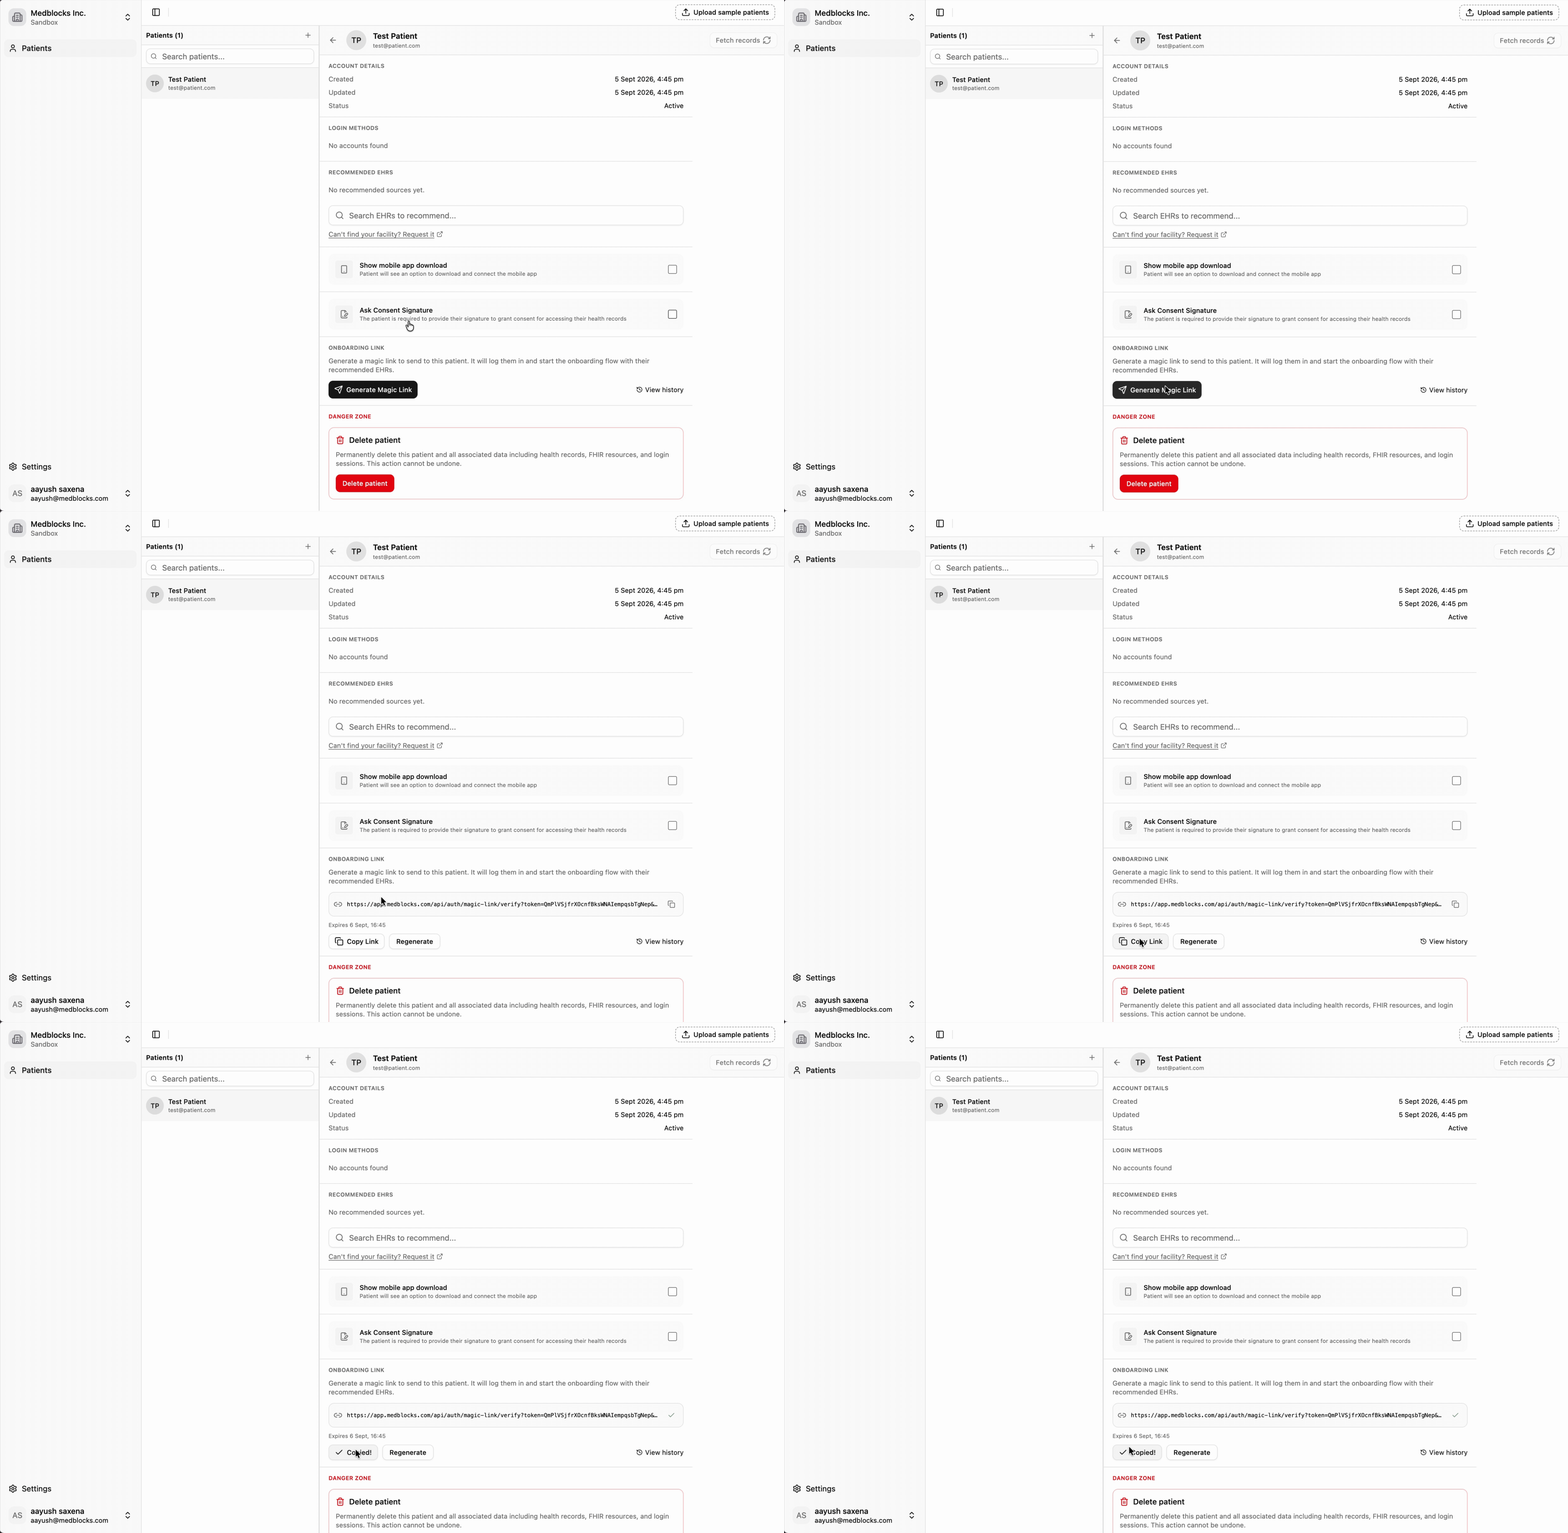
Click the patient you just added, or any other sample patient in your workspace, to open the patient detail panel. Find the Onboarding link section and click Generate Magic Link. Once the link is generated, you will see that the Copy Link button is now enabled. Click on it to copy the generated URL and open it in a new browser tab. You are now logged in as that sample patient.
Connect to the Synthetic Hospital
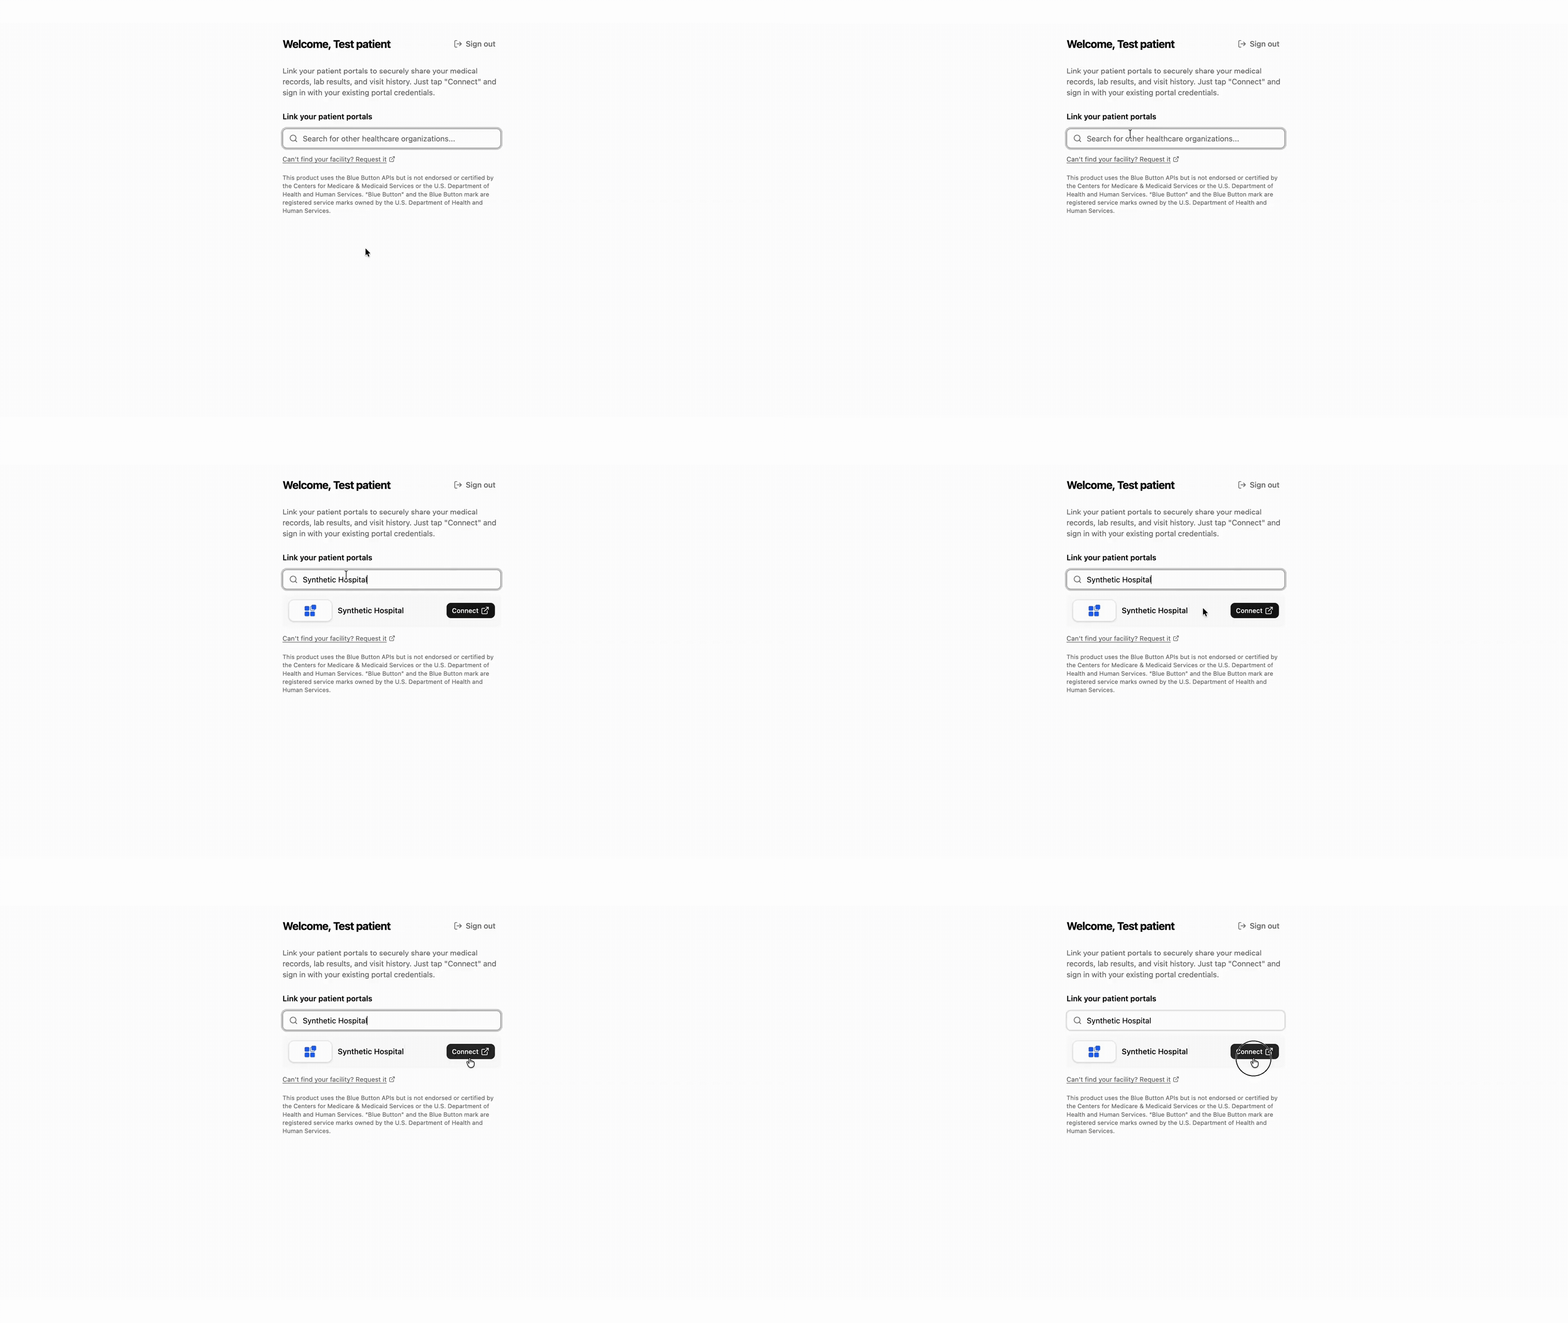
Search for Synthetic Hospital in the search bar, then click on the Connect button. After you click on the Connect button, you will be redirected to the Synthetic Hospital login page.
Log in to the Synthetic Hospital
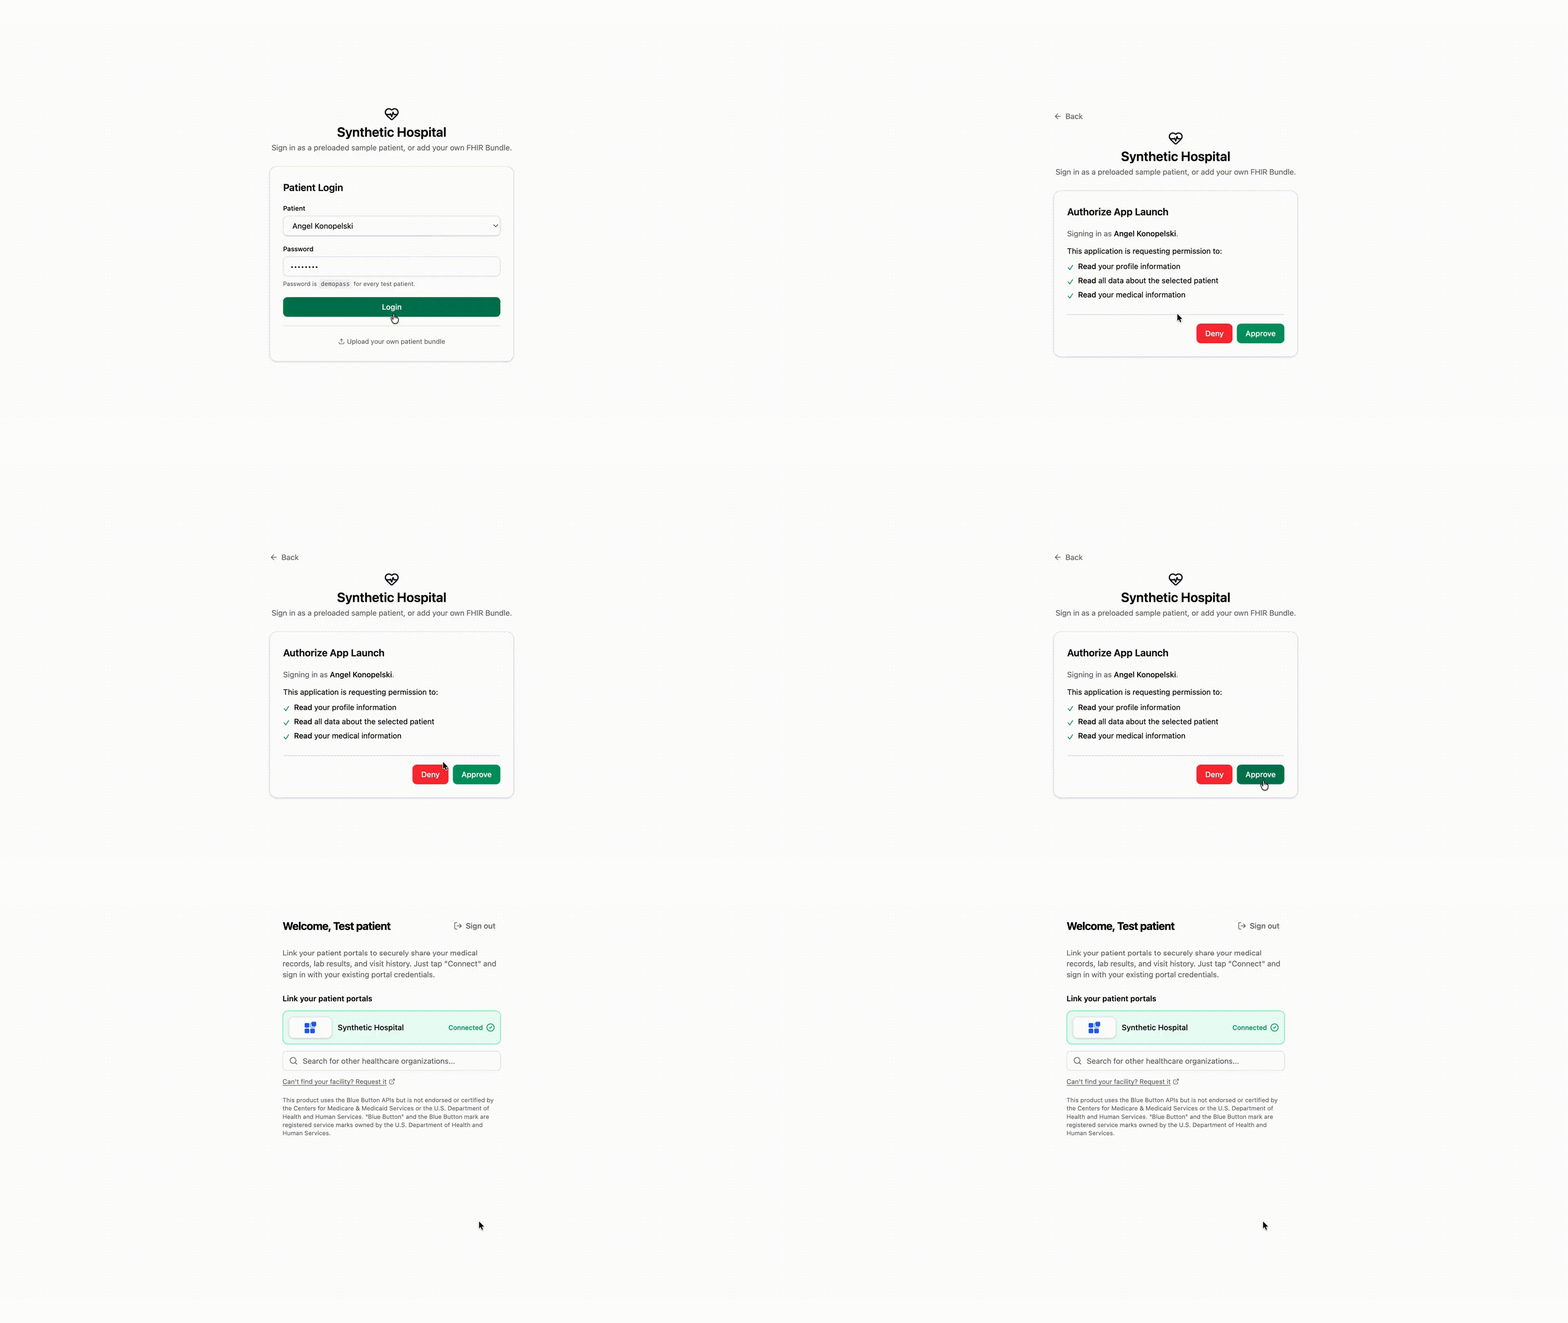
On the login page, you can see two options. You can log in using a pre-seeded patient or choose to Upload your own patient bundle to test with your own patient data. After that, you authorize the app to access the patient data by clicking on the Approve button.
A. Log in with a pre-seeded patient
Log in with any sample patient of your choice from the Patient dropdown. The password is demopass, which will be pre-filled. You can click Login to proceed.
B. Upload your own patient bundle
If you want to test with your own patient data, click on the Upload your own patient bundle button and then upload a FHIR R4 bundle file from your system. The bundle must contain a Patient resource. Click on the “Sign in as this” button to proceed.
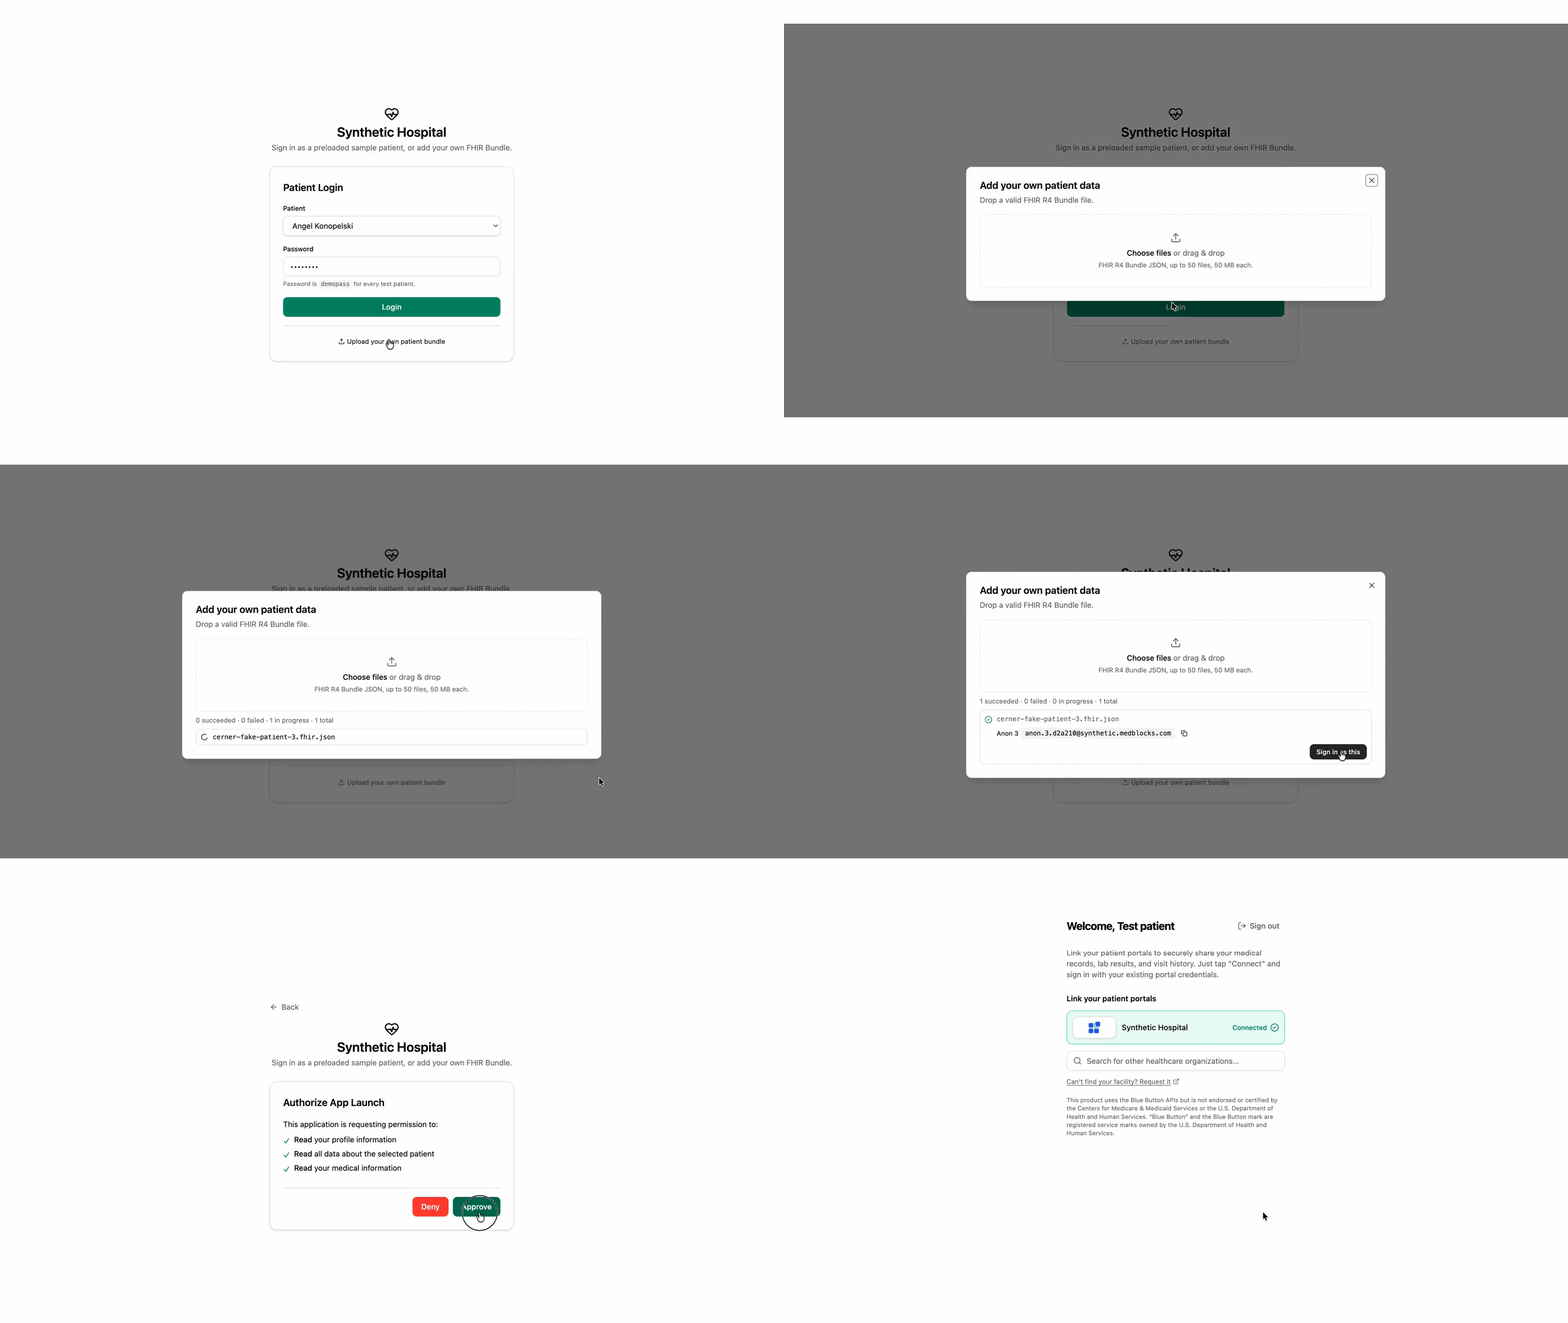
In case you do not want to proceed, click on the Deny button, and you’ll get redirected back to the patient portal and the sample patient will not be linked to your workspace.
The Synthetic Hospital is now connected, and the sample patient’s bundle has been added to your workspace.
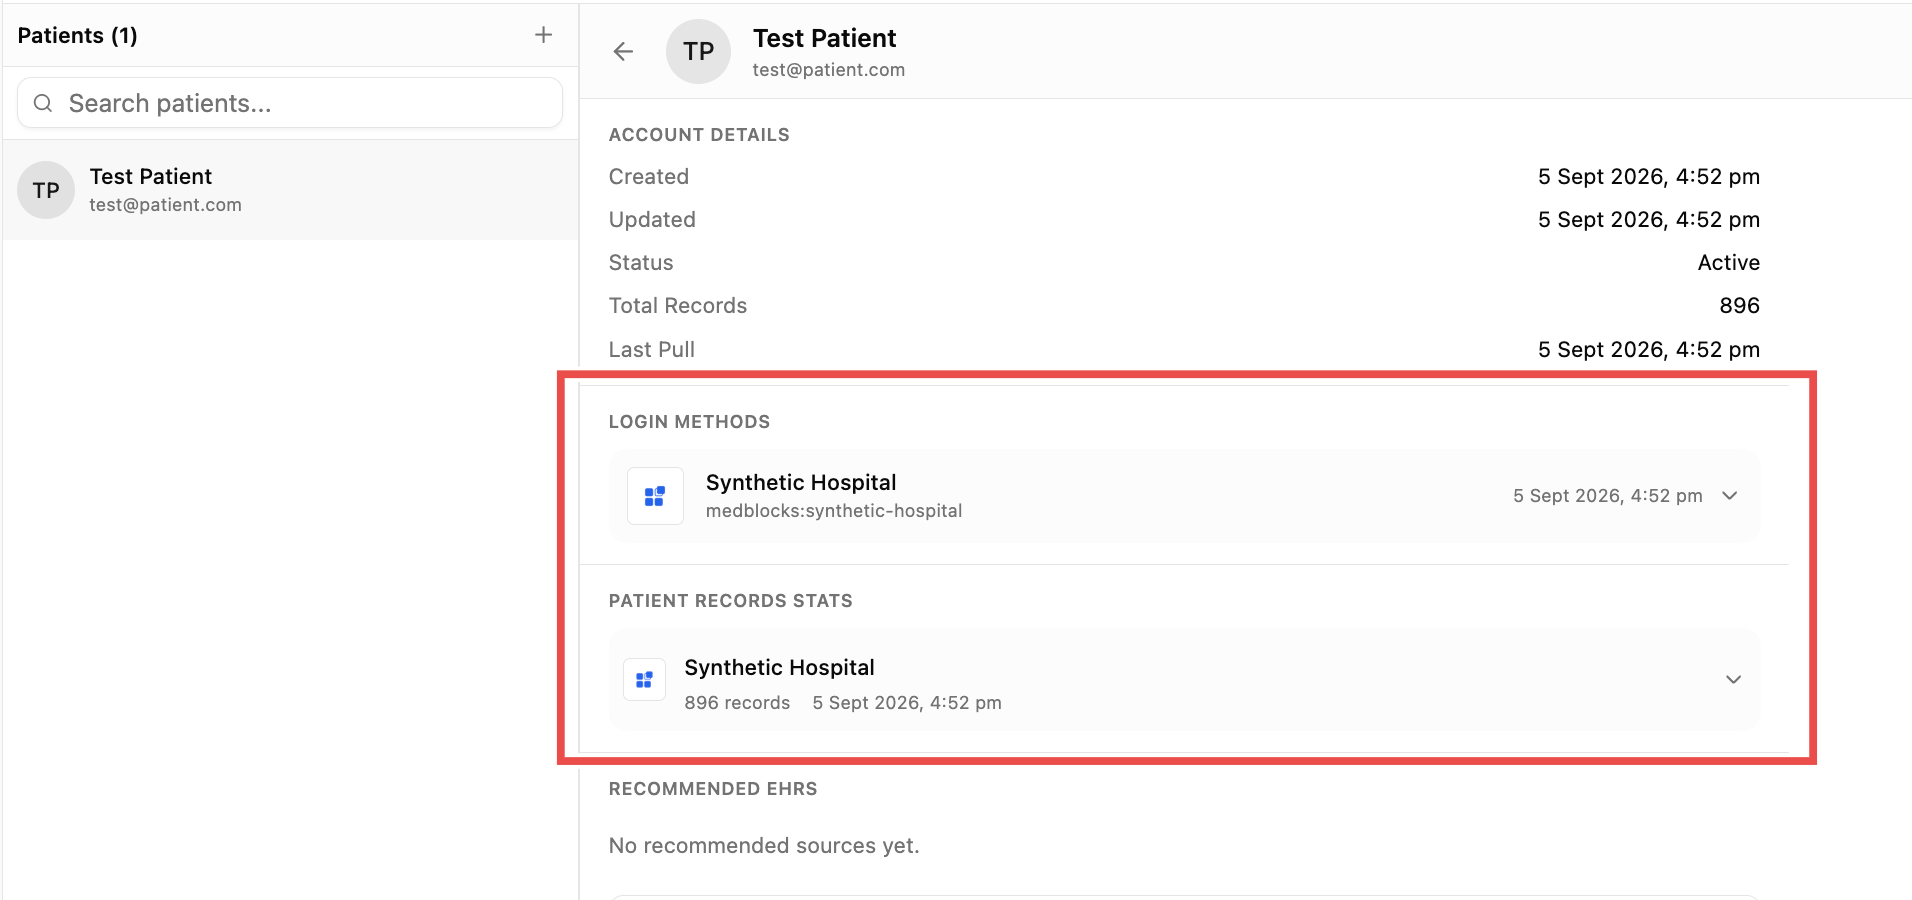
You can now test your integration with the sample patient bundle or your own uploaded patient data.
Preloaded patients
Each sample patient in the preloaded data set is a full FHIR R4 bundle, spanning a few years of history, with Encounters, Conditions, Observations, MedicationRequests, and Procedures. Every sample patient uses the password demopass.
| Patient Name | Patient Username |
|---|---|
| Angel Konopelski | angel.konopelski@synthetic.medblocks.com |
| Augusta Homenick | augusta.homenick@synthetic.medblocks.com |
| Clarinda O’Connell | clarinda.oconnell@synthetic.medblocks.com |
| Cristobal Montero | cristobal.montero@synthetic.medblocks.com |
| Dwana Tremblay | dwana.tremblay@synthetic.medblocks.com |
| Eliseo Nader | eliseo.nader@synthetic.medblocks.com |
| Ethyl Medhurst | ethyl.medhurst@synthetic.medblocks.com |
| Eunice Fay | eunice.fay@synthetic.medblocks.com |
| Ezekiel Walter | ezekiel.walter@synthetic.medblocks.com |
| Jody Hickle | jody.hickle@synthetic.medblocks.com |
SMART Health IT Sandbox
SMART Health IT runs a free, no-registration reference sandbox at launch.smarthealthit.org. It is a full SMART on FHIR authorization server backed by synthetic patient bundles.
Unlike vendor sandboxes, it has no developer portal, no client registration, and no username or password to remember.
Connect to the SMART Health IT Sandbox
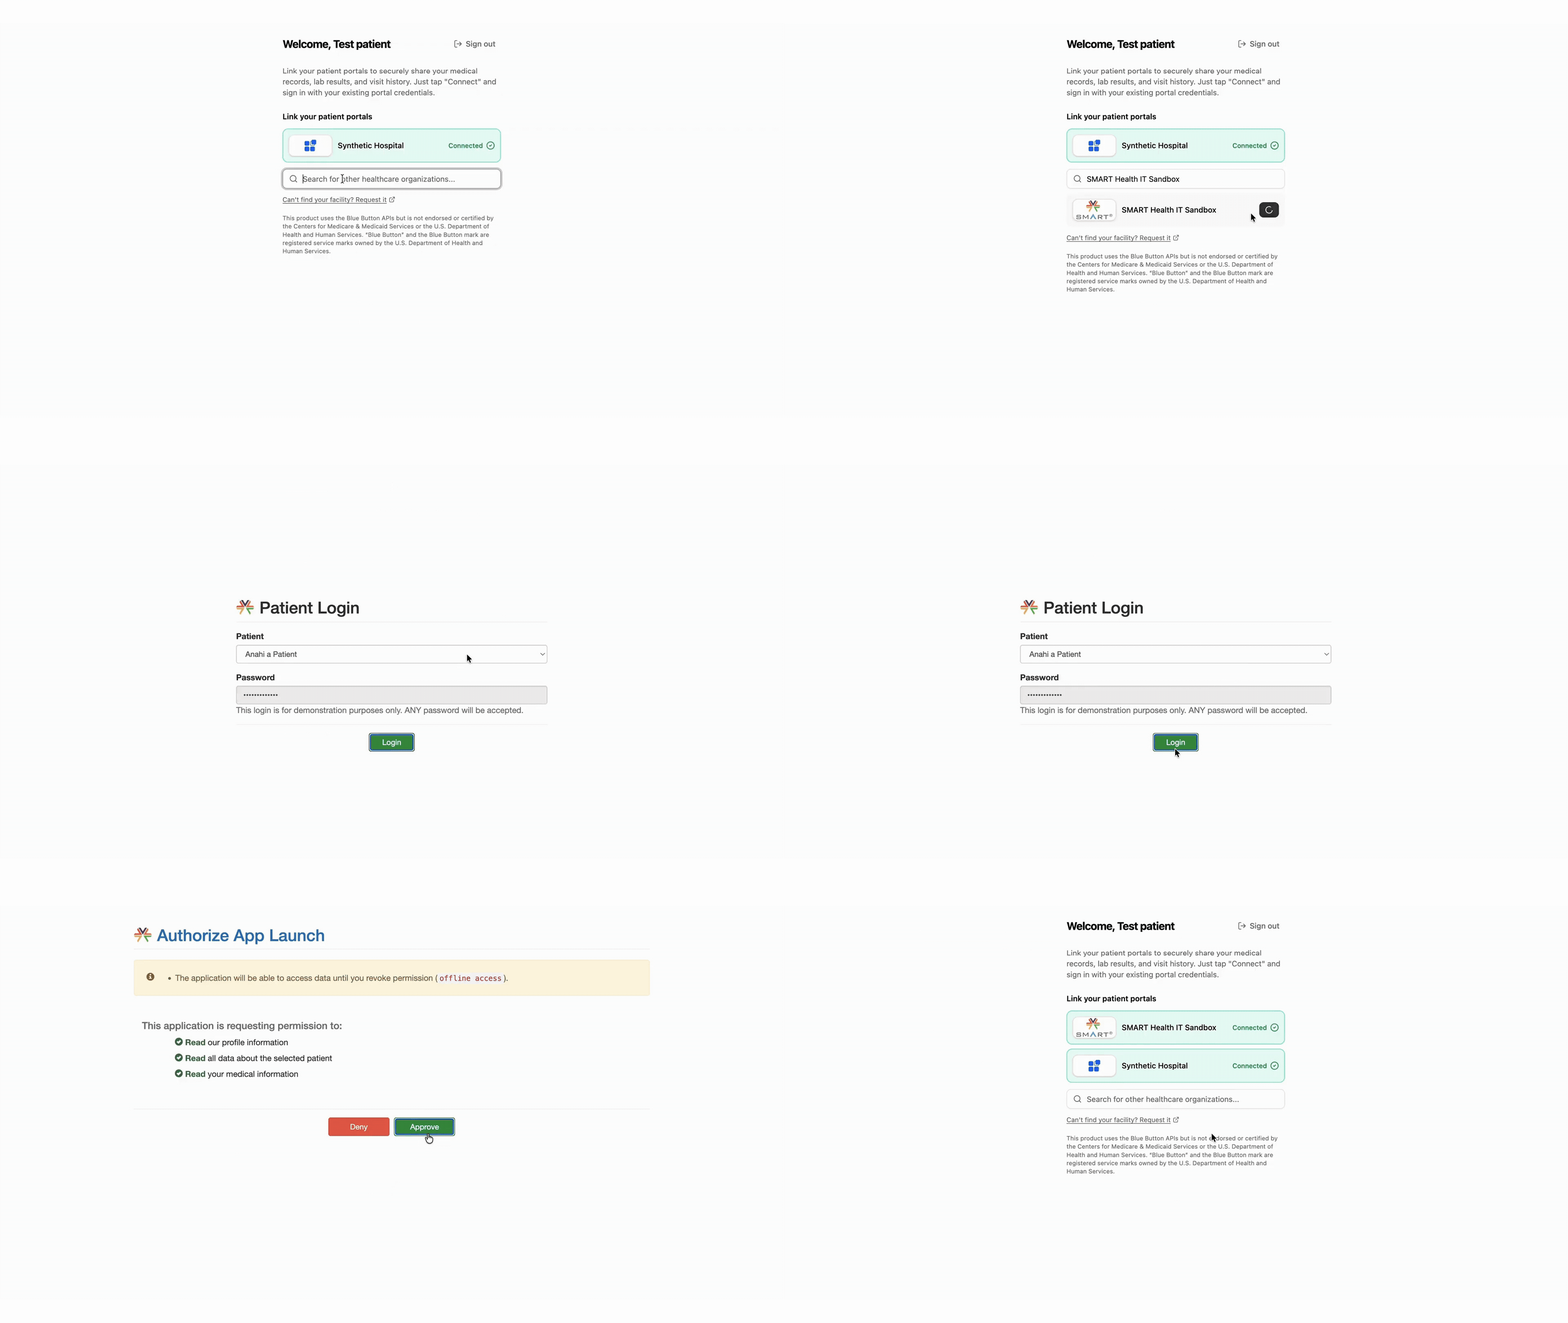
Using the magic link, open the patient portal for any sample patient. Under Link your patient portals, search for SMART Health IT Sandbox, then click on the Connect button. You will get redirected to launch.smarthealthit.org. Pick a sample patient from the dropdown and click Login. Any password works, so leave the field as it is. On the Authorize App page, click on the Approve button. You will get redirected to the Medblocks patient portal, and Medblocks starts pulling records in the background.
Aetna
For Aetna’s sandbox credentials, you can use VTETestUser as the username appended with numbers ranging from 01 to 19. All the usernames have the same password FHIRdemo2020. Register on the Aetna developer portal to get a sandbox Client ID.
| Username | Password |
|---|---|
| VTETestUser01 | FHIRdemo2020 |
| VTETestUser02 | FHIRdemo2020 |
| VTETestUser03 | FHIRdemo2020 |
Cerner (Oracle Health)
For the Cerner Code Sandbox, you can use any of the following usernames with the password Cerner01.
| Username | Password |
|---|---|
| nancysmart | Cerner01 |
| joesmart | Cerner01 |
| wilmasmart | Cerner01 |
| valeriesmart | Cerner01 |
| fredricksmart | Cerner01 |
| sandysmart | Cerner01 |
| timmysmart | Cerner01 |
| babyboysmart | Cerner01 |
| haileysmart | Cerner01 |
| timpeters | Cerner01 |
Epic
MyChart is Epic’s patient-facing application, and the following are the test patients. If you need more test patients, you can refer to their Sandbox Test Data.
| Username | Password |
|---|---|
| fhircamila | epicepic1 |
| fhirderrick | epicepic1 |
| fhirdesiree | epicepic1 |
Athenahealth
The Athenahealth preview environment provides a sandbox for testing with the set of credentials given below. Follow the athenahealth onboarding guide to connect a sandbox app to it.
| Username | Password |
|---|---|
| phrtest_preview@mailinator.com | Password1 |
eClinicalWorks (healow)
eClinicalWorks provides credentials for one test patient. Register a sandbox app through the healow FHIR R4 developer docs.
| Username | Password |
|---|---|
| AdultFemaleFHIR | e@CWFHIR1 |
Medicare
Medicare’s Blue Button sandbox accepts BBUser as the username followed by any 5-digit number. The password starts with PW followed by the same 5-digit number and an exclamation mark (!). For example, a username BBUser00042 will have the password PW00042!. For the sandbox app setup, see the CMS Blue Button developer guidelines.
| Username | Password |
|---|---|
| BBUser00000 | PW00000! |
| BBUser00001 | PW00001! |
| BBUser00002 | PW00002! |
| BBUser00003 | PW00003! |
| BBUser00004 | PW00004! |
Meditech
To get the sandbox credentials for Meditech, you can ask your Meditech representative for a Traverse sandbox tenant, then register a developer app on the Traverse developer portal.
UnitedHealthcare
UnitedHealthcare’s Optum FLEX sandbox requires an app registration. Sign up on the UHC developer portal to get sandbox credentials.
Enable the Client ID for your sandbox
Each EHR issues its own sandbox Client ID and Client Secret when you register an app on its developer portal. You can find the registration steps in the setup guide for each EHR under Patient access.
Once you have those credentials, plug them into your Medblocks workspace. Go to Settings → Connections, pick the EHR from the list, and paste the Client ID and Client Secret into the form.
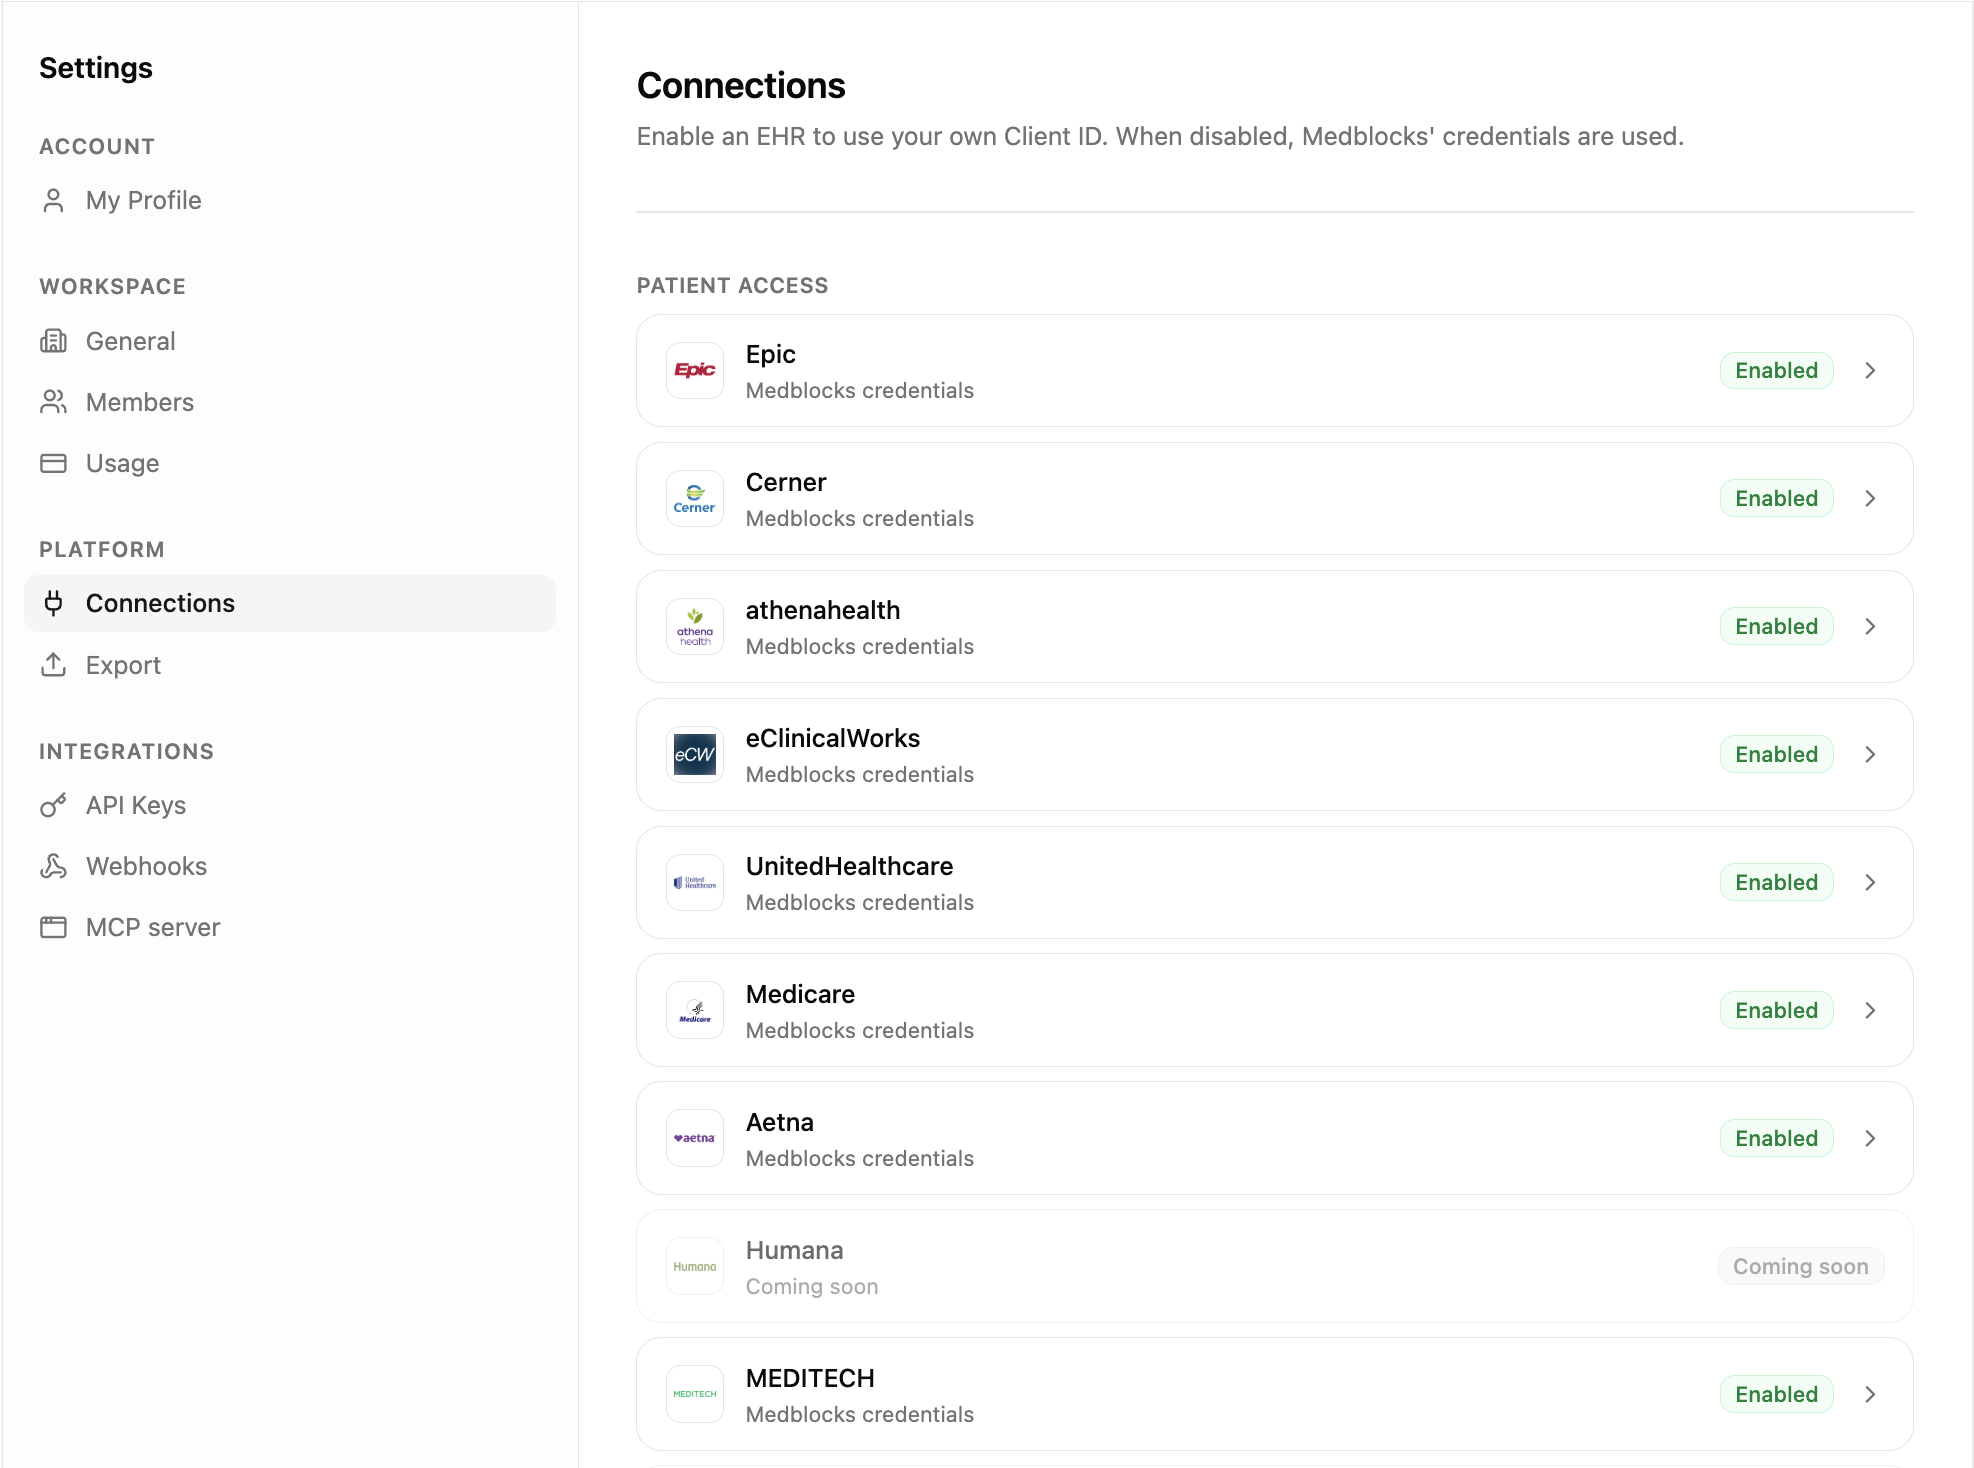
From here, the flow is the same as the one you use in production.
- Start a patient session for a sample patient against that EHR’s sandbox source.
- On the EHR’s hosted login screen, sign in with a patient credential from one of the tables above.
- Click Approve. Medblocks catches the callback and starts pulling records, exactly as it would for a real patient.
Records pulled from sandbox accounts land in your workspace. Delete or archive the patient you added when you are done.
Test dashboard workflows
Use synthetic patients when you need realistic records without Protected Health Information (PHI). Synthetic records are useful for UI states, mapping logic, exports, and webhook handlers.
Check for these in your sandbox workspace.
- Patient lists and patient detail pages.
- Record status and pull history.
- Export destination setup and retry behavior.
- Webhook endpoint setup, event delivery, retries, and redelivery.
- Support workflows such as auth event history.
Synthetic records should not be used to assess source coverage or evaluate production data quality.
Test source-specific flows
Some EHR vendors provide public or partner sandbox portals. Their behavior is close enough to test OAuth and SMART on FHIR, but they may not match every production scenario.
Some sources have their own sandbox guide.
Things to verify before production
Before switching to production, confirm each of these.
- Your Production workspace exists.
- Production credentials are configured from Configure connections.
- Your return URLs are HTTPS and match the configured apps.
- Webhook signature verification uses the raw request body.
- API keys and webhook secrets live in server-side secret storage.
- Your UI or dashboard workflow handles failed authorization and reconnect prompts.
- Export destinations have been tested with non-production data.
See also
Need help?
Running into an issue? Get support from our team and we will get back to you.
How is this guide?